Beauty Tools & Accessories
How to Turn Old Glasses Into a Snowman Ornament That’ll Melt Hearts
Jun
Before you toss that lonely old drinking glass, chipped-but-not-sharp votive, thrift-store shot glass, or forgotten mini tumbler into the “maybe someday” cabinet, allow it one last chance at greatness. With a little paint, ribbon, felt, and holiday cheer, you can turn old glasses into a snowman ornament that looks charming, handmade, and just sentimental enough to make someone say, “Wait, you made that?”
This DIY snowman ornament project is budget-friendly, beginner-friendly, and wonderfully forgiving. If the eyes are uneven, congratulations: your snowman has personality. If the scarf is crooked, he is simply cold and dramatic. Best of all, this handmade Christmas ornament gives new life to glassware that might otherwise sit unused, making it a sweet little win for your tree, your wallet, and your inner craft goblin.
For this tutorial, “old glasses” means small drinking glasses, votive holders, mini juice glasses, shot glasses, or lightweight glass cups. Avoid heavy tumblers for hanging ornaments; those are better as mantel decorations, table centerpieces, or candle holders. A Christmas tree branch is strong, but it is not a weightlifting champion.
Why Old Glasses Make Adorable Snowman Ornaments
Old glassware already has the perfect snowman shape: round, smooth, slightly shiny, and easy to decorate. Clear glass also gives you several creative options. You can paint the outside for a classic snowman look, frost it with faux snow for a wintry texture, or fill the inside with tiny white pom-poms, paper snow, glitter, or cotton batting for a snow-globe effect.
Upcycled Christmas crafts are especially meaningful because they transform ordinary household items into decorations with a story. A store-bought ornament may sparkle, but a handmade snowman ornament made from Grandma’s old cordial glass or a thrifted mini tumbler carries instant personality. It becomes part craft, part keepsake, and part tiny holiday miracle wearing a scarf.
Supplies You’ll Need
You do not need a professional craft studio for this project. A kitchen table, a sheet of newspaper, and the courage to use glitter responsibly will do just fine.
Basic Materials
- One small old glass, votive holder, shot glass, or lightweight mini tumbler
- White acrylic craft paint or white enamel glass paint
- Black and orange acrylic paint pens or fine paintbrushes
- Rubbing alcohol and a lint-free cloth
- Foam brush, small paintbrush, or sponge dauber
- Ribbon, yarn, twine, or fabric scraps for the scarf
- Black felt, craft foam, or cardstock for the hat
- Small buttons, beads, sequins, or mini pom-poms
- Hot glue gun or strong craft adhesive
- Hanging cord, ribbon loop, or ornament hook
- Optional: baking soda, faux snow, glitter, Mod Podge, clear sealer, cotton batting, or Epsom salt
Safety Notes Before You Start
Use only glass pieces that are sturdy and free from cracks. If the glass is chipped on the rim, sharp, or unstable, do not use it as a hanging ornament. For kids, consider using acrylic cups or plastic ornaments instead. Hot glue and glass can both cause trouble when rushed, so let adults handle the glue gun, sharp scissors, and any fragile pieces. Holiday crafting should involve cocoa, not Band-Aids.
Step 1: Choose the Right Glass
The best glass for this project is small, lightweight, and easy to hold in one hand. Shot glasses, mini dessert glasses, votive holders, and tiny juice glasses work beautifully. A clear glass gives you a frosty look, while a colored glass can create a vintage-style snowman with extra character.
If you plan to hang the ornament on a tree, keep the finished piece light. If your glass feels heavy before decorating, turn it into a standing snowman instead. Place it on a mantel, bookshelf, windowsill, or holiday table. It will still melt hearts; it just will not threaten the structural integrity of your Christmas tree.
Step 2: Clean the Glass Thoroughly
Paint and glue stick best to clean surfaces. Wash the glass with warm, soapy water, rinse it well, and let it dry completely. Then wipe the outside with rubbing alcohol to remove fingerprints, oils, and leftover soap film. This small step makes a big difference, especially if you want the paint to dry smoothly instead of peeling like a bad sunburn.
Place the glass upside down on parchment paper, wax paper, or a disposable cup while you work. This keeps your hands off the painted surface and gives the ornament a tidy drying station.
Step 3: Create the Snowy Body
There are several ways to make the glass look like a snowman. Choose the finish that matches your style.
Option A: Classic Painted Snowman
Use a foam brush or sponge dauber to apply white acrylic paint to the outside of the glass. Thin coats work better than one thick coat. Let the first coat dry, then add a second coat for full coverage. For a matte, snow-like texture, mix a tiny pinch of baking soda into the paint. This creates a soft ceramic finish that looks cozy and handmade.
Option B: Frosted Snowman
Brush a thin layer of Mod Podge or craft glue over the glass, then sprinkle faux snow, fine glitter, or Epsom salt over it. Let it dry completely. This gives the snowman a sparkling, icy texture. Work over a tray or paper plate so you can pour extra glitter back into the container instead of discovering it in your socks three weeks later.
Option C: Filled Glass Snowman
If your glass is clear and you want a snow-globe style ornament, skip the full paint coat and fill the inside with cotton batting, white pom-poms, paper snow, or iridescent flakes. Then turn the glass upside down so the opening becomes the base. Add the face and accessories to the outside.
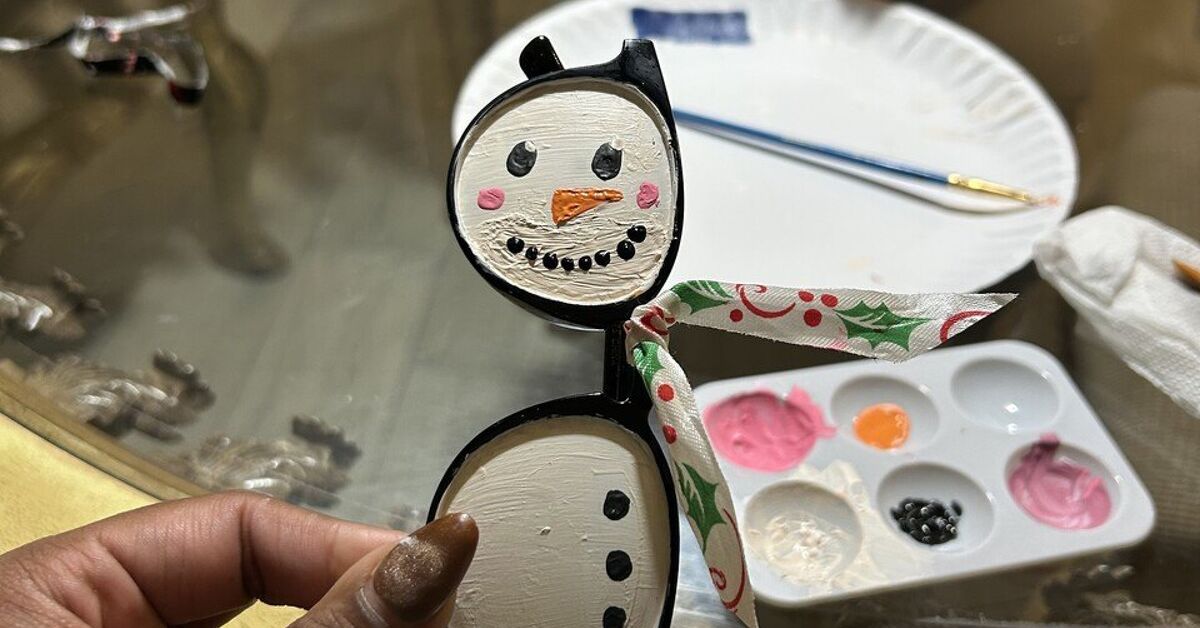
Step 4: Add the Snowman Face
Once the body is dry, it is time to bring your snowman to life. Use black paint pens, acrylic paint, or tiny beads for the eyes and mouth. Make two dots for the eyes and five or six small dots for a cheerful coal smile. For the nose, use orange paint to draw a carrot shape: wider near the face and pointy at the end.
If you are nervous about painting directly onto the glass, practice on paper first. You can also sketch the face lightly with a washable marker and paint over it. For a whimsical look, place the eyes slightly close together. For a classic look, keep the features centered. For a snowman who looks like he just heard holiday gossip, raise one eyebrow with a tiny curved line.
Step 5: Give Him Buttons and a Scarf
Glue two or three small buttons down the front of the glass. Black buttons look traditional, but red, green, gold, or mismatched buttons add playful charm. Mini pom-poms, beads, or sequins also work well.
Next, wrap a narrow ribbon, yarn strand, or fabric strip around the snowman’s “neck.” Depending on your glass shape, this may be near the top third or just below the face. Tie it into a knot or small bow. Trim the ends at an angle for a polished look. A plaid fabric scrap creates a farmhouse Christmas feel, velvet ribbon looks elegant, and red yarn gives your snowman “grandma made me this scarf” energy.
Step 6: Make a Tiny Hat
A snowman without a hat is still cute, but a snowman with a hat is ready for his holiday card photo. You can make a simple top hat from black felt or craft foam. Cut one small circle for the brim, one rectangle for the side, and one smaller circle for the top. Roll the rectangle into a cylinder, glue the seam, attach it to the brim, and finish with the top circle. Add a ribbon band around the hat for extra detail.
For an easier option, use a baby sock or finger from an old knit glove. Cut a small section, gather one end with thread or ribbon, and glue it to the top of the glass. Add a mini pom-pom at the tip. Suddenly your snowman looks like he shops at a tiny winter boutique.
Step 7: Add the Hanging Loop
For a tree ornament, glue a loop of ribbon, twine, or metallic cord securely to the top of the snowman. If you are adding a hat, sandwich the ends of the loop under the hat before gluing it down. This hides the attachment point and makes the ornament look finished.
Let the glue cure fully before hanging. Hot glue sets quickly, but strong craft adhesives may need several hours. Test the ornament by holding it over a soft towel and gently lifting it by the loop. If anything wiggles, add more glue and let it dry longer. The goal is festive, not airborne.
Step 8: Seal and Finish
If the ornament will be handled often, add a light coat of clear acrylic sealer. Choose matte sealer for a soft snow finish or gloss sealer for a shiny glass look. Always follow the product directions and use spray sealers in a well-ventilated area.
After sealing, add final touches: a dusting of glitter on the hat, a tiny holly leaf, a miniature bell, or a name and year written on the back. Personalized snowman ornaments make wonderful gifts for teachers, grandparents, neighbors, coworkers, and that one friend who starts decorating for Christmas before Halloween and refuses to apologize.
Creative Variations to Try
The Family Snowman Set
Use different sizes of old glasses to create a whole snowman family. A tall shot glass can become Dad Snowman, a small votive can become Baby Snowman, and a curvy mini dessert glass can become the aunt who brings the best cookies. Add initials or names to the backs for a personalized Christmas ornament set.
The Vintage Farmhouse Snowman
Use jute twine, buffalo plaid ribbon, wooden buttons, and matte white paint. Sand the paint very lightly after it dries to give it an aged look. This style pairs beautifully with pinecones, dried orange slices, burlap garland, and warm white lights.
The Sparkly Snow-Globe Snowman
Fill a clear glass with faux snow and iridescent glitter before turning it upside down. Add a face, scarf, and hat on the outside. This version catches tree lights beautifully and looks magical without being complicated.
The Kid-Friendly Version
Use a plastic cup, acrylic ornament, or shatter-resistant clear container instead of glass. Let kids add stickers, pom-poms, pipe-cleaner scarves, and washable paint details. Adults can handle the hot glue while children manage the personality department, which is where they usually excel.
Troubleshooting Common Problems
Paint Is Streaky
Apply thinner coats and let each coat dry before adding the next. A sponge dauber often creates smoother coverage than a brush. Mixing a little baking soda into acrylic paint can also help create a thicker, more even snowy finish.
The Face Looks Crooked
Let it dry, then turn the crookedness into charm. Handmade ornaments are not supposed to look factory-perfect. If you truly dislike it, paint over the area with white, let it dry, and try again.
The Glue Won’t Hold
Make sure the surface is clean and dry. Hot glue is fast, but some slick glass surfaces need a stronger craft adhesive. For heavier embellishments, use a glass-friendly adhesive and allow proper curing time.
The Ornament Is Too Heavy
Do not hang it on the tree. Turn it into a tabletop snowman, candle holder, place-card marker, or shelf decoration. A safe craft is always better than a dramatic crash during dessert.
How to Display Your Upcycled Snowman Ornament
Hang lightweight snowman ornaments on sturdy branches near the center of the tree, where they are supported by stronger limbs. You can also tie them to garland, attach them to wrapped gifts, or hang them from cabinet knobs, wreaths, or a holiday chandelier display.
For heavier glass snowmen, group them on a tray with bottlebrush trees, battery-operated fairy lights, pine sprigs, and faux snow. They also look adorable as place settings for a holiday dinner. Add a small name tag to each scarf, and guests get both a seat marker and a handmade keepsake.
Why This DIY Snowman Ornament Makes a Great Gift
A handmade snowman ornament feels personal without being overly complicated. It says, “I thought of you,” but not “I spent four months learning advanced woodworking in secret.” It is affordable, customizable, and easy to batch-make if you need several small gifts.
You can match each snowman to the recipient. Use school colors for a teacher, a tiny music-note charm for a choir friend, a plaid scarf for a cabin-loving relative, or a glittery hat for someone whose entire personality is “festive sparkle.” Add the year to the back, and the ornament becomes a memory marker.
Experience Notes: What Making These Snowman Ornaments Teaches You
The first time you turn old glasses into snowman ornaments, you may expect a quick craft. Technically, it is one. Emotionally, however, it becomes a tiny holiday production starring paint, ribbon, nostalgia, and at least one runaway button. That is part of the fun. Unlike store-bought ornaments, which arrive finished and smug, handmade ornaments invite you into the process. You decide whether the snowman is elegant, goofy, rustic, sparkly, or suspiciously similar to your uncle after Thanksgiving dinner.
One of the best experiences with this project is the hunt for materials. You start looking at old glassware differently. A forgotten shot glass becomes a snowman body. A lonely votive holder becomes a frosty little face. A ribbon scrap from last year’s gift wrap suddenly has purpose. This is where upcycled Christmas crafts shine: they make you notice the hidden potential in everyday things. Instead of buying another box of ornaments, you create something with a story. Even if the glass came from a thrift store for fifty cents, it now has a second life and a tiny hat. That is a major glow-up.
The painting step also teaches patience. White paint on glass can look streaky at first, and beginners often panic after the first coat. Don’t. The first coat is merely the snowman’s awkward teenage phase. The second coat usually fixes everything. Adding texture with baking soda, faux snow, or Epsom salt helps hide small imperfections and makes the piece feel intentionally handmade. This is a forgiving craft, which is exactly what holiday crafting should be. December already has enough pressure without demanding museum-quality snowmen.
Decorating the face is the moment the ornament becomes personal. Two dots and a carrot nose can change the entire mood. A small smile looks sweet. A wide smile looks excited. A lopsided smile looks like your snowman has secrets. If you are making these with family, this is often the part that brings the most laughter. Kids tend to create bold, expressive faces, while adults spend ten minutes trying to make two eyes perfectly even. The kids are usually right. Snowmen should look cheerful, not professionally audited.
Another memorable part of this project is gifting the finished ornament. People respond warmly to handmade decorations because they feel specific and thoughtful. A snowman made from an old glass is not just décor; it is evidence that someone slowed down long enough to create something. It works beautifully for ornament exchanges, classroom gifts, stocking stuffers, neighbor presents, or family crafting nights. You can even write a small tag that says, “Made from an upcycled glass,” which gives the gift an eco-friendly and sentimental touch.
Over time, these ornaments can become part of a family tradition. Each year, you might make one new snowman using a different glass, ribbon, or color scheme. After a few holidays, the tree tells a story: the glittery one from the year you hosted Christmas, the tiny one made by your child, the plaid one from the cozy cabin phase, the slightly strange one everyone secretly loves most. That is the real magic of DIY holiday ornaments. They do not just decorate a tree; they collect memories, inside jokes, and little moments of creativity that return every December.
Conclusion
Turning old glasses into a snowman ornament is the kind of craft that checks every holiday box: affordable, charming, customizable, and just messy enough to feel festive. With a clean small glass, a few coats of paint, a scarf, a hat, and a cheerful face, you can create an upcycled Christmas ornament that looks adorable on a tree, thoughtful on a gift, and cozy on a mantel.
Whether you make one snowman or a whole frosty family, this project proves that holiday magic does not have to come from expensive decorations. Sometimes it starts with an old glass, a dab of glue, and the bold belief that everything looks better with a tiny scarf.
