Makeup
PiPod: A Raspberry Pi Zero Portable Music Player
Jun
Some gadgets age like fine wine. Others age like a drawer full of mystery cables. The classic iPod, somehow, did both. It gave us pocket-sized music libraries, click-wheel nostalgia, and the deeply human experience of untangling earbuds in public like a tiny fishing net. But in the age of streaming subscriptions, sealed devices, and “sorry, your storage is full” messages, a DIY portable music player still has a surprisingly loud heartbeat.
Enter the PiPod: a Raspberry Pi Zero portable music player. It is not just a cute name with a lowercase “i” and a fruit-based computer. It is a maker-friendly, open-ended audio project that turns a tiny Raspberry Pi Zero into a handheld music player with local playback, a custom interface, a compact display, battery power, and enough retro charm to make your old MP3 player feel seen.
The PiPod sits at the intersection of DIY electronics, portable audio, open-source tinkering, and that glorious feeling of building something useful with your own hands. It is part iPod tribute, part Raspberry Pi experiment, part “I could buy a music player, but where is the adventure in that?”
What Is the PiPod?
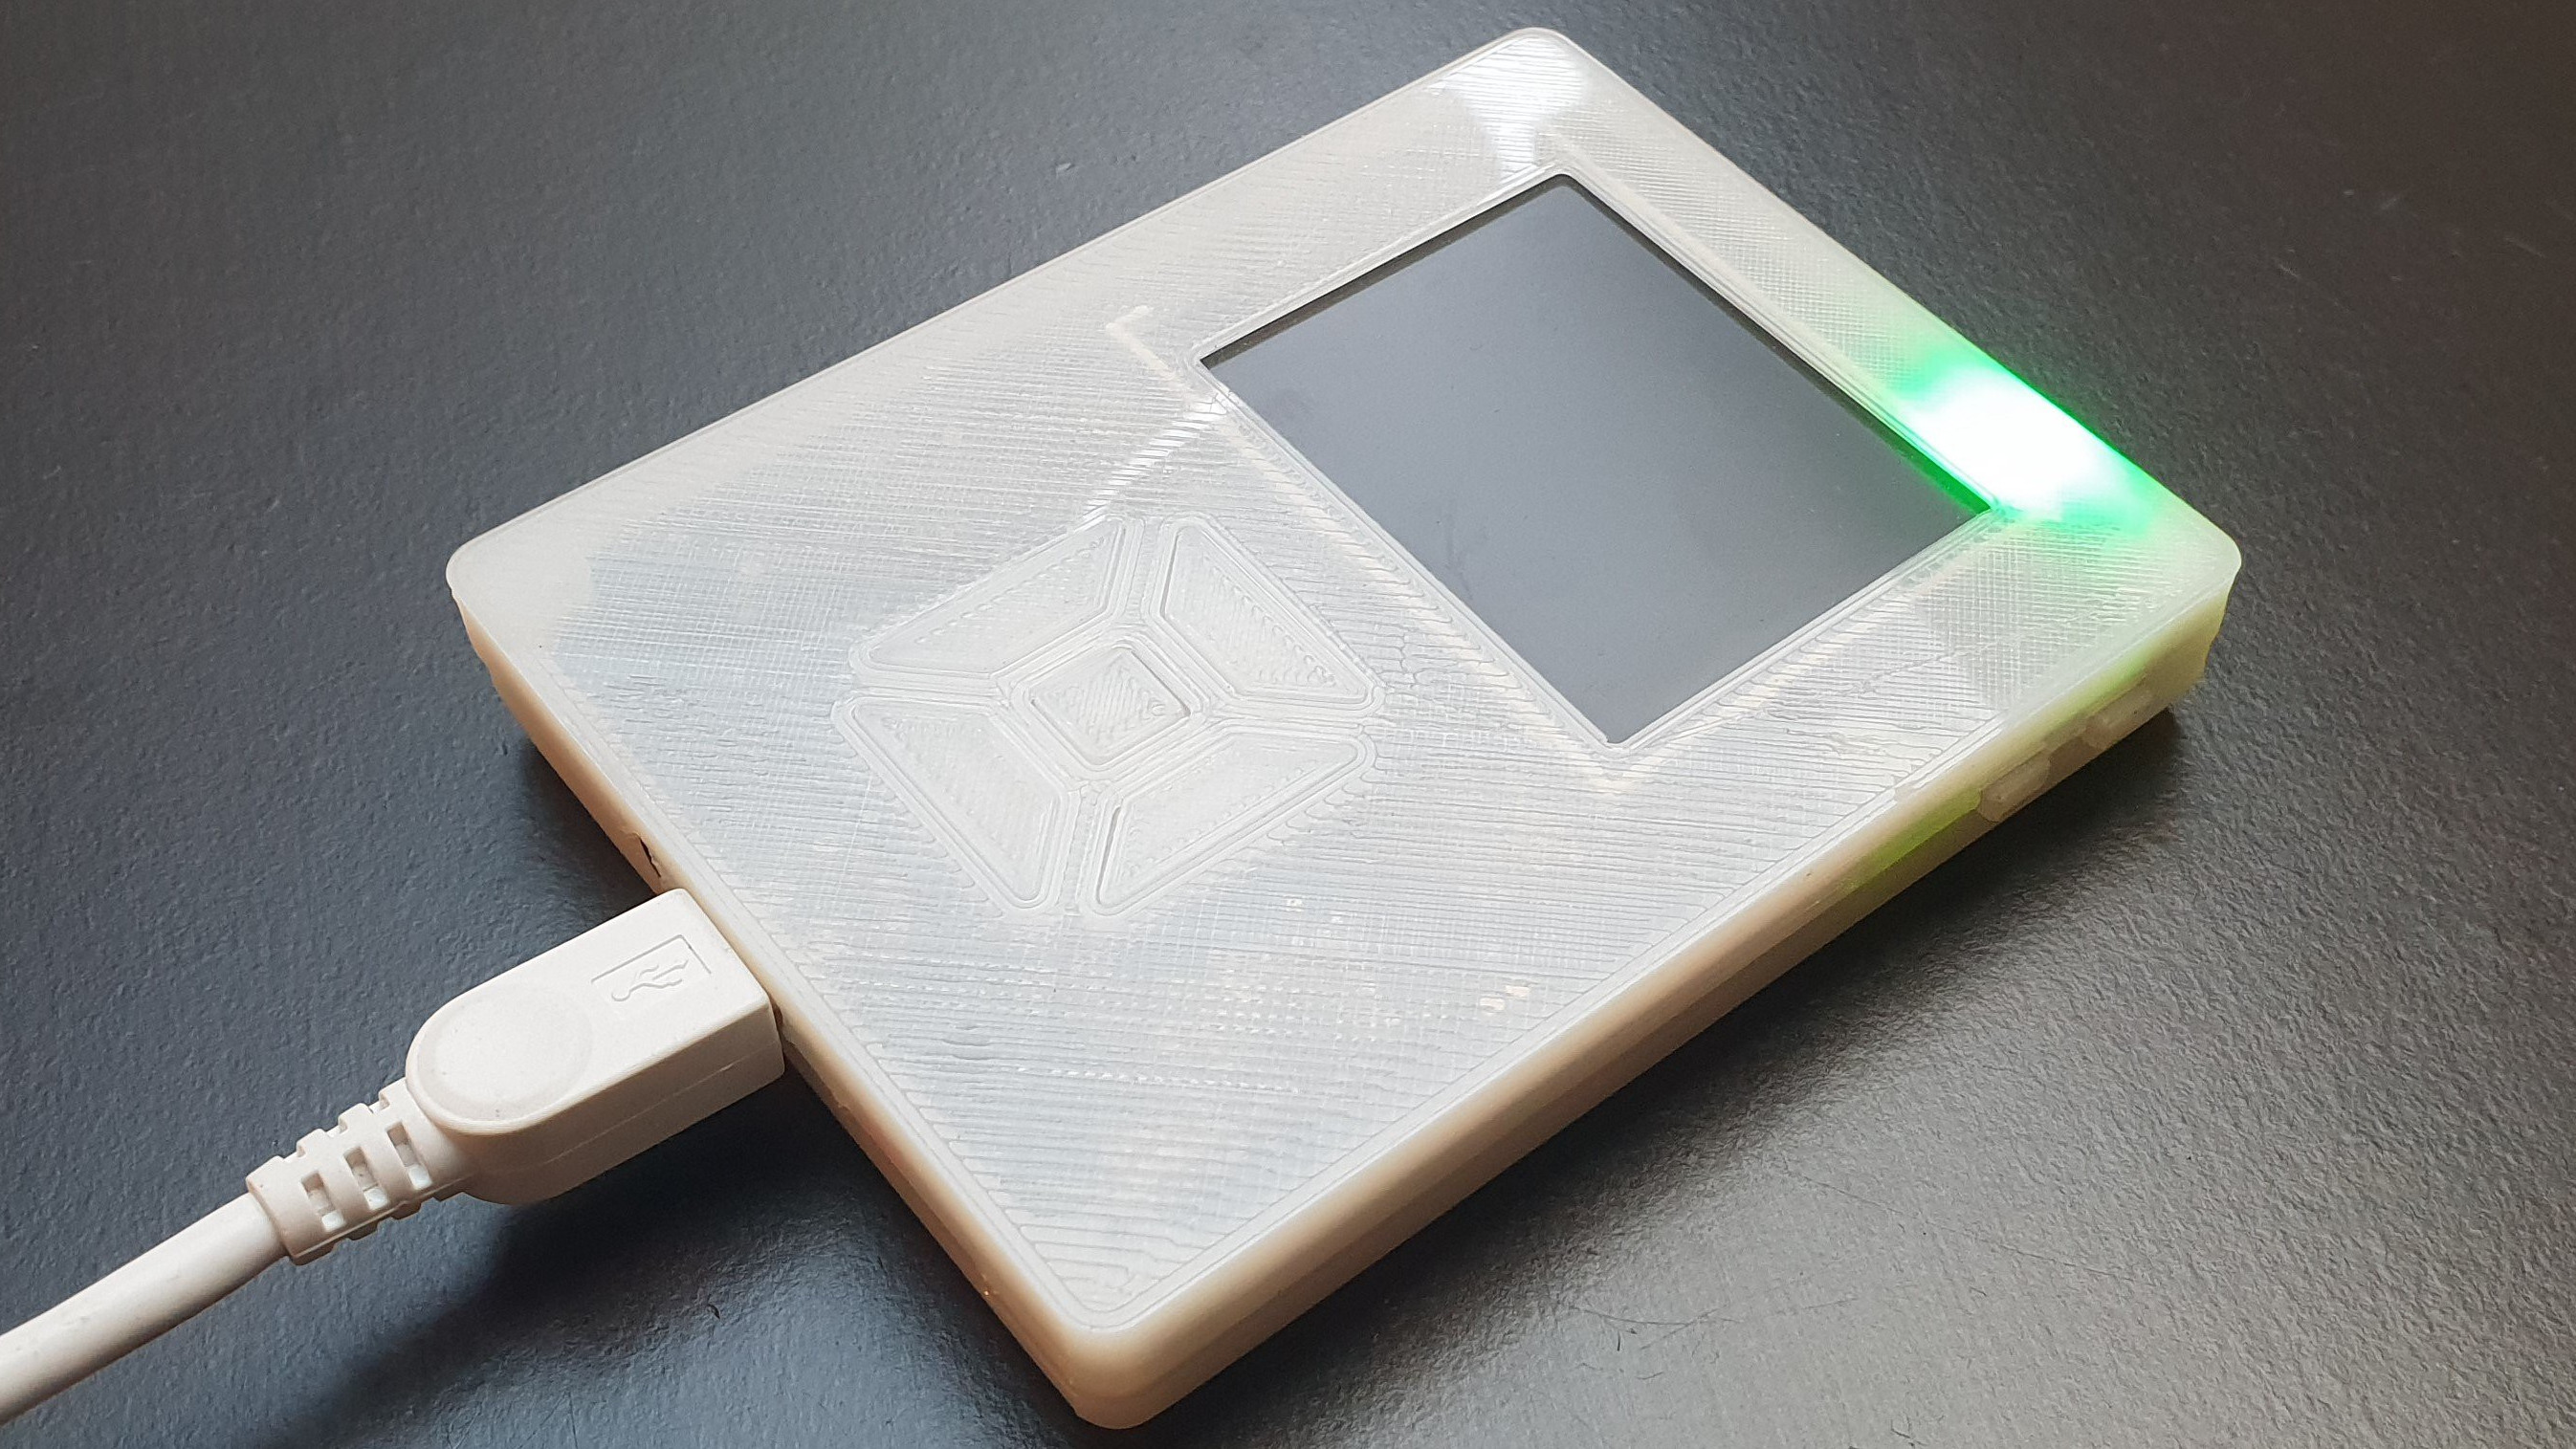
The PiPod is a homemade portable music player built around a Raspberry Pi Zero, one of the smallest and most affordable single-board computers in the Raspberry Pi family. The original project gained attention in the maker community because it managed to squeeze a functional music player into a compact, 3D-printed body while using open-source hardware and software ideas.
At its core, the PiPod is designed to do something beautifully simple: play your music without needing a smartphone, cloud account, or monthly subscription. That alone makes it feel rebellious in the most wholesome way possible. It is the audio equivalent of baking bread at home, except instead of flour on your shirt, you end up with solder fumes, a microSD card, and a grin.
A typical PiPod-style build includes a Raspberry Pi Zero or Raspberry Pi Zero W, a small TFT screen, physical controls, a battery, a boost converter, charging circuitry, audio output hardware, and a custom or lightweight software interface. Some versions use VLC as the playback backend and Python or Pygame for the front-end interface. Others may use Raspberry Pi music software stacks such as MPD, Mopidy, or Volumio-inspired setups, depending on the builder’s goals.
Why Use a Raspberry Pi Zero for a Portable Music Player?
The Raspberry Pi Zero is small, inexpensive, widely supported, and powerful enough for lightweight audio playback. That combination makes it ideal for a DIY portable MP3 player, especially when you care more about local music files and hackability than glossy commercial polish.
The Pi Zero family has a tiny board footprint, microSD storage, GPIO pins for buttons and accessories, USB support, and enough Linux flexibility to run custom music software. The Raspberry Pi Zero W adds wireless connectivity, which opens the door to Wi-Fi file transfers, remote control, web interfaces, and internet radio experiments. The Raspberry Pi Zero 2 W goes further with a quad-core 64-bit processor while keeping the same tiny form factor, making it a tempting upgrade for anyone who wants smoother performance without turning the device into a brick with earbuds.
For a portable music player, the Zero’s biggest strengths are size and freedom. You can decide how the interface works. You can choose your own case design. You can use physical buttons, a tiny display, a rotary encoder, or even a touchscreen. You can build a stripped-down offline FLAC player or a Wi-Fi-connected music streamer. Commercial players ask you to accept their design. A Raspberry Pi music player asks, “How weird do you want to get?”
PiPod Design: Small Body, Big Maker Energy
The most recognizable PiPod builds are compact and handheld, often using a 3D-printed case to hold the electronics together. That matters because early DIY versions made from off-the-shelf modules can become messy quickly. A Raspberry Pi here, a battery board there, a screen dangling like a nervous flagfunctional, yes, but not exactly pocket-ready.
The more refined PiPod concept solves that problem with a custom printed circuit board or carefully planned wiring. The goal is to reduce loose parts, improve durability, save space, and make the final device feel like an actual product rather than a science fair project that escaped.
Common PiPod Hardware Components
A PiPod-style Raspberry Pi Zero portable music player usually includes these major parts:
- Raspberry Pi Zero, Zero W, or Zero 2 W: The tiny Linux computer that runs the player software.
- Small TFT display: Often around 2.2 inches, used for menus, track information, and playback status.
- Battery: Usually a 3.7V lithium-ion or lithium-polymer battery selected for compact size and decent runtime.
- Boost converter: Steps battery voltage up to the 5V needed by the Raspberry Pi.
- Charging and protection board: Handles safe charging and helps protect the battery from common electrical problems.
- Audio output: Can be handled through USB audio, I2S DAC hardware, or another compact audio board.
- Buttons or controls: Used for play, pause, next track, previous track, menu navigation, and volume.
- 3D-printed enclosure: Keeps the device portable, tidy, and less likely to become a pocketful of circuit confetti.
That list sounds technical, but the idea is straightforward: computer, screen, storage, sound, battery, buttons, box. The magic comes from making all of those pieces cooperate inside a case that does not look like it was assembled during an earthquake.
Audio Quality: The DAC Matters
The Raspberry Pi Zero does not include a traditional 3.5mm headphone jack, so audio output deserves real attention. This is where a DAC, or digital-to-analog converter, becomes important. A DAC converts digital audio data into the analog signal your headphones or speakers can actually play.
For a Raspberry Pi Zero music player, there are a few common audio approaches. A tiny USB audio adapter is simple and affordable. An I2S DAC board can offer cleaner sound and a more integrated build. Some builders prefer headphone amplifier boards when they want better volume, lower noise, or support for more demanding headphones.
For casual listening, a compact USB DAC may be enough. For a more polished PiPod, an I2S DAC is often the better choice because it can be wired directly to the Pi’s GPIO pins and built into the enclosure. If your music library includes high-quality MP3, AAC, WAV, or FLAC files, a decent DAC helps the player sound less like “tiny computer doing its best” and more like a real portable audio device.
Software: The Soul of the PiPod
Hardware makes the PiPod portable. Software makes it pleasant. The original PiPod concept used custom software, with Python handling the interface and a media backend such as VLC taking care of playback. That is a practical approach because Python is friendly for makers, and VLC is famously capable of playing nearly every audio format short of a haunted cassette tape.
Other builders may choose different software stacks. MPD, the Music Player Daemon, is popular for lightweight music playback. Mopidy is a Python-based music server that can play local files and connect to various music services through extensions. Volumio is a polished Raspberry Pi audio platform often used for home streamers, and while it is usually associated with networked audio systems, its ecosystem offers useful lessons for Raspberry Pi music projects.
Best Software Approach for Different Builders
If you want a simple offline player, a custom Python interface with local file playback makes sense. If you want phone-based control over Wi-Fi, MPD or Mopidy can be a strong option. If your project is less about pocket use and more about building a small tabletop music streamer, Volumio-style software may be more comfortable.
The best PiPod software setup depends on the user experience you want. A dedicated handheld player should boot quickly, resume playback reliably, show track information clearly, and respond instantly to button presses. A portable device that needs thirty seconds to think about whether it is in the mood for music is charming exactly once.
Storage: Your Music Library, Your Rules
One of the best things about a Raspberry Pi Zero portable music player is local storage. Music files live on the microSD card or on attached storage, depending on the build. That means you can carry albums, playlists, podcasts, field recordings, or audiobooks without depending on signal strength, app permissions, or whether your favorite streaming service suddenly reorganized the interface again for “your convenience.”
A 32GB or 64GB microSD card is enough for a useful compressed music library. If you prefer lossless FLAC files, larger storage is better. The PiPod is flexible here: you can optimize for capacity, speed, cost, or simplicity. Just remember that the operating system also lives on the microSD card, so leave room for updates, logs, album art, and the occasional experiment that seemed clever at 1:00 a.m.
Battery Life and Power Management
Battery life is the eternal boss battle of portable Raspberry Pi projects. The Raspberry Pi Zero is efficient compared with larger boards, but it is still a small Linux computer, not a purpose-built ultra-low-power MP3 decoder. Add a screen, DAC, amplifier, Wi-Fi, and button lighting, and suddenly your battery has opinions.
A well-built PiPod typically uses a 3.7V rechargeable battery with a boost converter that supplies stable 5V power to the Pi. A charging board allows the battery to be recharged over USB, while a protection circuit helps guard against over-discharge and other common issues. This is one area where builders should avoid bargain-bin mystery components. A portable device spends time in pockets, backpacks, and hands. Power design should be boring, reliable, and safe.
To improve runtime, builders can dim or turn off the display when music is playing, disable Wi-Fi when not needed, use lightweight software, avoid unnecessary background services, and choose efficient audio hardware. The PiPod may not match the battery life of a commercial iPod or modern dedicated audio player, but it offers something those devices usually do not: complete control over the trade-offs.
Building a PiPod: What the Process Looks Like
A PiPod project usually begins with planning. Before buying parts, decide what kind of music player you want. Do you want a true pocket player with buttons and a small display? A desktop-friendly mini streamer? A wearable player? A retro iPod-style tribute? Your answer affects the battery size, case shape, controls, software, and audio output.
Step 1: Choose the Raspberry Pi Board
The Raspberry Pi Zero W is a good choice if you want wireless features. The Raspberry Pi Zero 2 W is better if you want faster booting, smoother menus, and more performance headroom. The original Pi Zero can still work for a stripped-down offline player, but wireless file transfer and setup convenience make the W models easier to live with.
Step 2: Pick the Audio Hardware
For the easiest build, a small USB audio adapter can get sound working quickly. For a cleaner and more integrated device, consider an I2S DAC board or compact audio HAT. If you plan to use headphones directly, make sure the output stage can drive them comfortably.
Step 3: Add Display and Controls
A 2.2-inch TFT display is large enough for track names and menus without making the player huge. Physical buttons are practical because they allow pocket operation. Touchscreens look fancy, but tiny touch targets can become annoying when you are walking, commuting, or trying to skip a song without staring at the device like it owes you money.
Step 4: Design the Case
The case is where the PiPod becomes personal. A 3D-printed enclosure can include button holes, screen bezels, battery compartments, charging access, and headphone output placement. Good case design is not just about looks. It affects heat, durability, comfort, and whether you can actually assemble the thing without needing the patience of a watchmaker.
Step 5: Install and Tune the Software
Raspberry Pi OS Lite is a sensible starting point because it avoids unnecessary desktop overhead. From there, install the playback backend, configure audio output, set up the interface, and test button input. A polished PiPod should start playback reliably, organize music logically, and recover gracefully if a file is missing or a playlist has a bad path.
PiPod vs. a Smartphone
Let’s be honest: your phone already plays music. It also receives messages, runs games, shows maps, opens social media, scans documents, tracks steps, stores memes, and occasionally pretends to be a flashlight. That is exactly why a dedicated music player still makes sense.
A PiPod offers focus. It plays music without dragging you into notifications. It keeps your local collection separate. It lets you listen without draining your phone battery. It can be repaired, modified, and redesigned. It also gives you the satisfaction of using something you built, which is hard to quantify but easy to recognize. It is the difference between ordering a pizza and pulling one from your own oven. Both feed you. One gives you a tiny victory dance.
PiPod vs. a Commercial Hi-Res Player
Dedicated hi-res audio players can be excellent, especially if they include premium DACs, balanced outputs, long battery life, and polished firmware. They can also cost serious money. A PiPod is not trying to beat every commercial player on measured performance. Instead, it wins on customization, openness, repairability, and educational value.
With a PiPod, you can choose the DAC, change the interface, print a new case, edit the software, upgrade the board, or rebuild the project entirely. If a commercial player is a finished appliance, the PiPod is a living project. Sometimes that means troubleshooting. Sometimes it means triumph. Occasionally it means both in the same afternoon.
Who Should Build a PiPod?
The PiPod is perfect for makers, Raspberry Pi fans, retro audio lovers, students, hobby programmers, and anyone who misses the idea of owning music files instead of merely renting access to them. It is also a great project for learning about Linux, Python, GPIO, audio hardware, battery systems, 3D printing, and user interface design.
However, it is not ideal for everyone. If you want something that works perfectly out of the box, buy a finished music player. If you dislike troubleshooting, avoid custom portable electronics. If the phrase “edit a configuration file” makes you want to lie down dramatically, the PiPod may test your spirit.
But if you enjoy building, experimenting, and improving a device over time, the PiPod is deeply rewarding. It is not just a music player. It is a pocket-sized classroom.
Common Challenges and How to Think About Them
Boot Time
A Raspberry Pi-based player may take longer to boot than a dedicated MP3 player. You can reduce startup time by using a lightweight operating system, disabling unnecessary services, and launching the player interface automatically.
Battery Drain
Power use depends on the board, screen, wireless activity, audio hardware, and software load. Turning off Wi-Fi, dimming the display, and simplifying the interface can make a noticeable difference.
Audio Noise
Portable builds can suffer from electrical noise if power and audio wiring are poorly arranged. A good DAC, clean power layout, short signal paths, and careful grounding help keep the sound clean.
Case Fit
3D printing is wonderful until a button hole is 1 millimeter off and suddenly your “finished” case becomes modern sculpture. Expect at least one prototype. Probably two. Do not let the printer smell fear.
Creative PiPod Upgrade Ideas
Once the basic Raspberry Pi Zero portable music player works, the upgrade possibilities are huge. You could add album art, Bluetooth audio output, Wi-Fi syncing, a rotary volume knob, physical playlist buttons, a sleep timer, podcast folders, audiobook bookmarking, or a dock for charging and speaker output.
You could also design themed cases. A translucent cyberpunk shell? A classic white-and-gray iPod-inspired body? A rugged hiking player with big buttons? A tiny desktop jukebox? The PiPod format invites personality. Unlike many modern gadgets, it does not have to look like a black rectangle auditioning for a spy movie.
Real-World Experience: Living With a PiPod-Style Music Player
Using a PiPod-style Raspberry Pi Zero portable music player feels different from using a phone. The first thing you notice is the intention. You do not unlock it and accidentally lose fifteen minutes to notifications. You pick it up to listen. That single-purpose design changes the mood immediately.
The second thing you notice is the joy of local music. There is something satisfying about organizing folders, loading albums, and knowing the device will play them whether or not Wi-Fi is available. On a walk, during a commute, or while working at a desk, the PiPod feels like a small rebellion against everything being online all the time. It does not ask you to log in. It does not recommend a playlist called “Midnight Productivity Goblin.” It just plays what you gave it.
The controls matter more than expected. Physical buttons make the device feel real. A click for next track is faster than waking a phone, finding the music app, dodging a notification, and trying not to open three other things by accident. A small screen with track names and playback status is enough. You do not need a cinema display to enjoy a song. In fact, the modest display becomes part of the charm.
The build experience is also part of the relationship. A commercial player arrives finished. A PiPod arrives in stages: the first successful boot, the first sound from the DAC, the first menu that does not crash, the first case that almost fits, and finally the first time it plays music while fully assembled. Each milestone feels earned. When something goes wrong, it is frustrating, but it is also understandable. You are not begging a sealed device to behave. You are improving your own machine.
Battery life becomes a practical teacher. You start paying attention to screen brightness, background services, Wi-Fi use, and efficient software. Audio quality becomes a lesson in DAC choice, grounding, and enclosure design. Usability becomes a lesson in button placement and menu simplicity. The PiPod teaches that product design is not magic. It is a thousand tiny decisions, many of them hiding behind the phrase “just one more tweak.”
The best part is how personal the final device feels. Maybe your PiPod holds old albums, study playlists, chiptune tracks, podcasts, or field recordings. Maybe it looks polished. Maybe it looks like a prototype that escaped the lab wearing a 3D-printed jacket. Either way, it is yours. In a world full of sealed gadgets, that matters.
Conclusion
The PiPod: a Raspberry Pi Zero portable music player is more than a clever DIY audio project. It is a reminder that technology can still be playful, personal, repairable, and understandable. With a Raspberry Pi Zero, a compact display, a DAC, battery hardware, buttons, and custom software, you can build a pocket music player that reflects your own listening habits instead of someone else’s product roadmap.
It may not be the easiest way to play music. Your phone already does that. But the PiPod is the more interesting way. It teaches electronics, software, audio design, power management, and patience. It brings back the charm of carrying a dedicated music device while adding the freedom of open-source hardware. And when it finally plays your favorite song from a device you built yourself, even the tiniest speaker in your soul says, “Yep, worth it.”
Note: This article is written for web publishing and synthesizes real Raspberry Pi, DIY audio, maker-project, open-source software, and portable electronics information into original editorial content.
