Makeup
Easy Ways to Tie an Adjustable Knot: 14 Steps
May
An adjustable knot is one of those tiny life skills that makes you feel mysteriously capable. One minute you are wrestling with loose cord like it owes you money; the next, you have a neat sliding knot that tightens, loosens, and behaves like it went to finishing school. Whether you are making a bracelet, securing a tent guyline, hanging a tarp, fixing a drawstring, or adjusting a necklace cord, learning how to tie an adjustable knot can save time, frustration, and a surprising amount of dramatic sighing.
The phrase “adjustable knot” usually refers to a knot that can slide when you push it but hold firm when tension is applied. In outdoor use, this often means a friction hitch such as the taut-line hitch or adjustable grip hitch. In jewelry and crafts, it usually means a sliding knot or sliding macramé closure. The good news? You do not need to be a sailor, climber, scoutmaster, or bracelet wizard to learn one. You only need cord, patience, and perhaps the willingness to untie your first attempt without taking it personally.
What Is an Adjustable Knot?
An adjustable knot is a knot designed to change position along a rope, cord, or line. Instead of staying fixed forever, it can slide to create more or less length. Once tension is applied, friction helps the knot grip the standing part of the rope. This makes adjustable knots useful for anything that needs flexible sizing or tension control.
For example, a sliding knot bracelet can expand so it fits over your hand, then tighten around your wrist. A taut-line hitch can slide toward or away from a tent stake to adjust the tension of a guyline. A necklace with sliding knots can be worn short one day and long the next. Adjustable knots are basically the yoga instructors of the knot world: flexible, practical, and surprisingly strong when balanced correctly.
Before You Start: Know the Parts of the Cord
Before tying an adjustable knot, it helps to understand a few basic terms. The working end is the end of the cord you move around to form the knot. The standing part is the longer section of rope or cord that stays mostly still. A loop is a curve where the cord crosses or nearly crosses itself. A wrap is a turn made around another section of cord. Once you know these terms, instructions become much easier to follow.
Best Materials for Adjustable Knots
The best cord depends on your project. For bracelets and necklaces, waxed cotton cord, leather cord, hemp cord, nylon cord, and Chinese knotting cord are popular choices. These materials usually slide well but still create enough friction to hold. Very thin or slippery cord can be annoying because the knot may not grip securely. Very thick cord can work, but the knot may look bulky, like it is wearing a winter coat.
For camping, tarps, and outdoor tensioning, use durable utility cord or rope appropriate for the task. Adjustable hitches are excellent for non-life-safety uses, such as tent guylines or clotheslines. They should not be used for climbing, rescue, towing, or supporting people unless a qualified professional has specified the correct rope, knot, and system. Knots are useful; gravity is not forgiving.
Easy Ways to Tie an Adjustable Knot: 14 Steps
The following 14 steps focus on a simple sliding adjustable knot that works well for bracelets, necklaces, drawstrings, and light craft projects. After that, you will also learn outdoor variations for tensioning rope.
Step 1: Cut the Cord to the Right Length
Start with a cord that is longer than your finished project needs. For a bracelet, use enough cord to wrap comfortably around the wrist with several extra inches on both ends. For a necklace, leave extra length so the sliding knots have room to move. Beginners should always use more cord than they think they need. Running out of cord halfway through a knot is like running out of coffee on a Monday: technically survivable, but emotionally unnecessary.
Step 2: Lay the Cord Ends Overlapping Each Other
Place the two ends of the cord so they overlap and point in opposite directions. Imagine a bracelet circle with the two loose ends lying beside each other. This overlap is where the adjustable section will be created. Keep the cords straight and avoid twisting them, because twisted cord can make the finished knot harder to slide.
Step 3: Choose One Working End
Pick one loose end to begin. This will be your working end. The other cord will act as the standing cord that your knot wraps around. You will repeat the process on the opposite side later so both ends can slide.
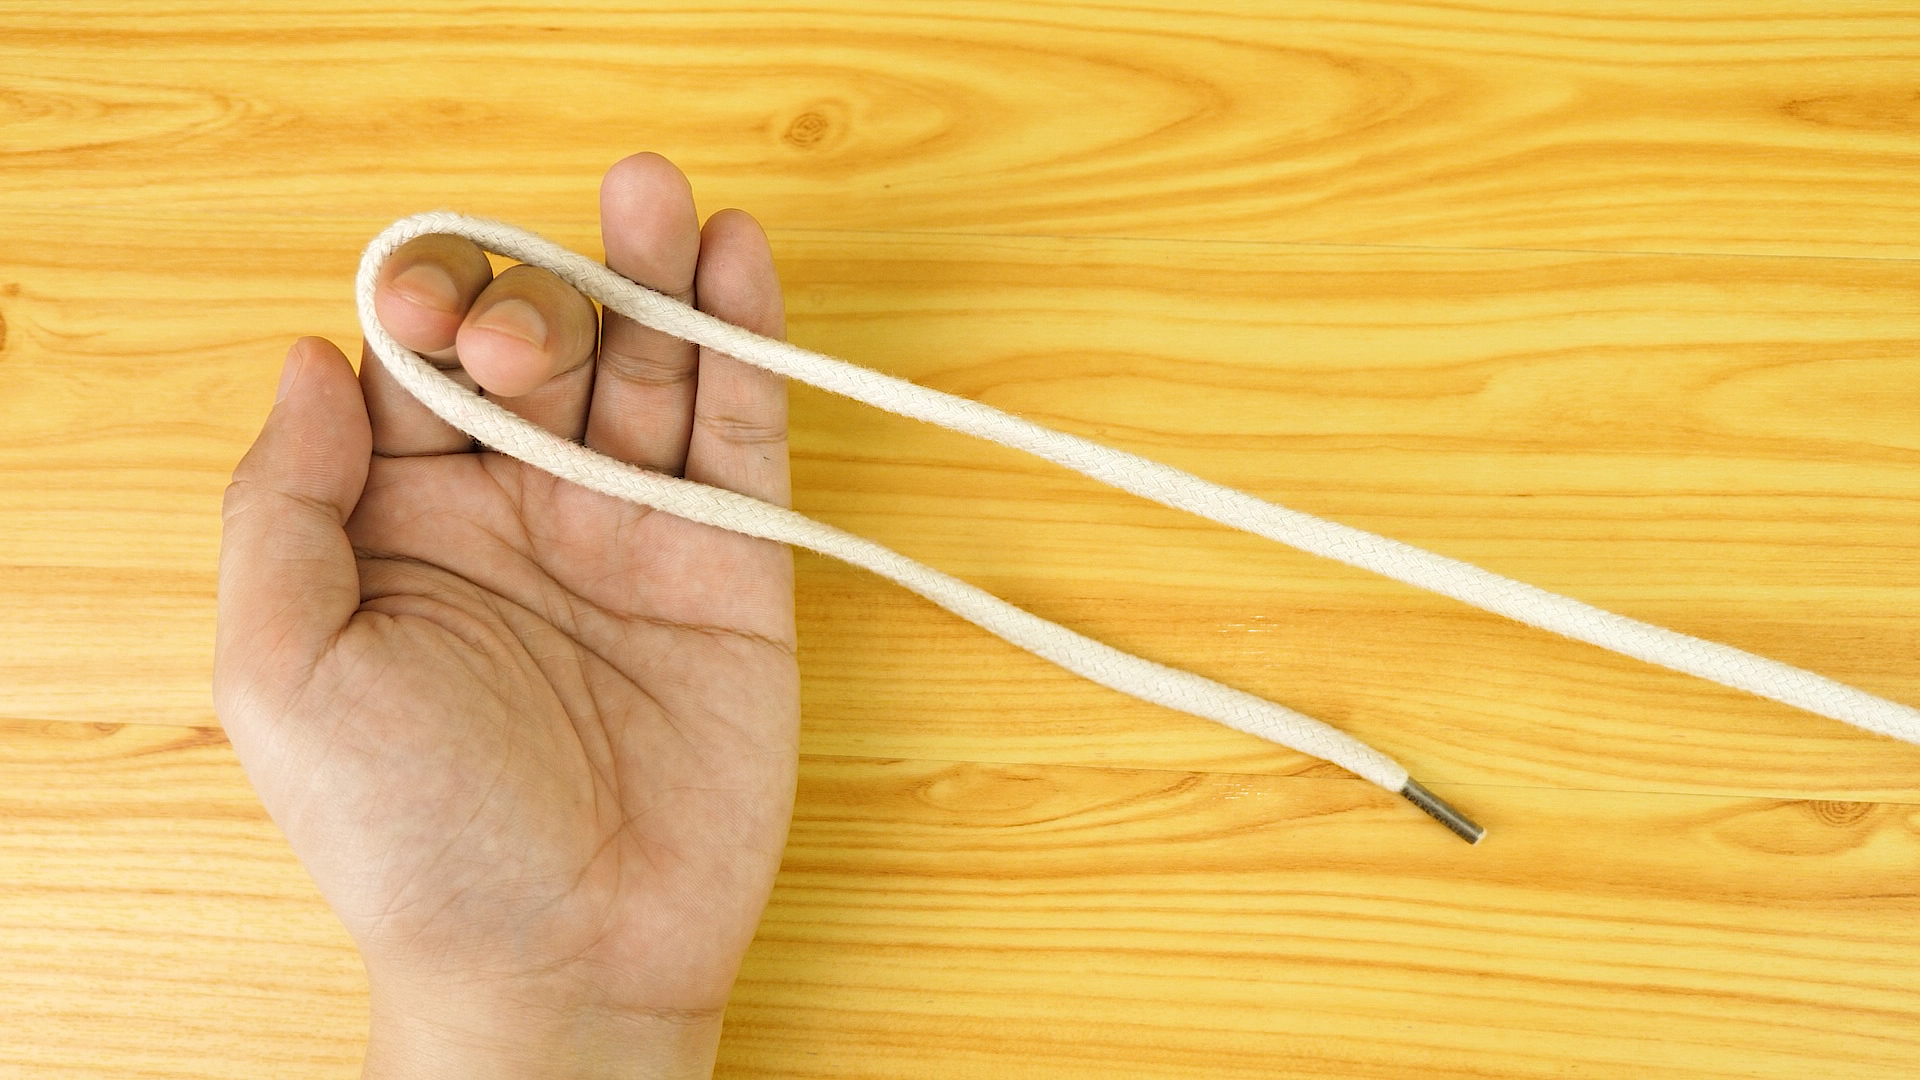
Step 4: Form a Small Loop
Take the working end and bend it back over itself to form a small loop. The loop should lie on top of the standing cord. Keep it neat and controlled. If the loop looks like a spaghetti incident, straighten it before moving forward.
Step 5: Wrap the Working End Around Both Cords
Wrap the working end around both the standing cord and the short part of the loop. Make two or three neat wraps, moving away from the loop. These wraps create the friction that allows the knot to grip. Two wraps may be enough for thicker cord, while three wraps often work better for smoother or thinner cord.
Step 6: Thread the End Back Through the Loop
After wrapping, pass the working end back through the original loop. Pull it gently so the wraps begin to snug together. Do not yank too hard yet. Adjustable knots need to be dressed first, which means arranging the wraps so they sit evenly and cleanly.
Step 7: Tighten and Dress the Knot
Hold the wraps between your fingers and gently pull the working end. The knot should compress into a tidy barrel shape. If the wraps overlap, pinch and nudge them until they line up side by side. A well-dressed knot is stronger, smoother, and better looking. It also tells the world, “Yes, I watched the details.”
Step 8: Test the Slide
Push the knot along the standing cord. It should move when guided by your fingers, then hold when you pull against it. If it slips too easily, add another wrap or tighten it more carefully. If it will not slide at all, the wraps may be too tight or the cord may be too grippy.
Step 9: Repeat on the Other Side
Turn the project around and repeat the same process with the other loose end. Create a loop, wrap around the opposite cord, thread the end through the loop, and tighten. When both knots are finished, you should be able to pull the knots away from each other to loosen the bracelet or necklace, then pull the cord ends to tighten it.
Step 10: Add Stopper Knots to the Cord Ends
Tie a small overhand knot near each loose end of the cord. These stopper knots prevent the sliding knots from accidentally pulling off the ends. They also make the piece look more finished. Trim excess cord only after you are sure everything adjusts correctly.
Step 11: Trim the Ends Carefully
Use sharp scissors to trim the cord ends, leaving a small tail beyond each stopper knot. If you are using synthetic cord, you may carefully melt the very tip with heat to prevent fraying, but only in a safe, ventilated area and only if the material is designed for that. For cotton, hemp, or leather, trimming cleanly is usually enough.
Step 12: Check the Fit
Try the bracelet, necklace, or cord loop on. Slide the knots until the size feels comfortable. A bracelet should not pinch the wrist, and a necklace should not feel like it is auditioning to be a turtleneck. Adjust the knots until the length is practical and comfortable.
Step 13: Practice with Different Cord Types
Practice the same knot with waxed cotton, leather, hemp, nylon, or paracord. Each material behaves differently. Waxed cord grips nicely. Leather looks stylish but may need larger loops. Nylon slides easily but may need extra wraps. Practicing with scrap cord helps you understand tension before working on your final project.
Step 14: Use the Right Knot for the Right Job
A sliding knot is great for jewelry and small craft items. A taut-line hitch or adjustable grip hitch is better for outdoor tensioning. A macramé sliding closure works well for decorative bracelets. The best adjustable knot is not always the fanciest one; it is the one that fits the material, load, and purpose.
How to Tie an Adjustable Knot for Camping and Outdoor Use
For tarps, tents, and guylines, the taut-line hitch is one of the most useful adjustable knots. It allows you to tighten or loosen a line without untying the knot. The basic method is simple: wrap the working end around an anchor, bring it back alongside the standing part, make two wraps inside the loop toward the anchor, then make one wrap outside the loop. Tighten the knot and slide it to adjust tension.
The adjustable grip hitch works in a similar spirit and is often used to tension lines. It generally involves passing the working end around an anchor, wrapping it around one side of the loop, then wrapping around both sides before tucking and tightening. Many campers like this style because it grips well under load but can be shifted when slack.
Sliding Knot vs. Taut-Line Hitch: What Is the Difference?
A sliding jewelry knot and a taut-line hitch are both adjustable, but they are not the same. A sliding knot is usually tied around another cord end and used for bracelets, necklaces, and small accessories. It is decorative and compact. A taut-line hitch is a friction hitch used to adjust the tension of a rope attached to a fixed object, such as a stake, post, or tree.
Think of it this way: the sliding knot goes to craft night; the taut-line hitch goes camping. Both are useful. Both deserve respect. Only one is likely to smell like campfire smoke.
Common Mistakes When Tying Adjustable Knots
Using the Wrong Cord
If the cord is too slippery, the knot may not hold. If it is too stiff, the knot may not tighten neatly. Choose cord that bends smoothly and creates enough friction.
Making Messy Wraps
Overlapping wraps weaken the knot and make it harder to slide. Keep each wrap neat and parallel. Dressing the knot is not optional decoration; it is part of making the knot work correctly.
Cutting the Cord Too Short
Short cord leaves no room for adjustment. Always leave extra length while practicing. You can trim cord later, but you cannot magically grow it back unless your craft drawer has powers the rest of us do not know about.
Skipping Stopper Knots
Without stopper knots, sliding closures can pull apart. A tiny overhand knot at each end can save the whole project.
Using Craft Knots for Safety Loads
Adjustable knots for crafts and camping are not automatically safe for climbing, towing, hanging heavy objects, or supporting body weight. Use rated equipment and expert-approved systems for any high-risk application.
Best Uses for Adjustable Knots
Adjustable knots are useful in many everyday situations. You can use them to make friendship bracelets, leather cord necklaces, pendant cords, anklets, bag drawstrings, curtain ties, plant hangers, tent guylines, tarp lines, clotheslines, and temporary tie-downs for light items. They are especially helpful when you need a loop or line that can be resized without cutting or retying.
Tips for Making Your Adjustable Knot Look Professional
Use consistent tension when wrapping. Keep the wraps close together. Trim the ends evenly. Choose cord that matches the style of your project. For jewelry, a little symmetry goes a long way. For outdoor lines, function matters more than beauty, but a clean knot is still easier to inspect and adjust.
If you are making bracelets as gifts, adjustable knots are a smart choice because you do not need the exact wrist size. That flexibility makes the finished piece more wearable. It also prevents the awkward moment when a handmade bracelet fits like either a tourniquet or a hula hoop.
Care and Maintenance
Check adjustable knots regularly. Jewelry knots can loosen over time, especially with smooth cord. Outdoor knots can shift after rain, wind, or repeated tension changes. If a knot looks worn, frayed, flattened, or unreliable, retie it. Cord is inexpensive; failed knots are inconvenient.
Experience Notes: What Actually Helps When Learning Adjustable Knots
The first time many people try to tie an adjustable knot, they expect the cord to behave like the pictures in a tutorial. It rarely does. The loop flips, the wraps wander, one end disappears under the wrong strand, and suddenly the project looks less like a bracelet and more like a tiny rope argument. That is normal. Adjustable knots are simple once your fingers understand the motion, but the first few attempts can feel strangely backward.
One helpful experience is to practice with thick, light-colored cord before using jewelry cord. Thick cord makes it easier to see where the working end goes, and light colors show the wraps clearly. Once the movement makes sense, switch to the final material. This is especially useful with black leather or dark waxed cotton, where every strand can blend together like a mystery novel with no chapter titles.
Another useful trick is to slow down at the wrapping stage. Beginners often rush the wraps, then wonder why the knot refuses to slide evenly. Place each wrap beside the previous one, not on top of it. Pinch the wraps gently while pulling the working end through the loop. That small pinch keeps the knot from collapsing into a random lump. It also helps you feel how friction builds as the knot tightens.
When making bracelets, test the opening before trimming the ends. A sliding bracelet needs to open wide enough to pass over the hand, not just fit around the wrist. This is a common mistake. The bracelet looks perfect on the table, but then it cannot get past the knuckles. Always test the largest needed opening, then test the smallest comfortable fit. After both work, then trim the cord.
For outdoor use, practice the taut-line hitch on a chair leg, railing, or tent stake before relying on it at camp. Tie it, slide it, load it, loosen it, and tie it again. The goal is to learn how the knot feels when it is properly dressed and tensioned. A good adjustable hitch should slide when you push the knot by hand but grip when the standing line is under tension. If it creeps under load, retie it with cleaner wraps or choose a better cord.
The biggest lesson is that knots are physical knowledge. Reading helps, diagrams help, and videos help, but the real learning happens in your hands. After a few repetitions, the knot becomes less of a puzzle and more of a rhythm: loop, wrap, tuck, dress, tighten, test. Once that rhythm clicks, you will start noticing adjustable knot opportunities everywhere. Loose hoodie cord? Fixable. Pendant necklace too long? Adjustable. Tent line sagging? Not today, wind.
Conclusion
Learning easy ways to tie an adjustable knot gives you a practical skill that works across crafts, camping, jewelry making, and everyday fixes. The basic sliding knot is ideal for bracelets and necklaces, while the taut-line hitch and adjustable grip hitch are better for tensioning ropes outdoors. The secret is not brute strength; it is clean wraps, correct tension, and choosing the right cord for the job. Start with practice cord, move slowly, and test the knot before trimming or trusting it. Once you learn the motion, an adjustable knot becomes one of those satisfying little skills you will use again and again.
Note: This guide is intended for general craft, household, and light outdoor use. Do not use these knots for climbing, rescue work, towing, or any situation where failure could cause injury or property damage.
