Body Care
How to Soften Grout for Removal: 8 Ways to Dissolve It
May
Grout has a funny personality. When it is fresh, it behaves nicely. When you need to remove it years later, it suddenly becomes the stubborn main character in your bathroom renovation story. If you are trying to figure out how to soften grout for removal, the good news is that you do have options. The less-fun news is that grout does not always “dissolve” like sugar in coffee. In real life, most methods either soften, loosen, or weaken grout so it is easier to scrape, saw, or grind out.
This guide breaks down the smartest ways to remove grout without turning your tile project into a dramatic episode of “Oops, I cracked the whole wall.” You will learn which methods work best on cement grout, which ones are safer for epoxy or ready-mixed grout residue, and when it is time to stop chasing miracle liquids and pick up the right tool.
Before You Try to Soften Grout, Know What Kind You Have
This step matters more than most people think. Using the wrong remover on the wrong grout is how a simple DIY job becomes a chemistry experiment nobody asked for.
Cement grout
This is the most common type in older floors, backsplashes, and showers. It is usually the easiest to loosen with moisture, steam, or an acidic grout haze remover. If your goal is grout removal around ceramic or porcelain tile, this is the grout most likely to respond to soaking and chemical softening.
Epoxy grout
Epoxy grout is much more chemical-resistant and tougher to remove. It is designed to resist stains and moisture, so naturally it also resists your plans. Specialty epoxy haze removers may help with residue on the tile face, but fully cured epoxy joints usually require more aggressive removal methods.
Ready-mixed or premixed grout
Some modern grouts are acrylic, urethane, or other ready-to-use formulas. These often need specialty cleaners made for non-cement grout residue rather than old-school acidic removers. If you are not sure what you have, test in a small hidden area first and read the original product information if you still have it.
Safety First, Because Tile Dust Is Not a Personality Trait
Before we get into the eight methods, let’s talk safety. Removing grout can create fine dust, especially when you use a rotary tool, oscillating tool, or other power equipment. Wear safety glasses, gloves, and a well-fitting dust mask or respirator appropriate for the job. Keep the area ventilated, and use a vacuum to control debris as you work. If you are working in an older home or a large enclosed area, slow down and take dust control seriously.
You should also protect surrounding tile. Painter’s tape along delicate edges can help, and a little patience goes a long way. Grout is replaceable. Your tile, on the other hand, is less forgiving.
How to Soften Grout for Removal: 8 Ways That Actually Help
1. Soak Cement Grout With Hot Water
The simplest place to start is hot water. No fireworks. No dramatic fumes. Just heat, moisture, and patience.
Use a sponge, spray bottle, or cloth to saturate the grout lines with hot water. Let it sit for several minutes, then reapply. On old, dry cement grout, this can soften the surface enough to make a grout saw or utility knife much more effective. It will not magically melt the joint, but it can reduce brittleness and help the top layer break away more cleanly.
This method is especially useful for small repairs, like removing cracked grout around one loose tile. It is also a smart first step before moving on to stronger products. Think of it as the polite knock on the door before you bring in the louder tools.
2. Use a Vinegar-and-Water Mix on Unsealed Cement Grout
If the grout is cement-based, unsealed, and surrounded by ceramic or porcelain tile, a diluted vinegar solution may help loosen the top layer. A common starting point is a 1:1 mix of white vinegar and warm water. Apply it carefully to the grout lines, let it sit briefly, then scrub or scrape.
There is a big caution label here, so let’s put it in bold-in-spirit: do not use vinegar on natural stone such as marble, travertine, or limestone. Acid can etch stone and create a much bigger problem than dingy grout. Vinegar also is not a great everyday cleaner for finished grout because repeated acid exposure can wear it down over time.
That said, for targeted grout removal on the right surface, vinegar can be a useful light-duty softening step. If nothing changes after a short test, stop there. Stubborn grout is telling you it wants a different strategy.
3. Loosen It With Steam
Steam is one of the most underrated grout removal tricks. A steam cleaner with a concentrated nozzle can direct heat and moisture right into the joint, which helps loosen old cement grout and soften residue sitting on the surface.
Work in small sections. Steam a grout line, then scrape while it is still warm. This method is appealing because it avoids harsh chemicals, and it can be surprisingly effective in showers and bathrooms where mineral buildup and grime are part of the problem.
The downside is time. Steam is not the fast-and-furious option. It is more like the patient friend who quietly gets the job done while everyone else is making a mess. Still, if you want a lower-odor, lower-chemical approach, this is one of the best ways to soften grout for removal.
4. Apply Sulfamic Acid Crystals for Cementitious Residue
For tougher cementitious grout residue, sulfamic acid is a common next step. It is often sold in powder form and mixed with water according to the manufacturer’s instructions. This type of cleaner is typically used to break down cement-based grout haze or residue, and it can also help weaken stubborn cement grout at the surface before scraping.
This is not the method to freestyle. Always follow the label, wear gloves and eye protection, and test first in a hidden spot. Do not use sulfamic acid on natural stone. Do not assume stronger is better. And do not leave it sitting forever like you are marinating a steak. Controlled use works better than chemical overconfidence.
When used correctly on the proper tile and grout, sulfamic acid can save a lot of elbow grease.
5. Try a Commercial Cement Grout Haze Remover
If you want something made specifically for the job, a commercial cement grout haze remover can be more predictable than DIY acids. These products are designed to break down dried cement-based grout film, mortar smears, efflorescence, and related residue. Some also work on hard water deposits and mineral buildup.
Why use a product like this instead of random pantry chemistry? Because tile is expensive, and product labels usually tell you where the cleaner is safe to use. That is useful information when you would rather not discover the answer by damaging your floor.
Commercial haze removers are especially helpful when the grout has become crusty, chalky, or bonded with residue. They are less about magically removing the entire joint and more about weakening the material so mechanical removal becomes easier and cleaner.
6. Use an Epoxy or Non-Cement Grout Haze Remover for Specialty Grouts
If you are dealing with epoxy grout residue, urethane haze, or ready-mixed grout film, use a remover made for non-cement products. This is where many DIY jobs go sideways. People assume “grout remover” means one bottle fits every scenario. It does not.
Epoxy and other non-cement grouts are more resistant to acid-based cleaners. Specialty haze removers are formulated differently and can soften cured residue on the tile surface without relying on the same chemistry used for cement grout. If your tile still looks smeary or sticky after installation, this type of product is usually the right lane.
For grout joints themselves, these removers may help at the surface, but heavily cured epoxy grout often still requires careful scraping or power-tool removal. In other words, the product helps, but it does not grant magical powers.
7. Use a Heavy-Duty Tile and Grout Cleaner for Ready-Mixed Residue
Some ready-mixed grout products respond better to heavy-duty stone, tile, and grout cleaners than to acidic removers. These cleaners are often recommended for residue from newer pre-mixed grouts, especially when the issue is surface buildup rather than full joint removal.
This method is worth trying when the grout feels rubbery, polymer-rich, or unusually stain-resistant. It can soften surface residue enough that a nylon pad, scrub brush, or plastic scraper can remove more material with less force. That matters if you are working around glossy tile, decorative finishes, or areas where scratching would be a disaster.
Again, the theme here is matching the product to the grout type. Good removal starts with good identification.
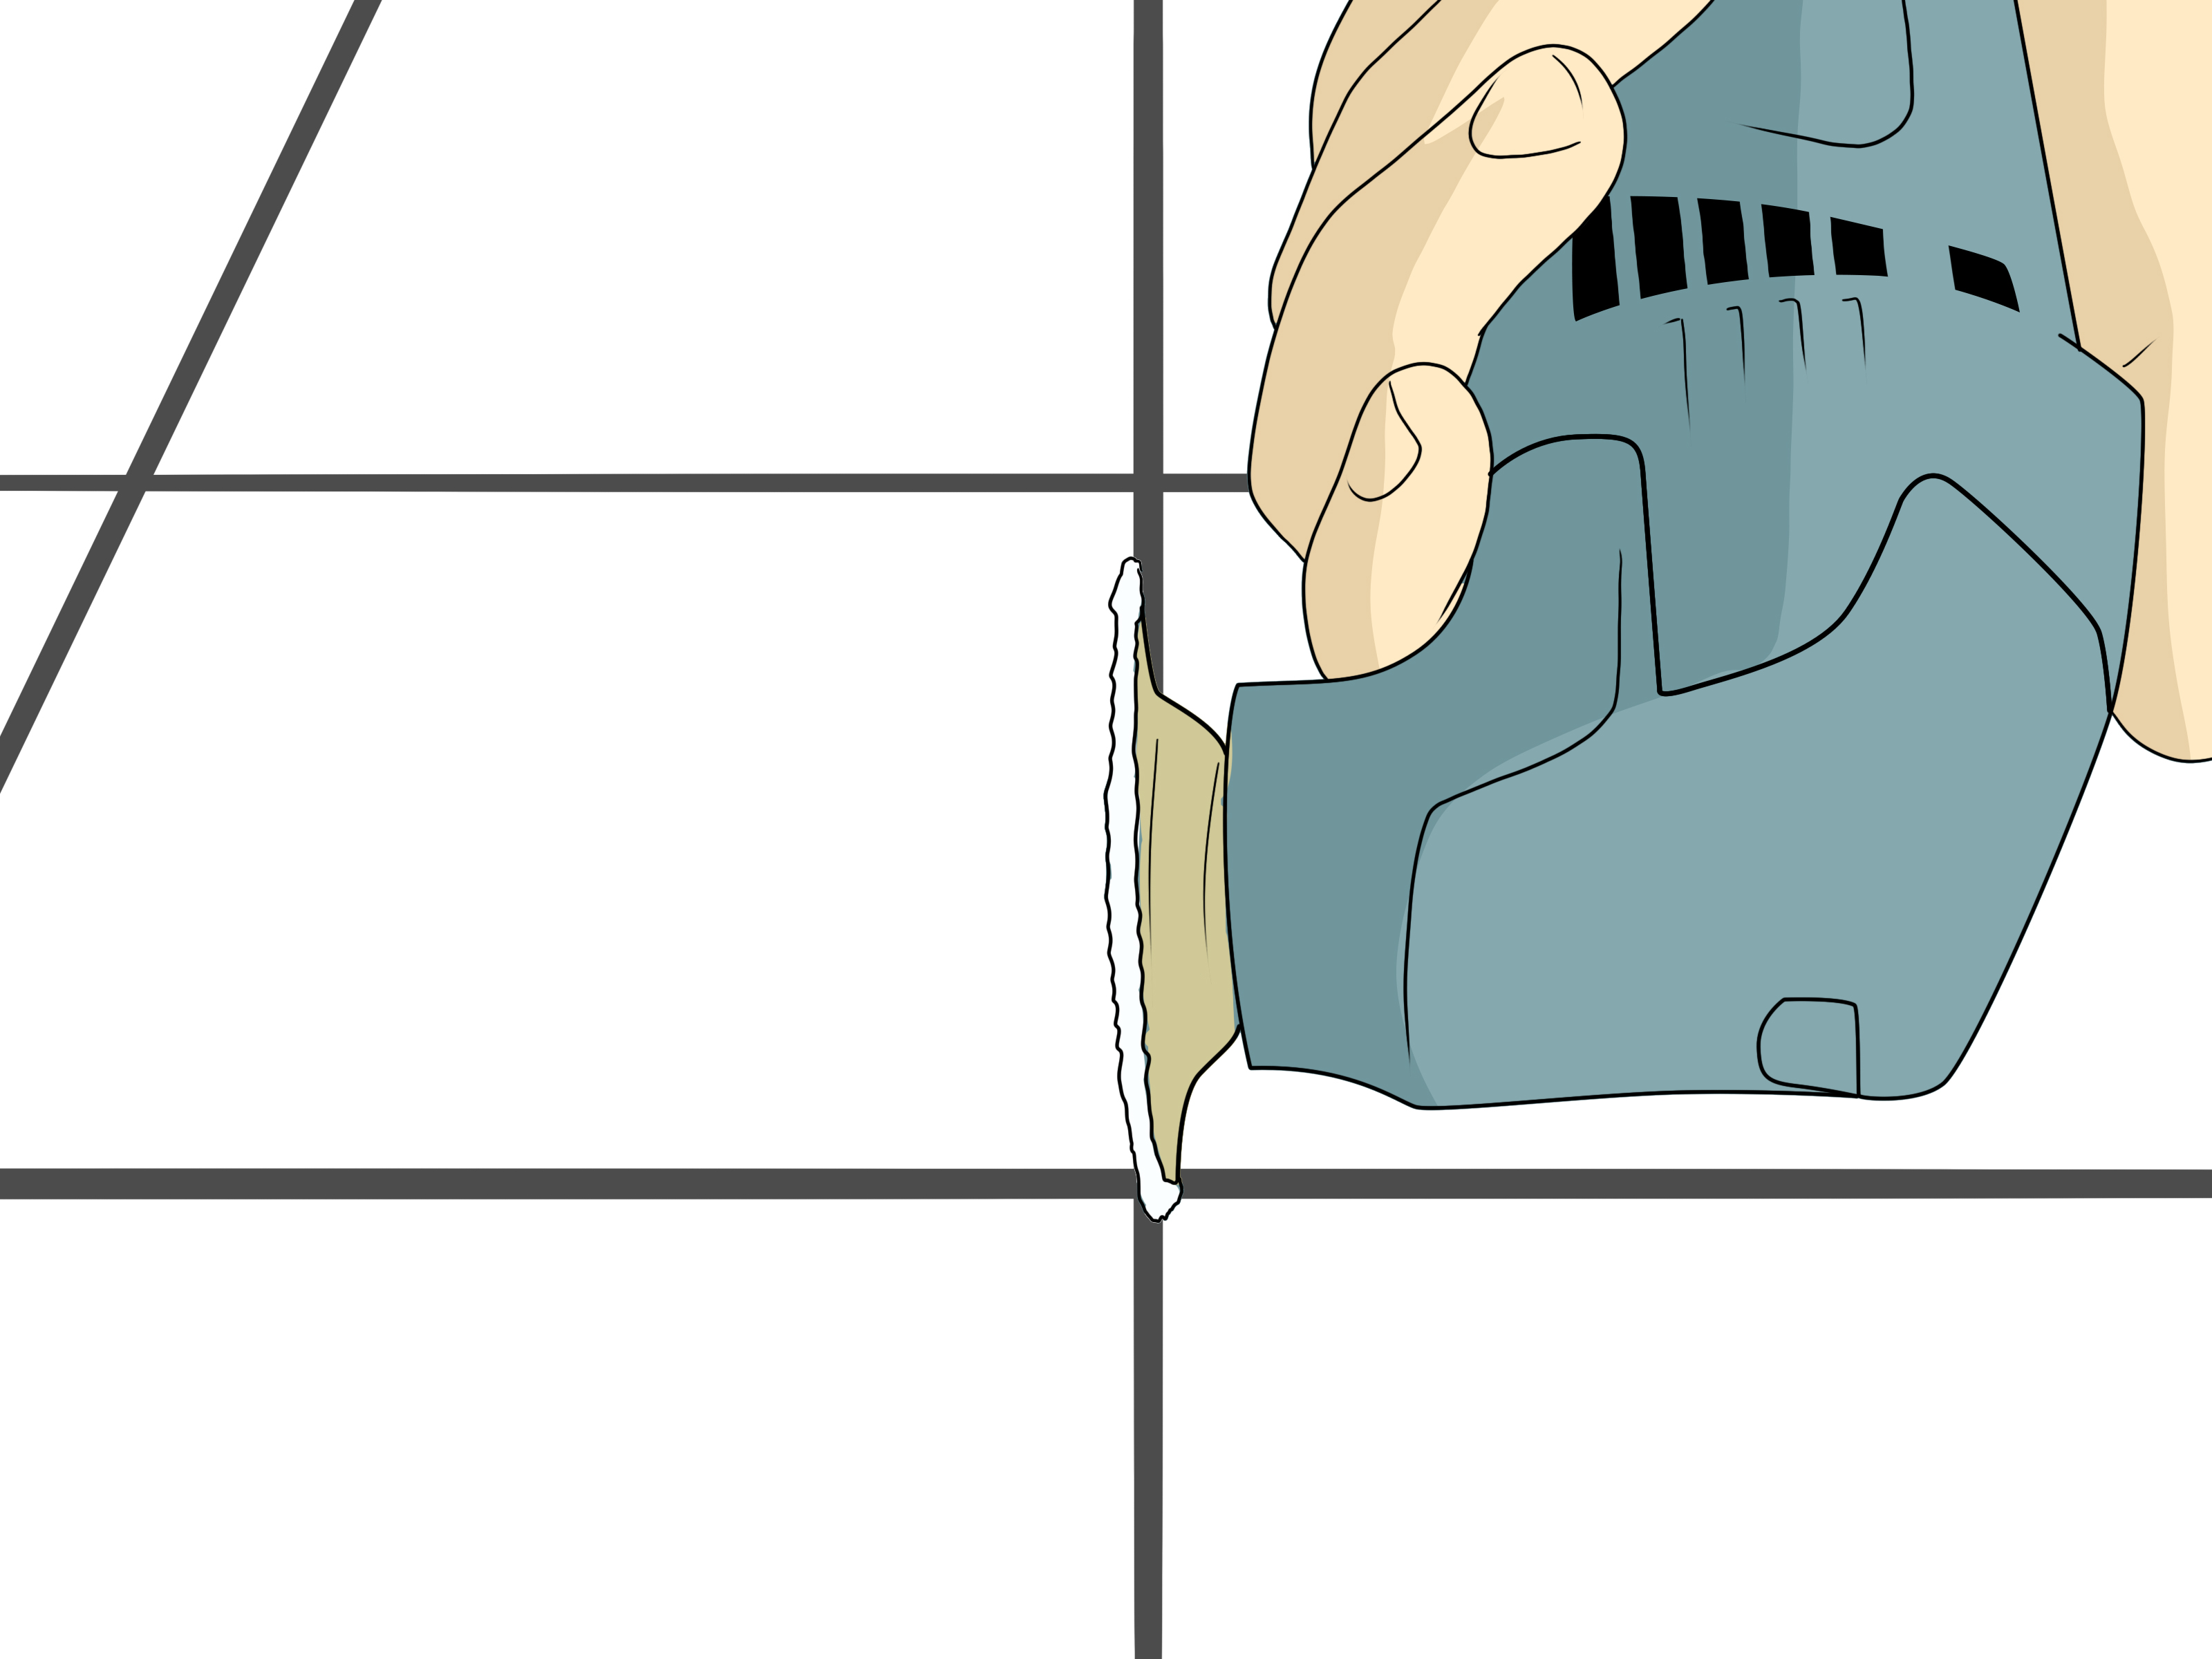
8. After Softening, Remove the Grout Mechanically
Here is the honest truth: even when you soften grout, most of the actual removal still happens with tools. For narrow lines or delicate tile, start with a grout saw, carbide hand tool, or utility knife used carefully. For larger projects, an oscillating multi-tool or rotary tool with a grout removal blade can save serious time.
The trick is to combine methods. Soften first, then cut. Steam first, then scrape. Apply the correct remover, then use a grout saw. That sequence gives you more control and reduces the chance of chipping tile edges.
Vacuum debris frequently so you can see what you are doing. Work in short passes. Do not try to remove everything in one aggressive swipe unless your long-term goal is “learning how to replace tile too.”
Best Method by Grout Type
For cement grout
Start with hot water or steam. If that is not enough, move to vinegar on compatible tile, then step up to sulfamic acid or a commercial cement grout haze remover. Finish with a grout saw or oscillating tool.
For epoxy grout
Use an epoxy-specific haze remover for residue and expect mechanical removal for the joint itself. Epoxy does not surrender easily, which is great when you want durability and less great when you are kneeling on the bathroom floor questioning your life choices.
For ready-mixed grout
Use the manufacturer-recommended cleaner or a heavy-duty cleaner meant for non-cement or specialty grout residue. Test first, then scrape gradually.
Mistakes to Avoid
- Using acid on natural stone: This can etch marble, limestone, and travertine.
- Skipping the spot test: Every tile surface behaves a little differently.
- Over-soaking shower walls: Too much water can seep behind the tile in compromised areas.
- Going straight to max power: Fast tool speed plus fragile tile equals instant regret.
- Ignoring dust control: Fine dust is messy at best and unhealthy at worst.
- Using the wrong cleaner for the grout type: Cement and epoxy are not the same job.
When to Call a Pro
If your tile is natural stone, historic, handmade, cracked, loose, or expensive enough to make you sweat just looking at it, hiring a pro may be the smart move. The same goes for large floors, commercial spaces, and fully cured epoxy grout over a wide area. Sometimes paying for experience is cheaper than paying for replacement tile you can no longer find.
Final Thoughts
If you came here hoping for one secret liquid that turns grout into pudding, I hate to be the bearer of mildly disappointing home-improvement news: that is not really how it works. The best grout removal strategy is usually a combination of softening and careful mechanical removal. Start with the least aggressive method, match the cleaner to the grout type, protect the tile, and work in stages.
Done right, you can remove old grout cleanly, prep the joints for fresh grout, and end up with tile that looks refreshed instead of accidentally battle-tested. And that, frankly, is the kind of renovation win we all deserve.
Real-World Experience: What This Job Is Actually Like
In real homes, grout removal rarely happens in the neat, glamorous way tutorials make it look. Usually, it starts with optimism. You think, “I’ll freshen up these grout lines this afternoon.” Then you kneel down, make three passes with a hand tool, and realize the grout has been living there since flip phones were exciting. Suddenly, it is not an afternoon project. It is you, a sponge, a vacuum, and a growing respect for the person who installed the tile in the first place.
One of the most common experiences people report is that the first few minutes feel discouraging. The grout does not move much. The tool catches. Dust shows up everywhere. Then, after soaking with hot water or steaming a small section, things begin to change. The top layer starts to crumble more cleanly. The tool tracks straighter. The job stops feeling impossible and starts feeling repetitive, which is actually progress in disguise.
Another real-life lesson is that small sections are your best friend. People who try to attack an entire shower wall at once usually end up tired, sloppy, and annoyed. People who work in one-foot sections tend to get better results. They can soften the grout, remove it while it is still workable, vacuum the debris, and move on before the tile surface gets overly wet or the cleaner dries out. It is not dramatic, but it is efficient.
Experience also teaches you that grout type changes everything. Cement grout often gives you little signs that your method is working. It gets chalky, damp, or crumbly. Epoxy, on the other hand, often responds with the emotional energy of a brick. If you have ever tried to remove epoxy with the wrong cleaner, you know the feeling: nothing happens, except maybe your patience leaving the room. That is why identifying the grout first saves so much time.
There is also the tile factor. On basic ceramic tile, you can work with a little more confidence. On glossy porcelain, glass, or natural stone, you become extremely aware that one bad slip can scratch, chip, or dull the finish. Most experienced DIYers adjust quickly. They use lighter pressure, more tape, better lighting, and more frequent breaks. Fancy that: caution turns out to be useful.
Then there is cleanup, the part nobody loves but everybody remembers. Grout dust gets into corners, along baseboards, and somehow onto surfaces you swear were not even nearby. Keeping a shop vacuum close changes the whole experience. Vacuuming every few minutes is not overkill. It improves visibility, reduces dust, and honestly makes the project feel more under control. The same goes for wiping the tile face often so you can see whether you are actually removing grout or just making a gritty modern art piece.
The most encouraging thing about this project is that technique improves fast. The first ten minutes can feel clumsy, but by the second or third section, most people settle into a rhythm. You learn how long to let a softening method dwell, how much pressure your tool needs, and when to stop before damaging the tile. That learning curve is short, and it pays off quickly.
So yes, softening grout for removal can be tedious. Your knees may complain. Your vacuum may become your new best friend. But with the right method, the right cleaner, and a little patience, the job becomes very manageable. And few home projects are as satisfying as seeing old, cracked, dingy grout disappear and realizing your tile can actually look sharp again. Suddenly the room looks cleaner, newer, and less like it has been quietly losing an argument with humidity for the last decade.
