
Beauty Tools & Accessories
How to Paint Geometric Patterns on Walls
Jul
Blank walls are polite, but they are not always interesting. A painted geometric wall can turn an ordinary bedroom, hallway, office, or playroom into a custom-looking space without requiring a muralist’s résumé or a mysterious art-school scarf. With painter’s tape, a level, a little patience, and a willingness to measure before caffeinating too aggressively, you can create crisp stripes, triangles, grids, arches, diamonds, and color-blocked designs that look intentional rather than “my toddler discovered the paint drawer.”
Note: Keep a small container of your original wall color nearby. It is the emergency undo button for tiny touch-ups, tape mishaps, and those moments when a line looks more enthusiastic than straight.
Why Paint a Geometric Accent Wall?
Geometric wall paint ideas work because they combine color, shape, and scale in one project. Instead of hanging one framed print and hoping it carries the room on its tiny shoulders, you can create a full-wall focal point that reflects your style.
A geometric pattern can make a narrow room feel wider, add height to a low ceiling, define a work-from-home zone, frame a bed, or create a playful background in a child’s room. The design does not need to cover every inch of the wall, either. A painted rectangle behind a desk, a band of triangles above wainscoting, or a large arch around a headboard can make a strong visual statement with less paint and less commitment.
The best part is flexibility. A bold black-and-white grid feels modern and tailored. Muted terracotta, cream, and dusty blue triangles feel warm and artistic. A checkerboard pattern can lean retro, preppy, whimsical, or delightfully diner-adjacent depending on the colors you choose. Geometry is basically interior design’s version of a good blazer: it can dress up almost anything.
What You Need to Paint Geometric Patterns on Walls
- Interior wall paint in two to five colors
- Painter’s tape in one or two widths
- Measuring tape
- Long level, laser level, or straightedge
- Pencil and eraser
- Small paint rollers and roller covers
- Angled paintbrush for edges and corners
- Paint tray or disposable tray liners
- Drop cloths, plastic sheeting, or old canvas sheets
- Spackle, putty knife, and fine-grit sanding sponge for repairs
- Clean microfiber cloth or sponge
- Step stool or ladder, depending on wall height
Use quality painter’s tape rather than ordinary masking tape. Painter’s tape is designed for cleaner removal and sharper painted edges. It is also wise to choose tape appropriate for your surface, especially if the wall was painted recently or has a delicate finish.
Choose the Right Geometric Wall Design Before You Paint
Start With the Room’s Purpose
Before drawing a single triangle, consider what the room needs. A bedroom usually benefits from a calmer design with fewer colors and larger shapes. A playroom can handle cheerful contrast, zigzags, checkerboards, or scattered polygons. A home office may look more polished with a limited palette, such as charcoal, taupe, white, and one accent color.
Ask one simple question: should this wall feel restful, energetic, elegant, playful, or dramatic? The answer will help you choose both color and pattern.
Pick a Pattern That Matches Your Skill Level
Not every geometric wall requires a geometry degree, a compass, or a sudden interest in ancient Greek theorems. Choose a design that fits your comfort level.
- Beginner: vertical stripes, horizontal stripes, large color blocks, checkerboards, or a painted rectangle.
- Intermediate: triangles, diamonds, overlapping rectangles, diagonal bands, or mountain-inspired shapes.
- Advanced: repeating hexagons, cubes, tessellations, layered arches, or multi-color abstract polygons.
Use Color With a Plan
A geometric pattern looks best when the palette feels coordinated. Choose one dominant color, one supporting color, and one or two accents. You do not need five loud colors competing like contestants on a reality show.
For a calm modern wall, try warm white, sage green, muted clay, and soft charcoal. For a bold contemporary wall, pair deep navy with cream, ochre, and rust. For a child’s room, consider soft gray as the base with coral, sky blue, mustard, and blush as accents.
A useful rule is to include at least one neutral color. White, cream, pale gray, taupe, or beige gives the eye a place to rest and prevents the design from looking overloaded.
How to Plan a Geometric Paint Pattern on a Wall
Measure the Wall First
Measure the width and height of the wall, then draw a simple scaled version on graph paper or in a digital sketching app. It does not need to be museum-worthy. A rough layout helps you spot awkwardly tiny triangles, uneven borders, or a giant shape that would accidentally swallow a light switch.
Mark doors, windows, outlets, vents, sconces, and furniture that will sit against the wall. These details matter. A beautiful diamond pattern can lose its charm when one perfect point disappears behind a bookshelf.
Find the Focal Point
For symmetrical designs, locate the center of the wall and build outward. This is especially useful for checkerboards, diamonds, grids, and centered arches. Starting from the middle helps the pattern feel balanced even when the wall itself has awkward features.
For abstract geometric patterns, symmetry is optional. You can use a more spontaneous arrangement of angled lines and colored sections. Still, plan the overall visual weight so the darkest colors do not all pile up in one corner like they are waiting for a bus.
Test the Design With Tape
Before painting, place a few strips of painter’s tape on the wall to test the scale. Stand back, walk into the hallway, and look at it from the normal viewing distance. A pattern that looks perfect from six inches away can appear strangely busy from across the room.
This tape preview is also helpful for deciding whether a design should cover the entire wall or only a framed portion. Sometimes the best answer is not “more pattern.” Sometimes the best answer is “stop while the wall still has oxygen.”
Prepare the Wall for Painting
Preparation is not glamorous, but neither is repainting an entire wall because dust, grease, or loose paint ruined the finish. Move furniture away from the wall, protect the floor, and remove outlet and switch-plate covers. Turn off power at the breaker if you are working very close to exposed electrical boxes.
Clean the wall with a slightly damp cloth or sponge and mild soapy water. Kitchen walls may need extra attention because cooking residue can interfere with paint adhesion. Let the surface dry completely before applying tape or paint.
Fill nail holes and small dents with spackle, let it dry, then sand it smooth. Wipe away sanding dust. If you are covering a dark color, working over a glossy wall, or painting fresh drywall repairs, use primer where needed. A smooth, even base makes the finished geometric pattern look sharper.
Step-by-Step: How to Paint Geometric Patterns on Walls
Step 1: Paint the Base Color
If the existing wall color is staying as part of the design, you may be able to skip this step. Otherwise, paint the entire wall in your chosen base color. Let it dry thoroughly according to the paint label before measuring, taping, or adding additional colors.
For a clean, professional look, apply enough coats to create solid coverage. A patchy base coat will remain visible around the geometric sections, which is not the kind of surprise you want after pulling off thirty yards of tape.
Step 2: Mark Your Layout Lightly
Use a measuring tape, pencil, and level to mark the key points of your design. For horizontal or vertical stripes, make small marks at equal intervals along both sides of the wall. For triangles or diamonds, mark the corners and connect them with a straightedge.
Use light pencil marks. You want guides, not a wall that looks like it has been solving algebra homework all afternoon.
Step 3: Apply Painter’s Tape
Place painter’s tape along the outside edge of each section you plan to paint. This is important: tape placement affects the final size of your shapes. If you tape directly on top of your pencil line, the painted area may end up slightly smaller than planned.
Use long, continuous pieces of tape whenever possible. Short, overlapping pieces create more chances for gaps and paint bleed. Press the tape down firmly with a plastic putty knife, credit card, or clean fingertip, especially along the edge that will receive paint.
For diagonal lines, stretch the tape gently but do not pull it so hard that it lifts or curves. Check the line with a level or step back and visually inspect it before committing. Your eyes can be surprisingly good at noticing a crooked diagonal from across the room.
Step 4: Seal the Tape Edge
For extra-crisp geometric paint lines, lightly paint along the tape edge using the original base color first. This seals tiny gaps beneath the tape with the color already on the wall. Let that pass dry briefly, then apply your new paint color over it.
This extra step feels slightly fussy, but it can prevent the dreaded paint seepage that turns a sharp triangle into a fuzzy little cloud. A foam roller or nearly dry brush works well because heavy paint is more likely to push under the tape.
Step 5: Paint One Color at a Time
Use a small roller for larger sections and an angled brush for tight corners. Apply thin, even coats rather than loading on a thick layer. Thick paint can form ridges near the tape and increase the chance of bleeding.
If the pattern uses several colors, label your paint cups or trays. A quick piece of tape marked “navy,” “clay,” or “do not accidentally use on the ceiling” can save considerable confusion.
Allow each color to dry enough before taping across it for the next section. Follow the paint manufacturer’s drying and recoating directions rather than relying on the classic DIY method of poking the wall and saying, “Seems fine.”
Step 6: Remove the Tape Carefully
Peel the tape slowly at a 45-degree angle, pulling it back over itself instead of yanking it away from the wall. Tape-removal timing can vary by paint and tape product, so check the manufacturer’s recommendations. In general, the goal is to avoid tearing the new paint film or letting tape sit so long that it bonds too firmly to the wall.
Keep the removed tape from brushing against wet paint. Work in sections, admire your crisp lines, and resist the urge to invite everyone in the house to inspect the wall before you finish the last corner.
Step 7: Touch Up Small Imperfections
Even careful painters occasionally get minor bleeds, rough corners, or pencil marks. Use a small artist brush and the base color to sharpen an edge. For larger mistakes, let the paint cure, lightly sand the rough area, repaint it, and re-tape if necessary.
Small touch-ups are normal. They are not proof that you failed. They are proof that walls, like people, are rarely as perfectly flat as they claim to be.
Three Easy Geometric Wall Pattern Ideas
1. Oversized Color-Block Rectangle
Paint a large rectangle behind a desk, bed, or console table. Use a contrasting color that complements the surrounding décor. This is one of the easiest geometric wall designs because it requires only straight lines and a level. It also looks intentional, modern, and much more expensive than its actual paint budget suggests.
2. Painted Checkerboard Wall
Create a checkerboard by measuring equal squares across and down the wall. Paint the base color first, then tape around every other square. A neutral checkerboard in cream and taupe feels subtle, while high-contrast black and white delivers instant graphic drama. For a softer look, use two shades from the same color family.
3. Abstract Triangle Accent Wall
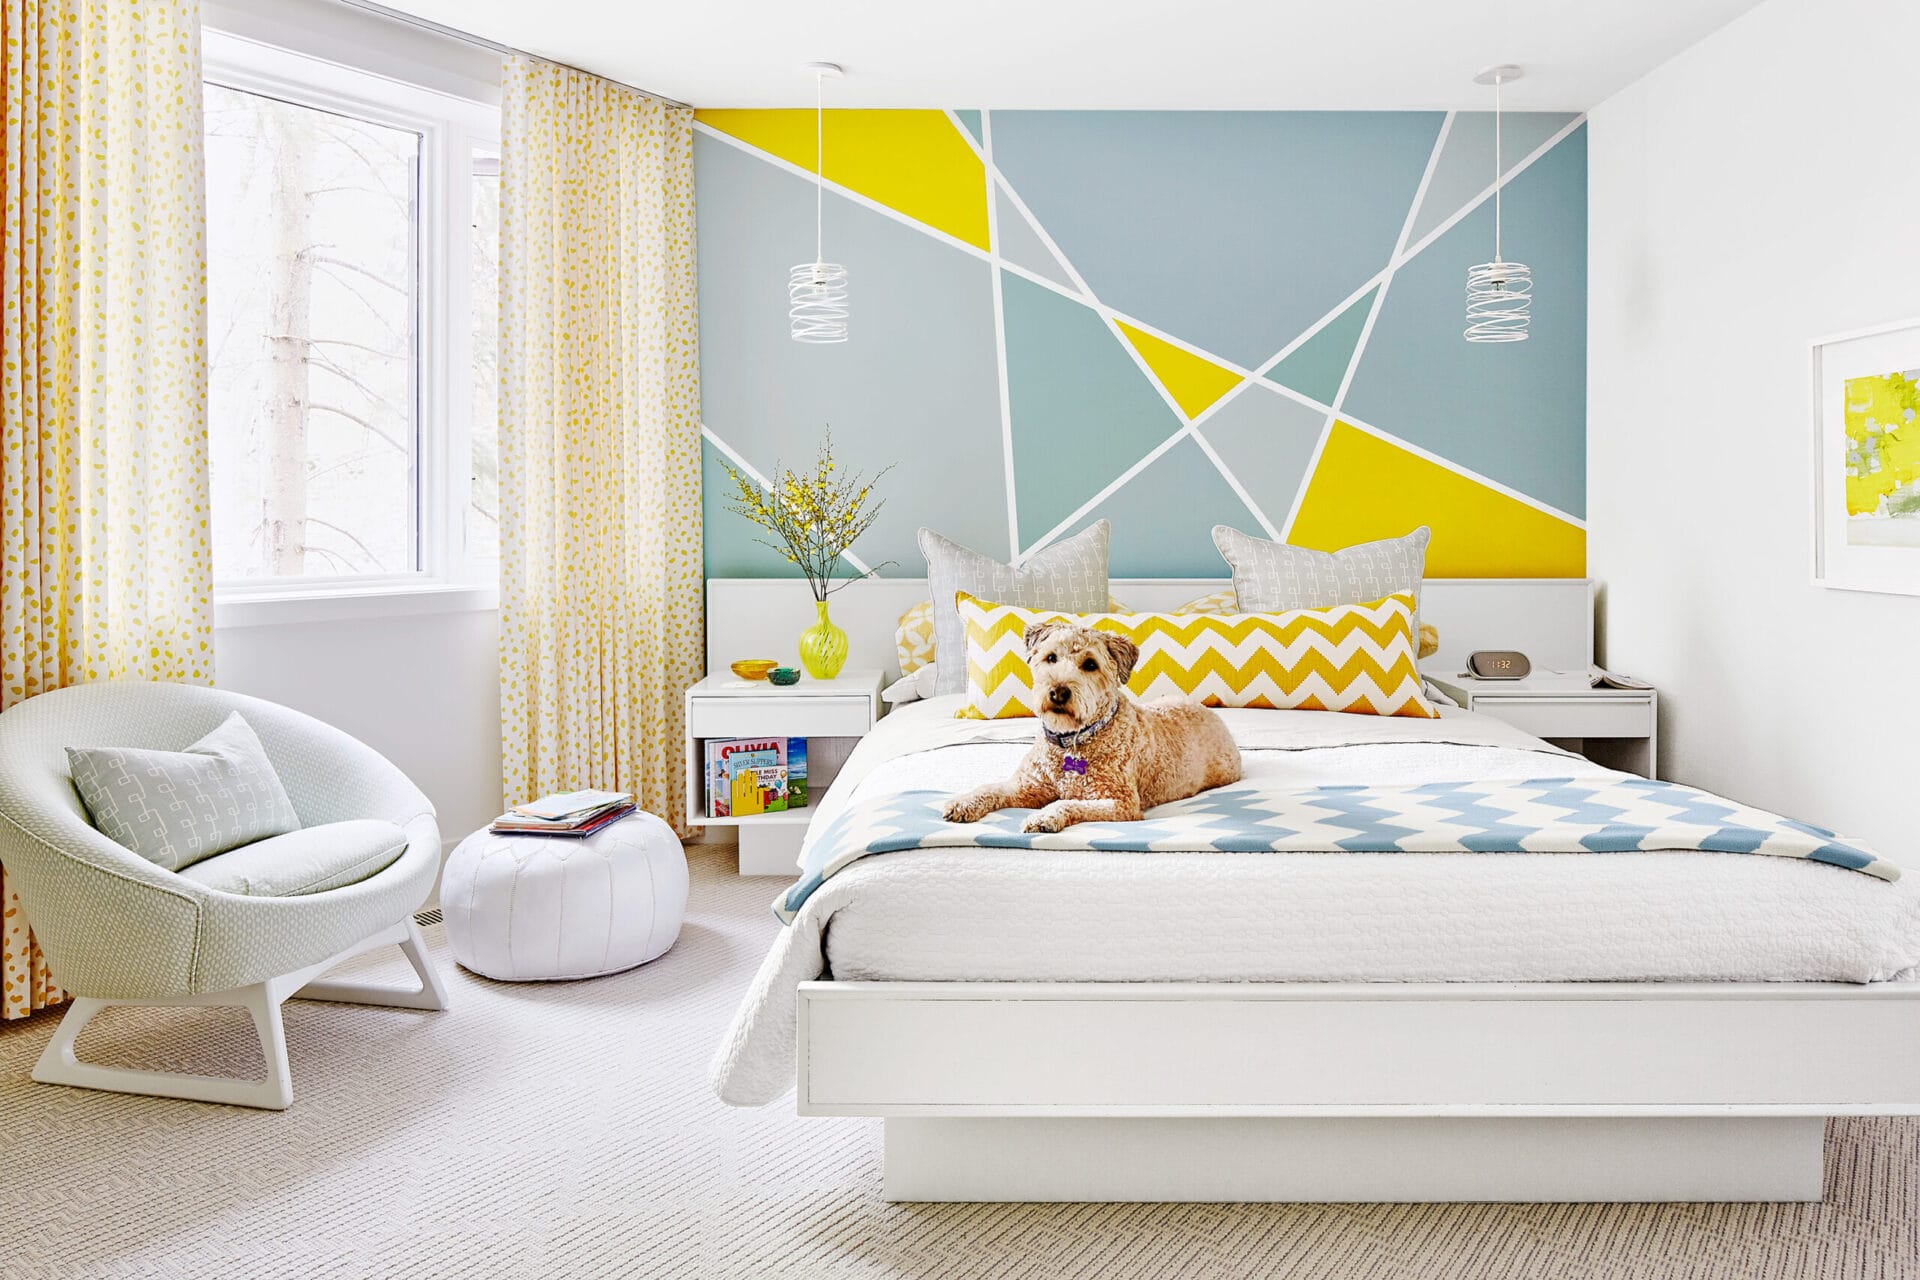
For an artistic look, use painter’s tape to divide the wall into large triangles and irregular polygons. Limit the palette to three or four colors, and leave a few sections in the base color. This prevents the design from becoming visually crowded and gives it a polished, modern mural effect.
Common Geometric Wall Painting Mistakes to Avoid
- Skipping the layout: Random can look stylish, but unplanned can look accidental. Sketch first.
- Using low-quality tape: Cheap tape may lift, tear, or allow paint to bleed beneath the edges.
- Not sealing the tape: Pressing down tape edges is one of the simplest ways to improve line quality.
- Applying paint too heavily: Thick coats are more likely to seep under tape and create raised ridges.
- Ignoring drying time: Taping across uncured paint can pull it up or leave marks.
- Using too many colors: A geometric wall should feel bold, not like a paint-store sample rack exploded.
- Forgetting room scale: Tiny shapes on a huge wall may look busy, while enormous shapes in a small powder room can feel overwhelming.
How to Make a Geometric Wall Look Designer-Made
Choose one element in the room to echo in the wall design. Pull a color from a rug, pillow, artwork, curtain, or headboard. This creates visual connection and makes the painted wall feel like part of the room rather than a very enthusiastic guest.
Also consider repeating a shape. A round mirror looks great against a painted arch. A rectangular headboard pairs naturally with color-blocked rectangles. Angular pendant lights can complement triangles or diamonds. The goal is not to match every detail perfectly; it is to create a few intentional conversations between the wall and the rest of the space.
Finally, leave some visual breathing room. A geometric accent wall is usually strongest when the surrounding walls remain calmer. Let the pattern be the star instead of forcing every surface to audition for the same role.
Frequently Asked Questions About Painting Geometric Walls
Can beginners paint geometric patterns on walls?
Yes. Beginners should start with large blocks, stripes, checkerboards, or simple triangles. The key is accurate measuring, careful tape placement, and patience between coats.
What paint finish is best for a geometric accent wall?
Eggshell and satin are popular choices for interior walls because they offer a subtle sheen and are generally easier to wipe clean than flat paint. Matte finishes can look elegant, but they may show scuffs more easily in busy areas.
Should I paint the whole wall or only part of it?
Both options work. A full-wall pattern creates stronger impact, while a partial pattern can frame furniture, define a zone, or add personality without dominating the room.
How do I remove pencil marks after painting?
Erase very lightly after the paint has dried. If a mark remains, use a tiny brush with the appropriate paint color to cover it. Avoid aggressive scrubbing, especially on fresh paint.
Experience: What Painting Geometric Patterns on Walls Teaches You
Painting geometric patterns on walls looks like a quick weekend project from the comfort of a phone screen. In real life, it teaches you several useful lessons before lunch: walls are not perfectly square, ceilings are not always level, and one roll of painter’s tape somehow disappears faster than snacks during a movie night.
The first major lesson is that planning beats improvisation. When people rush into a painted wall design, they often focus on color first. Color matters, but spacing matters just as much. A beautiful palette cannot rescue a pattern that is squeezed awkwardly around an outlet, cut off by a window frame, or visibly tilted. Spending fifteen extra minutes sketching and measuring can prevent three hours of touch-ups later.
The second lesson is that the tape does not do all the work for you. Painter’s tape is helpful, but it is not a tiny construction crew with its own laser level and artistic standards. The cleanest lines come from pressing the tape firmly, using thin coats of paint, and resisting the urge to flood the edge with a heavy, overloaded roller. The moment paint starts pooling near tape, it becomes less of a design project and more of a suspense film.
You also learn that imperfect walls demand flexibility. Older homes may have uneven plaster, slightly bowed corners, textured surfaces, or baseboards that seem to have been installed during a minor earthquake. Instead of chasing mathematical perfection, focus on visual balance. The pattern should look straight and pleasing from normal viewing distance. Nobody walks into a room carrying a protractor unless they are either an architect or a very intense dinner guest.
Another valuable experience is discovering how much color changes with light. A soft blue can look peaceful in morning sunlight, gray by noon, and unexpectedly electric under warm evening lamps. Before committing to several geometric sections, paint sample boards or small test patches and observe them throughout the day. This is particularly important with dark colors, saturated reds, deep greens, and cool grays, which can shift dramatically depending on natural light and nearby furnishings.
There is also a practical emotional benefit to the project. A geometric wall gives you an immediate, visible result. You can walk into the room and say, “I made that,” even if your first triangle required the kind of concentration usually reserved for assembling flat-pack furniture without instructions. That sense of ownership is part of why DIY painted accent walls feel so satisfying. They are not just decoration; they are proof that a small amount of planning and paint can change how a room feels.
Most importantly, experience teaches you that a geometric wall does not need to be flawless to be successful. The slight hand-made quality is often what gives it personality. Clean lines matter, but so does confidence. Once the furniture is back, the lighting is on, and the room has its life again, people will notice the overall impact long before they notice a tiny touch-up near the baseboard. In other words, paint bravely, measure twice, and remember that even a slightly crooked triangle can still look fantastic from the sofa.
Conclusion
Learning how to paint geometric patterns on walls is one of the most affordable ways to make a room feel personalized, current, and full of character. Begin with a clear design, choose a balanced color palette, prep the wall carefully, and take your time with measuring and tape placement. Whether you choose a crisp checkerboard, bold stripes, abstract triangles, or a simple color-blocked shape, the finished wall can become the feature that makes the entire room feel complete.
Do not be afraid to start small. A single painted arch, a rectangle behind a desk, or a few diagonal color blocks can deliver major impact. Once you see how much personality a little geometry can add, plain walls may begin to look suspiciously underdressed.
SEO Metadata

