
Hair Care
How to Make a Guitar Pick Necklace: 8 Steps
Jul
A guitar pick necklace is one of those rare DIY projects that checks all the boxes: it is affordable, personal, beginner-friendly, and cool enough to make people ask, “Wait, did you make that?” It can be a tiny tribute to your favorite band, a wearable memory from your first guitar lesson, a handmade gift for a music lover, or simply a way to turn a forgotten pick into something that looks like it belongs backstage.
The best part? You do not need to be a professional jeweler, a rock star, or the kind of person who owns seven mysterious pliers. With one guitar pick, a jump ring, a chain, and a few basic tools, you can make a DIY guitar pick necklace in less time than it takes to tune a guitar while pretending the G string is not judging you.
In this guide, you will learn how to make a guitar pick necklace in 8 simple steps, including how to choose the right pick, make a clean hole, attach hardware, and customize the final piece so it feels personal instead of “craft table emergency.” We will also cover safety tips, design ideas, common mistakes, and real-life experience from making pick jewelry that actually survives regular wear.
What Is a Guitar Pick Necklace?
A guitar pick necklace is a handmade pendant necklace that uses a guitar pick as the main charm. Most versions are made by placing a small hole near the top of the pick, attaching a jump ring or bail, and sliding it onto a chain, cord, ribbon, or leather necklace. The result is lightweight, casual, and full of personality.
Guitar picks come in many materials, including celluloid, nylon, Delrin-style plastics, wood, metal, and other specialty finishes. For jewelry, standard plastic picks are usually the easiest to work with because they are light, colorful, and simple to drill or punch. Thicker picks may feel sturdier, while thin picks can look delicate but may bend more easily.
Supplies You Will Need
Before you start, gather your materials. Having everything nearby prevents that classic DIY moment where you are holding a half-finished necklace in one hand and searching for pliers with the other like a raccoon in a toolbox.
Basic Materials
- 1 guitar pick
- 1 small jump ring, preferably 6mm to 8mm
- 1 necklace chain, cord, ribbon, or leather cord
- Jewelry pliers, ideally two pairs of flat-nose or chain-nose pliers
- A fine-tip marker or pencil
- A small drill bit, hand drill, rotary tool, or jewelry hole punch
- Scrap wood or a protective work surface
- Fine sandpaper or a nail file
- Optional charms, beads, paint pens, stickers, or sealant
Safety Note Before You Begin
If you are using a drill, rotary tool, or sharp jewelry punch, work slowly and protect your fingers. Wear eye protection, secure the guitar pick on a stable surface, and ask an adult for help if you are not comfortable using tools. This necklace also contains small parts, so keep loose jump rings, beads, and picks away from young children and pets.
How to Make a Guitar Pick Necklace: 8 Steps
Step 1: Choose the Right Guitar Pick
Start with a pick that fits the style you want. A classic teardrop-shaped pick gives the necklace an instantly recognizable music-inspired look. A bright pick feels playful, a black pick looks sleek, and a pearl or tortoiseshell-style pick gives the necklace a vintage rock-and-roll vibe.
If the necklace is a gift, choose a pick that means something. Maybe it matches the recipient’s favorite color, came from a concert, or has the logo of a band, music store, or guitar brand they love. If you are making the necklace for yourself, pick one that feels like your personality in tiny plastic form. Yes, that is a real design strategy.
For beginners, a medium-thickness plastic pick is usually best. Very thin picks can flex too much when you drill them, while very thick picks may require more patience. Avoid brittle picks with cracks, deep scratches, or worn edges, especially if you want the necklace to last.
Step 2: Plan the Necklace Design
Before making any holes, decide how you want the pick to hang. Most guitar pick necklaces use one hole near the top center. This makes the pick dangle like a pendant and gives it a relaxed, slightly swinging look. If you want the pick to sit flatter against the chest, you can use two small holes near the top corners and attach both sides to chain sections.
Also consider the necklace length. A 16-inch chain usually sits close to the base of the neck, an 18-inch chain is a classic everyday length, and a 20- to 24-inch chain gives a more casual pendant style. Leather cord or black waxed cotton cord works especially well for a handmade rocker look.
This is also the time to decide whether you want extras. A tiny music-note charm, bead, initial charm, or mini tassel can make the necklace feel more finished. Just do not overload it. The guitar pick should remain the star of the show, not get buried under a charm avalanche.
Step 3: Mark the Hole Placement
Place the pick on your work surface with the point facing downward. Use a fine-tip marker to make a small dot near the top center of the pick. A good rule is to place the dot about 1/8 to 1/4 inch from the top edge. This gives the jump ring enough room to move while leaving enough material around the hole so the pick does not tear or crack.
If the pick has a logo, signature, or printed artwork, check the placement before drilling. You do not want the hole to go straight through the coolest part of the design. If the pick has text, keep the necklace orientation in mind so the words do not hang sideways unless “mysterious sideways band merch” is the aesthetic.
For a two-hole necklace, mark two dots evenly spaced near the top corners. Keep them symmetrical so the pick hangs evenly. You can use a ruler, but honest eyeballing works if you are careful and not crafting during a caffeine earthquake.
Step 4: Secure the Pick on a Safe Surface
Put the guitar pick on a small piece of scrap wood, cork, or thick cardboard. This protects your table and gives the tool something to enter after it passes through the pick. If possible, hold the pick with a small clamp or tape it down firmly with painter’s tape.
Do not hold the pick in your bare fingers while drilling. The pick is small, the tool is sharp, and your fingers deserve a better storyline. Securing the pick also helps you make a cleaner hole because the material will not slide around.
Work in good lighting so you can see the marked dot clearly. If the pick is dark, use a silver marker, white pencil, or a tiny piece of tape with the dot marked on top.
Step 5: Make a Clean Hole
The cleanest method is to use a small drill bit or hand drill. A bit around 1/16 inch often works well for a jump ring, but the exact size depends on your hardware. Start slowly and use light pressure. Let the tool do the work instead of forcing it through the pick.
If you are using a rotary tool, keep the speed low. High speed can melt or roughen some plastics, especially if you press too hard. Drill straight down through the marked spot, then lift the tool away carefully once the hole is complete.
A jewelry hole punch may also work on many standard plastic picks. This tool is quieter and easier for some beginners, though it may not handle very thick or hard picks. Avoid using heated pins, open flames, or improvised burning methods. They can create fumes, rough holes, burns, and a general atmosphere of “why does my craft smell like a tiny disaster?”
Step 6: Smooth the Hole and Edges
After the hole is made, check both sides of the pick. You may see a small burr or rough plastic edge. Smooth it gently with fine sandpaper, a nail file, or a small jewelry file. The goal is to remove sharp bits without scratching the visible surface.
Run your finger lightly around the hole. It should feel smooth enough that it will not scrape the cord or catch on clothing. If the hole is too tight for your jump ring, widen it slightly with the drill bit by hand rather than forcing the metal through.
This step may seem tiny, but it makes a big difference. A rough hole can weaken the necklace over time, while a smooth hole helps the pick swing naturally and keeps the hardware from wearing through the material.
Step 7: Attach the Jump Ring
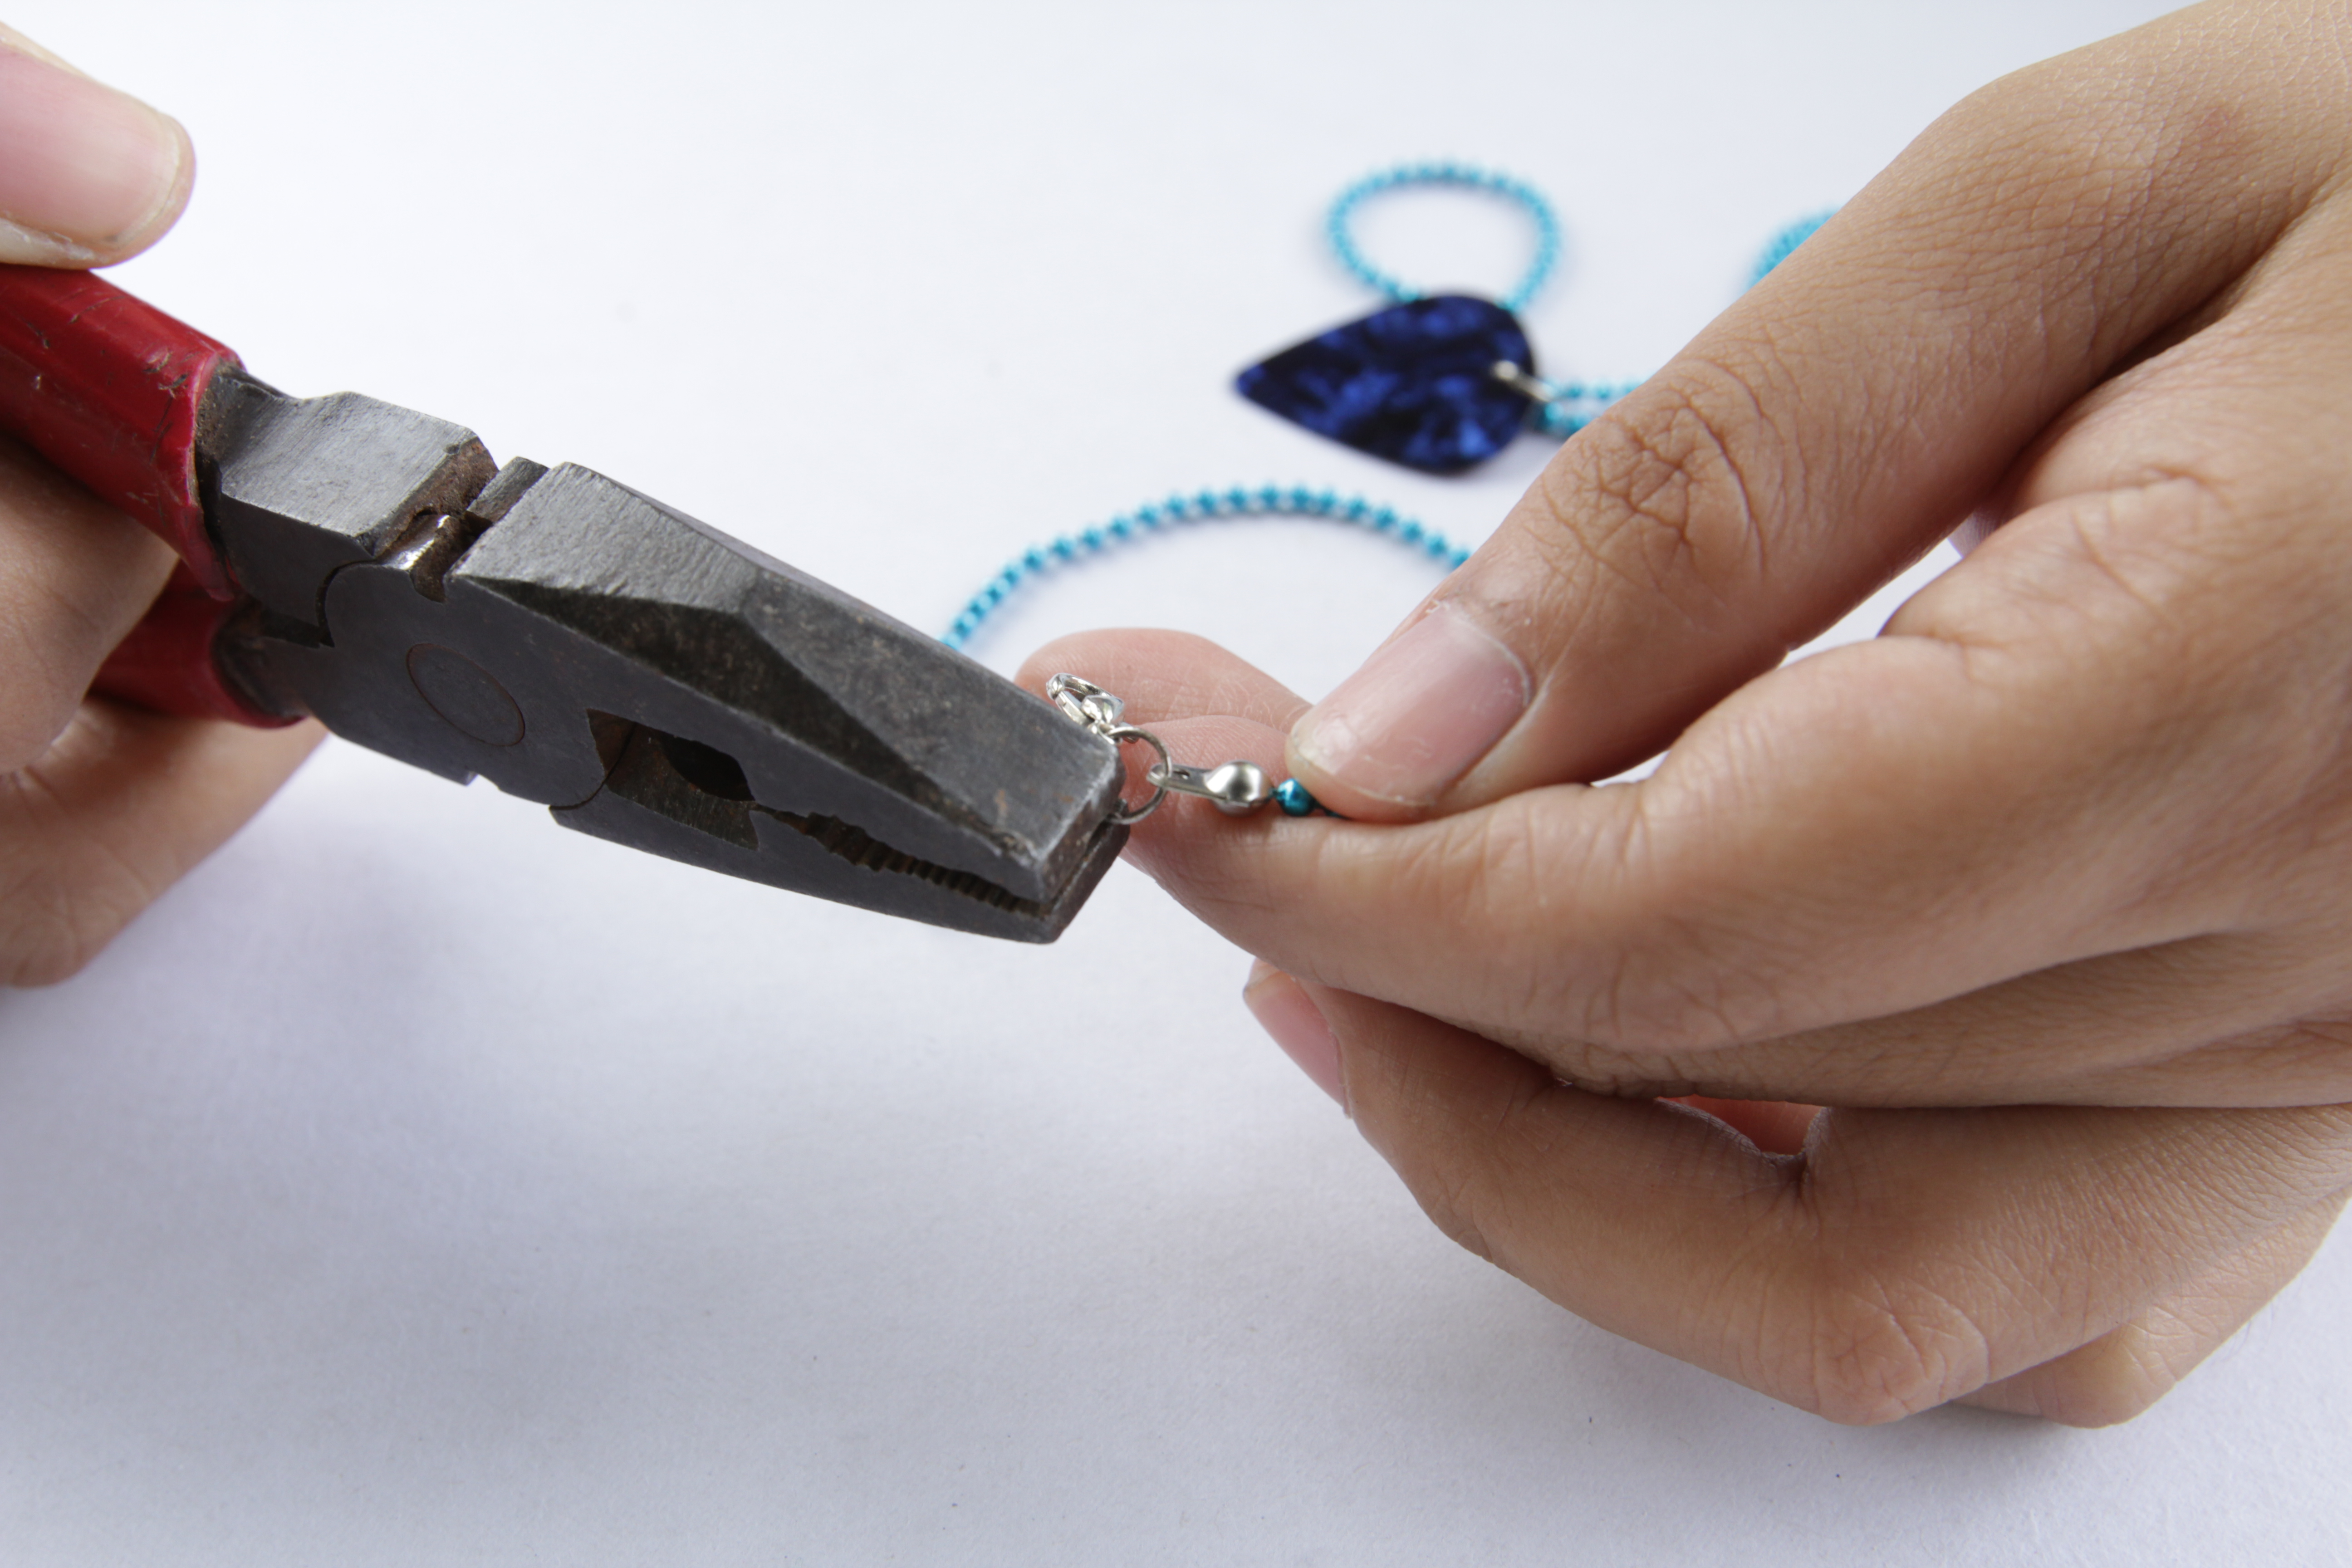
Open the jump ring using two pairs of jewelry pliers. Hold one side of the ring with one pair and the other side with the second pair. Instead of pulling the ring apart outward, twist one side forward and the other side backward. This keeps the round shape intact and makes it easier to close securely.
Slide the open jump ring through the hole in the guitar pick. If you are adding a charm, add it now. Then twist the jump ring closed by reversing the motion. The ends should meet neatly with little or no gap.
Give the ring a gentle tug to make sure it is secure. If there is a visible opening, the pick or chain may slip out later. A well-closed jump ring is the difference between “cute handmade necklace” and “I lost my pendant somewhere between lunch and algebra.”
Step 8: Add the Chain and Test the Necklace
Slide the chain, cord, or ribbon through the jump ring. If you are using a chain with a clasp, make sure the clasp still moves easily through the jump ring or sits comfortably at the back of your neck. If you are using leather or cotton cord, tie secure sliding knots or attach cord ends with a clasp.
Put the necklace on and check how it hangs. If the pick flips backward too much, try a slightly larger jump ring, a shorter chain, or a small charm as a balancing detail. If the pick hangs too low, shorten the cord or switch to a different chain length.
Once everything feels comfortable, your guitar pick necklace is ready to wear. Congratulations: you have officially turned a tiny triangle of music gear into jewelry. Somewhere, a craft drawer is applauding.
Creative Guitar Pick Necklace Ideas
Concert Memory Necklace
If you caught or bought a pick at a concert, turn it into a keepsake necklace. Keep the design simple so the pick remains the focus. A plain silver or black chain works well and lets the memory do the talking.
Personalized Name Necklace
Use paint pens or permanent markers to add initials, a date, or a short phrase to a blank pick. Let the ink dry completely, then seal it with a clear craft sealant if the marker is likely to rub off.
Layered Rock Necklace
Pair the guitar pick pendant with a second chain at a different length. One necklace can hold the pick, while the other has a small charm, bead, or simple metal pendant. Layering makes the piece look more styled without making it complicated.
Friendship Pick Necklaces
Make matching necklaces using picks in different colors. This is a great idea for bandmates, best friends, siblings, or anyone who shares playlists like they are emotional legal documents.
Common Mistakes to Avoid
Placing the Hole Too Close to the Edge
If the hole is too close to the top, the pick may crack or split after a few wears. Leave enough space around the hole so the jump ring has support.
Using the Wrong Jump Ring Size
A jump ring that is too tiny may pinch the pick and make it hang stiffly. A ring that is too large may look clunky. For most picks, 6mm to 8mm is a comfortable starting point.
Pulling Jump Rings Open Instead of Twisting
Pulling a jump ring apart can distort the shape and weaken the closure. Twist it open sideways, add the pick, then twist it closed.
Skipping the Smoothing Step
A rough hole can scratch the chain or make the pendant feel unfinished. A few seconds of sanding makes the necklace look and wear better.
How to Make the Necklace Last Longer
Store your guitar pick necklace in a small jewelry pouch, box, or drawer when you are not wearing it. This helps protect the pick from scratches and keeps the chain from tangling. Avoid wearing it in the shower or pool, especially if the pick has printed artwork or painted decorations.
If you added stickers, marker art, or paint, use a light clear sealant suitable for crafts. Apply thin coats and let each coat dry completely. Heavy sealant can make the pick look cloudy or uneven, so patience is your friend here.
Check the jump ring occasionally. If the gap starts to open, close it again with pliers. Handmade jewelry is sturdy when assembled well, but it still appreciates a little maintenance now and then.
Experience Notes: What I Learned Making Guitar Pick Necklaces
The first thing you learn when making a guitar pick necklace is that the hole placement matters more than you expect. On my first attempt, I placed the hole too close to the top because I wanted the jump ring to be subtle. The result looked fine for about five minutes, then the pick started hanging awkwardly and the top edge felt weak. Moving the hole slightly lower made the necklace look better and feel much stronger.
The second lesson is that not all picks behave the same. A flexible thin pick is easy to work with, but it can curl slightly when worn on a long chain. A medium pick usually gives the best balance because it is sturdy without feeling heavy. A very thick pick looks premium, but drilling it requires more control. If you are making your first necklace, practice on a regular inexpensive pick before using a meaningful concert pick or custom pick.
I also learned that hardware changes the entire mood of the necklace. A silver chain makes the pick feel more polished, while black cord gives it a casual musician vibe. Leather cord can look great, but it needs neat knots or proper cord ends. Otherwise, the necklace can look unfinished in the “I made this during a power outage” way, which is charming only in very specific circumstances.
Jump rings are another small detail with big consequences. Cheap, soft rings can open over time, especially if the necklace gets pulled or tossed into a backpack. A slightly stronger jump ring makes the necklace feel more secure. Closing the ring carefully is also essential. When the two ends meet cleanly, the pendant stays where it belongs instead of making a dramatic escape.
Customizing the pick is fun, but less is often more. One tiny charm can look intentional. Five charms, three beads, a tassel, and a giant lobster clasp can make the guitar pick look like it got trapped in a craft-store parade. The cleanest designs usually let the pick shine. A meaningful color, simple chain, and smooth finish are enough.
If you are making guitar pick necklaces as gifts, presentation helps. Place the necklace on a small card with a music quote, a handwritten message, or the date of a concert. Suddenly, a simple DIY project feels thoughtful and gift-worthy. It is the difference between “here is a necklace” and “here is a tiny wearable memory.” Big upgrade, same pick.
The most satisfying part is how personal the final necklace feels. A guitar pick is small, but it carries a lot of personality. It can represent music, friendship, creativity, or a specific moment. That is why this project works so well: it is not just about making jewelry. It is about turning an everyday object into something with a story.
Conclusion
Learning how to make a guitar pick necklace is simple, affordable, and surprisingly rewarding. With the right pick, careful hole placement, a smooth finish, and a secure jump ring, you can create a necklace that looks stylish and feels personal. Whether you are making one for yourself, a friend, a bandmate, or a music-loving family member, this project proves that great DIY jewelry does not need expensive supplies or complicated techniques.
Start with a practice pick, take your time with the hole, and do not skip the small finishing details. Once you make one, you may find yourself turning every spare pick in the house into jewelry. Consider yourself warned: DIY guitar pick necklaces are easy to make, easy to gift, and dangerously good at making you say, “I could totally make one more.”
SEO Tags

