
Beauty Unlocked
How to Build a DIY Dog Wash Station
Jul
Every dog owner eventually learns a humbling truth: your dog does not become “less muddy” just because you bought white towels. Whether your pup is a backyard explorer, a puddle enthusiast, a seasonal shed machine, or a mysterious creature who can locate swamp water in a suburban driveway, a dedicated dog wash station can save your floors, your bathtub, your back, and possibly your dignity.
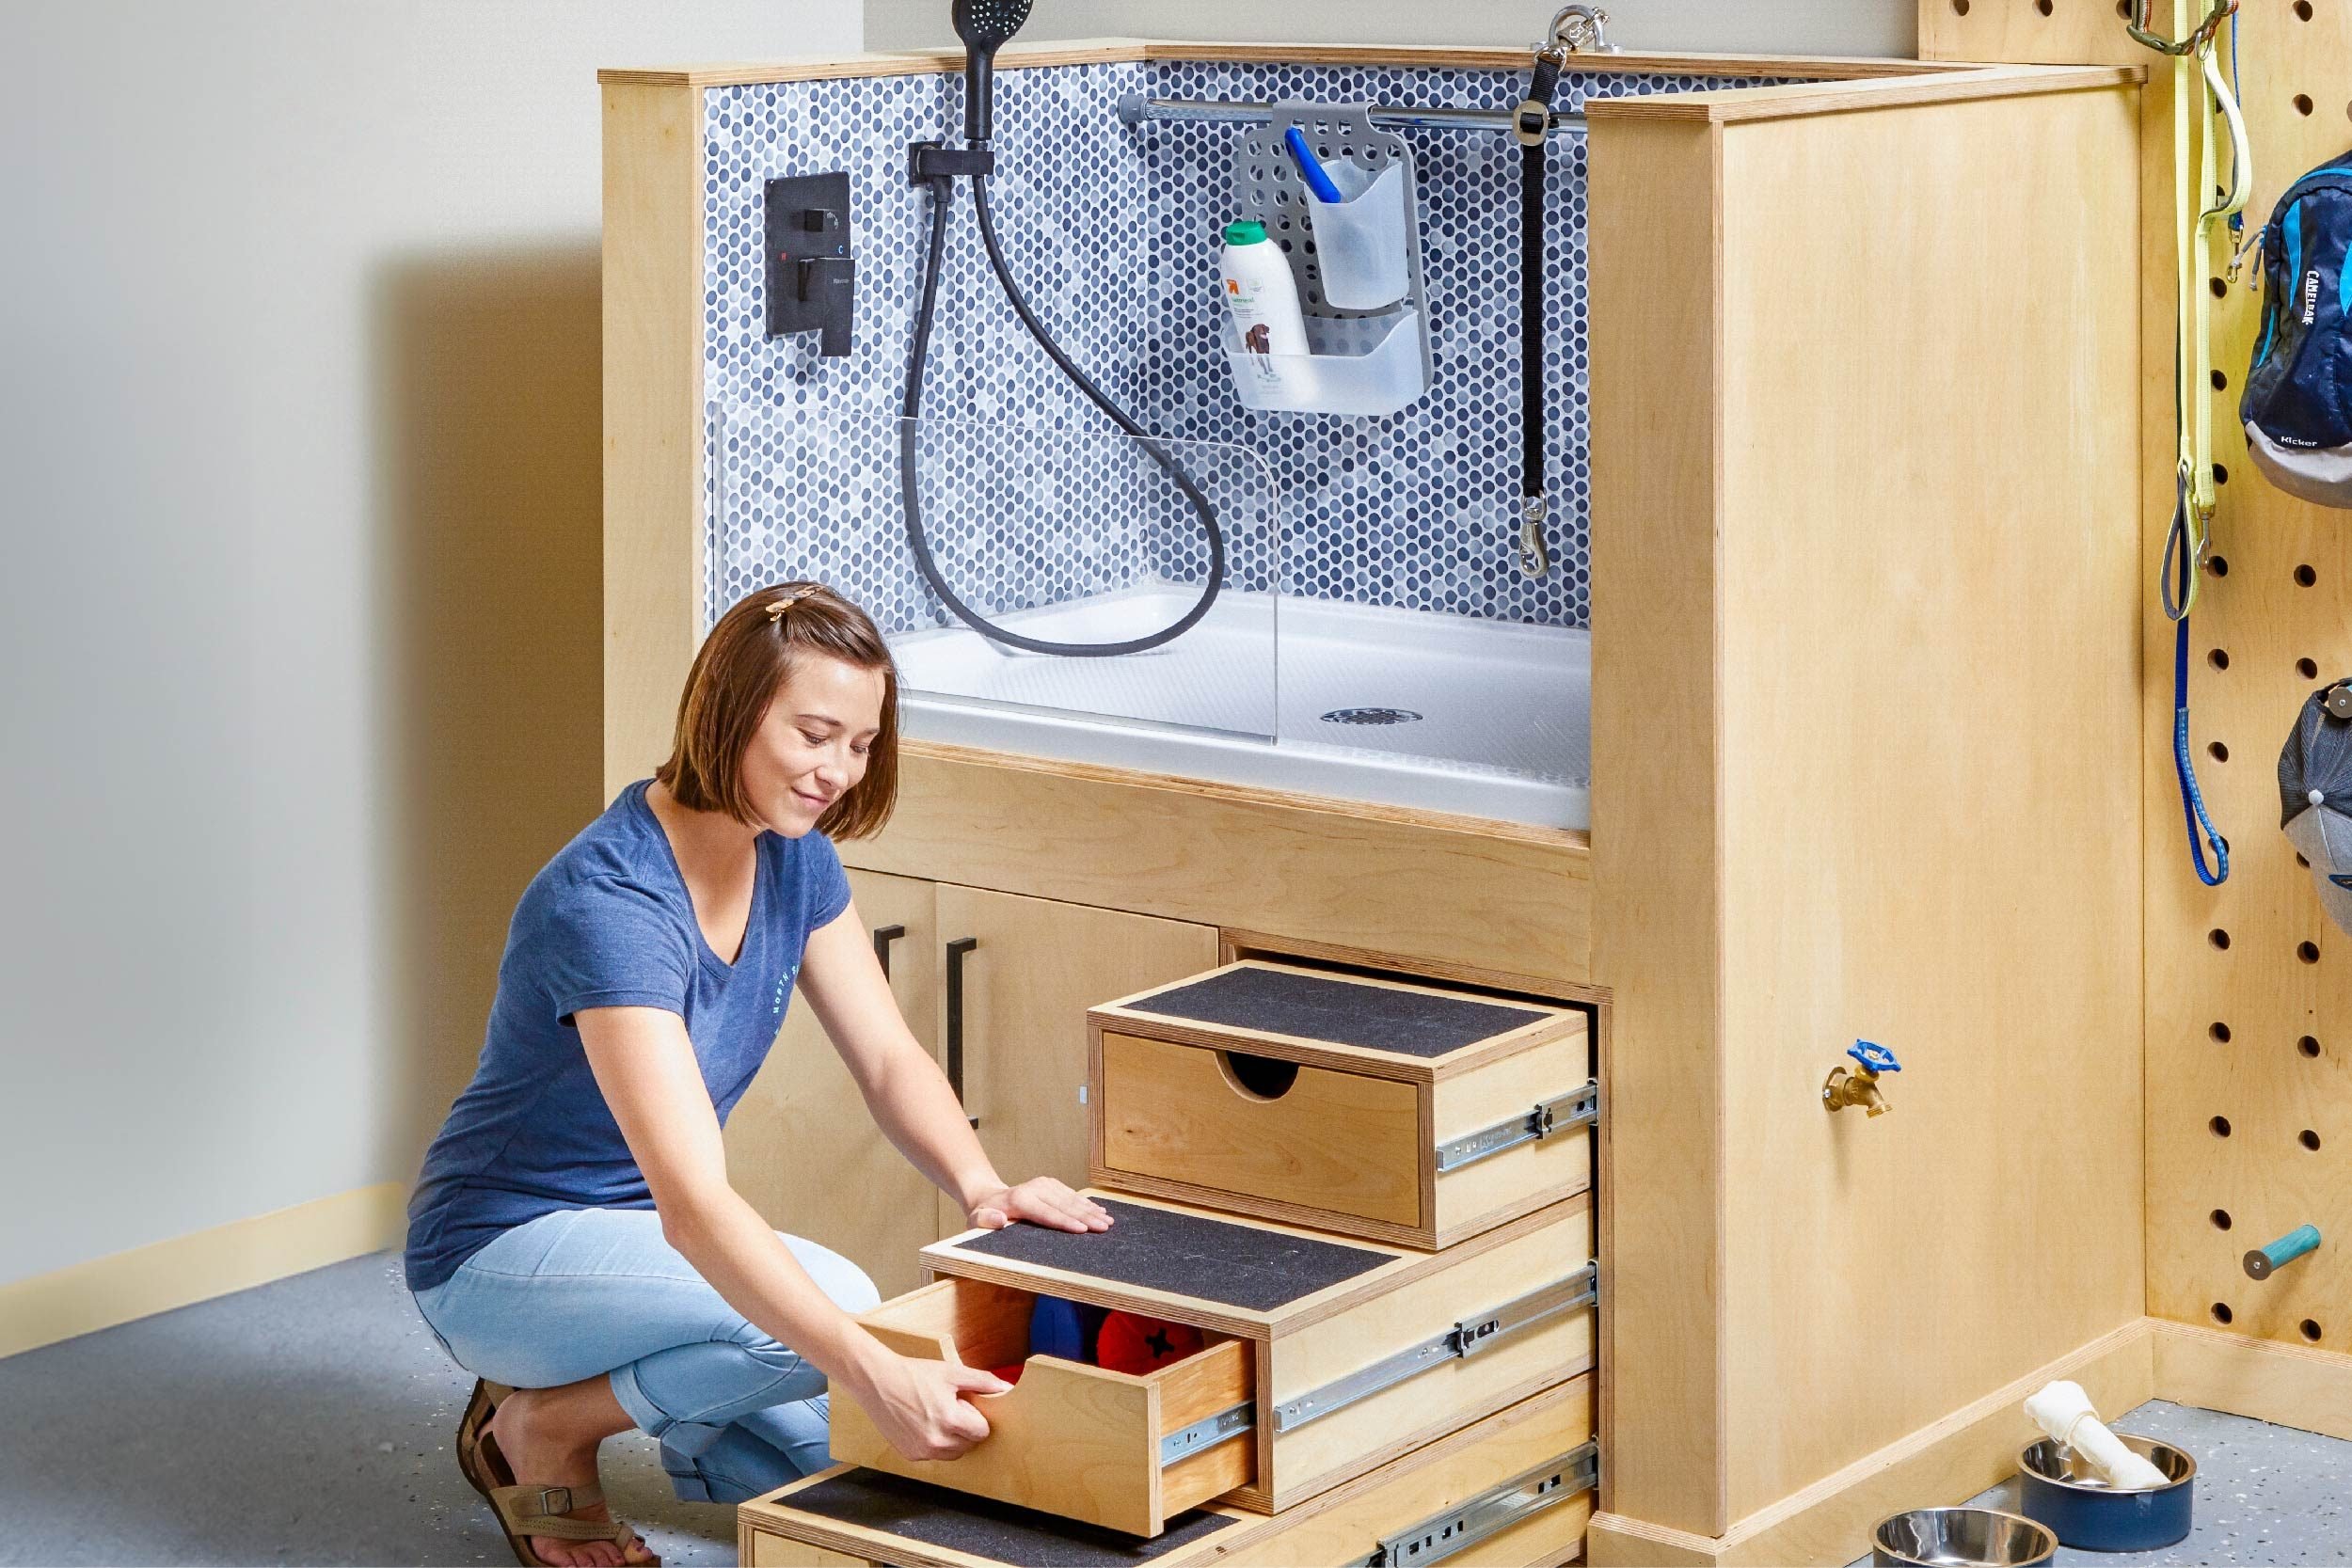
A DIY dog wash station is essentially a compact, waterproof bathing area designed for dogs. It usually includes a shower pan or tub, waterproof walls, a handheld sprayer, safe drainage, non-slip flooring, and smart storage for shampoo, towels, brushes, and treats. The best part? You can build one in a mudroom, laundry room, garage, basement, or even a well-planned utility area without turning your whole house into a canine water park.
This guide walks you through how to build a DIY dog wash station from planning to finishing touches. We’ll cover layout, materials, plumbing, waterproofing, safety, design ideas, cost-saving tips, and real-life lessons learned from bathing dogs who believe “standing still” is a personal insult.
Why Build a DIY Dog Wash Station?
Bathing a dog in a regular bathtub works, but it is rarely elegant. You kneel. The dog shakes. Water appears on walls you did not know could get wet. Shampoo bottles fall like bowling pins. Then, after the bath is over, your bathroom smells like wet fur and betrayal.
A home dog wash station solves several common problems. First, it keeps mess contained in a space designed for splashing. Second, it makes bathing easier on your body, especially if you raise the tub to a comfortable height. Third, it creates a safer surface for your dog with better traction, lower entry points, and a handheld sprayer that gives you more control than a standard showerhead.
For families with active dogs, large breeds, multiple pets, or frequent muddy-yard emergencies, a dog washing station can become one of the most practical upgrades in the house. It may not impress your dog at first, but your floors will send you a thank-you card.
Best Places to Build a Dog Wash Station
Location matters more than almost anything else. A beautiful dog wash station in the wrong spot can become expensive, awkward, or difficult to use. Ideally, build near existing water supply lines and drainage to reduce plumbing complexity.
Laundry Room
A laundry room is one of the best locations because it often already has hot and cold water lines, a drain, durable flooring, and space for towels or cleaning supplies. If your laundry room connects to a garage or backyard entrance, even better. Your dog can go from “mud goblin” to “acceptable roommate” without crossing the living room.
Mudroom
A mudroom dog wash station is ideal for homes with pets, kids, boots, sports gear, and other objects that mysteriously collect dirt. Mudrooms are usually positioned near an exterior door, making them perfect for rinsing paws before your dog redecorates the hallway in paw-print chic.
Garage
A garage dog wash station can be practical if the space is heated or protected from freezing temperatures. It is especially useful for large dogs because you can design a floor-level walk-in shower with a low curb. However, plumbing and insulation should be considered carefully.
Basement
A basement can work well if it has accessible plumbing and enough ceiling height. The main challenge is drainage. The dog wash drain must connect properly to the home’s waste system, and the layout should allow water to flow safely without creating backups or moisture problems.
Planning Your DIY Dog Wash Station
Before buying tile because it looks cute next to your dog’s collar, start with practical planning. A dog wash station is basically a small shower, which means water management is the main event.
Choose the Right Size
The size depends on your dog. For small dogs, a station around 24 to 36 inches wide and 36 to 48 inches long may be enough. Medium and large dogs usually need more room, often closer to 36 to 48 inches wide and 48 to 60 inches long. Your dog should be able to stand comfortably, turn around, and avoid looking at you like you built a tiny tile prison.
Wall height also matters. For small and medium dogs, side walls around 20 to 30 inches above the base can help control splashes. For large dogs or professional-style setups, taller tiled walls may be smarter, especially behind the sprayer. If your dog is a champion shaker, assume water will travel farther than physics promised.
Raised vs. Floor-Level Design
A raised dog wash station is easier on your back because you do not have to bend as much. This works especially well for small and medium dogs. A raised platform of about 18 to 36 inches can make grooming more comfortable, but you will need stairs, a ramp, or a safe lift-in plan.
A floor-level station is better for large dogs, senior dogs, or dogs with joint issues. It lets them walk in with minimal effort. The trade-off is that you may need to bend or sit on a stool while washing them.
Think About Entry and Exit
A low curb, removable step, or gentle ramp helps dogs enter safely. Avoid slick surfaces, sharp edges, and narrow openings. If your dog is nervous, design the station so they do not feel trapped. A calm dog bath starts before the water turns on.
Tools and Materials You’ll Need
Your exact materials depend on the design, but most DIY dog washing stations use a combination of framing lumber, waterproof backing, a shower pan or utility tub, tile or wall panels, plumbing fixtures, and safety accessories.
Common Materials
- Shower pan, utility sink, livestock-style wash tub, or custom tiled base
- 2×4 lumber for framing
- Cement backer board or approved waterproof wall board
- Waterproofing membrane or liquid waterproofing system
- Tile, fiberglass panels, PVC panels, or shower surround panels
- Drain assembly and P-trap
- Hot and cold water supply lines
- Handheld shower sprayer or pet washing wand
- Mixing valve or shower valve
- Waterproof sealant and silicone caulk
- Non-slip mat or textured floor surface
- Towel hooks, shelves, shampoo niche, or storage basket
Common Tools
- Tape measure
- Level
- Circular saw or miter saw
- Drill and driver bits
- Utility knife
- Pipe wrench or adjustable wrench
- Tile cutter or wet saw, if using tile
- Notched trowel and grout float
- Caulk gun
- Safety glasses and work gloves
If plumbing changes are involved, consider hiring a licensed plumber. A dog wash station is fun; hidden water damage behind a wall is not.
Step-by-Step: How to Build a DIY Dog Wash Station
Step 1: Measure the Space
Measure the width, depth, height, and available plumbing access. Mark where the drain, water lines, sprayer, shelves, and entry point will go. Leave room for you to stand, kneel, or sit while bathing your dog. Also leave enough space nearby for towels, because once the dog exits, you will have approximately three seconds before the celebratory shake.
Step 2: Plan the Plumbing
Your dog wash station needs hot water, cold water, and proper drainage. If you are placing it near a laundry sink, bathroom, or existing shower, you may be able to tie into nearby plumbing. The drain must slope correctly and connect to the home’s waste line with a proper trap. Poor drainage can lead to standing water, odors, clogs, and other problems best described as “future regret.”
For safety, choose a mixing valve that lets you control water temperature. Dogs should be washed with comfortably warm water, not hot water. A handheld sprayer with gentle pressure is ideal because it lets you rinse paws, bellies, and undercoats without blasting your dog like a driveway.
Step 3: Build the Frame
If you are building a raised station, frame the base with sturdy 2×4 lumber. The frame must support the weight of the tub or pan, tile, water, and dog. That last part is important, especially if your dog is a Labrador who believes every bath requires interpretive dance.
Use a level throughout the framing process. A small mistake at the frame stage can become a bigger problem when installing the pan, tile, or drain. Secure the frame to nearby wall studs when possible for extra stability.
Step 4: Install the Shower Pan or Tub
A preformed shower pan is one of the easiest options for DIY builders because it already has the correct slope toward the drain. Utility sinks and commercial pet tubs can also work, especially for smaller dogs. If you choose a custom tiled base, waterproofing and slope must be handled carefully.
Dry-fit the pan first to confirm the drain lines up properly. Once everything fits, install it according to the manufacturer’s directions. Make sure it sits level and is fully supported underneath. Flexing can cause cracks, leaks, or grout failure later.
Step 5: Add Waterproof Wall Backing
Install cement backer board or another approved waterproof wall board around the wash area. Regular drywall is not suitable inside a wet zone unless it is protected by an approved waterproof system. Dogs create splash patterns that are not recognized by polite human shower design.
Seal seams, corners, screw heads, and transitions using waterproof tape and membrane or liquid waterproofing. Pay special attention to the joint where the wall meets the pan. Water loves tiny gaps. It has hobbies, and one of them is finding your framing.
Step 6: Finish the Walls
Tile is durable, attractive, and easy to clean, which makes it a popular choice for dog wash stations. Large-format tile reduces grout lines, while textured tile may help visually hide water spots. If you want a simpler installation, fiberglass, PVC, FRP, or shower surround panels can be budget-friendly and easier to maintain.
For tile, use thinset mortar rated for wet areas, keep your rows level, and grout carefully. After grout cures, apply sealant if the grout type requires it. Use silicone caulk in corners and around fixtures rather than grout, because corners move slightly over time.
Step 7: Install the Sprayer and Fixtures
A handheld showerhead or pet sprayer is the heart of a good dog wash station. Look for one with a long hose, comfortable grip, and adjustable spray settings. A pause button can help save water while you shampoo. Mount the sprayer where it is easy to reach but not perfectly positioned for your dog to knock it down with one enthusiastic tail swipe.
Add a wall hook or slide bar so the sprayer can be used hands-free when needed. A built-in shampoo niche or small shelf keeps supplies off the floor and away from the drain.
Step 8: Add Non-Slip Safety Features
Dogs need traction. A slick shower pan can make them nervous, and nervous dogs are more likely to scramble, slip, or attempt a dramatic escape. Use a non-slip mat, textured pan, rubber insert, or textured tile. Avoid anything that traps water underneath for long periods, since that can lead to odor or mildew.
For raised stations, add a stable step or ramp. For floor-level stations, keep the entry low and easy. If your dog is older, has arthritis, or is recovering from an injury, comfort and accessibility matter more than designer tile.
Step 9: Create Storage and Drying Zones
Install towel hooks, a small cabinet, open shelves, or baskets nearby. Store dog shampoo, conditioner, ear-safe wipes, brushes, nail tools, and extra towels within reach. Keep electrical grooming tools away from wet areas unless the space is designed safely for them.
A drying mat outside the station helps catch drips. If your dog likes to run after baths, place a towel path between the wash station and the nearest “zoomie runway.” This will not stop the chaos, but it may reduce the evidence.
Design Ideas for a Better Dog Wash Station
Add a Splash Guard
A partial glass panel, raised side wall, or waterproof curtain can reduce splash. This is especially helpful for dogs who shake before, during, and after every rinse.
Use Large-Format Tile
Large tiles mean fewer grout lines, which makes cleaning easier. For the floor, choose a textured surface or use a non-slip mat so your dog feels secure.
Install a Shampoo Niche
A recessed niche keeps bottles organized and prevents them from falling into the tub. If you have multiple dogs, label products clearly so the oatmeal shampoo does not go missing during shedding season.
Include a Leash Hook Carefully
A grooming loop or leash hook can help keep some dogs in place, but it must be used safely and never in a way that could choke, panic, or trap the dog. Many home setups work better with treats, calm handling, and a helper instead of restraint.
Choose Easy-Clean Materials
Dogs bring fur, dirt, shampoo residue, and outdoor mystery particles. Smooth wall panels, sealed tile, removable mats, and accessible drains make cleaning less annoying. A hair catcher over the drain is a small purchase that can save a large plumbing headache.
How Much Does a DIY Dog Wash Station Cost?
The cost depends on size, location, plumbing access, and finishes. A simple setup using a utility sink, handheld sprayer, and waterproof wall panels may cost a few hundred dollars if plumbing already exists. A more polished tiled dog shower with a preformed pan, custom framing, new plumbing, storage, and premium fixtures can cost significantly more.
The biggest cost drivers are plumbing changes, tile labor, waterproofing, and custom carpentry. If you do most of the work yourself and keep the station near existing plumbing, you can control the budget. If you move drains, open walls, or create a high-end mudroom feature, expect the project to behave like a miniature bathroom remodel with fur.
Common Mistakes to Avoid
Skipping Waterproofing
Tile and grout are not a complete waterproofing system by themselves. The walls behind them need proper protection. Skipping waterproofing is one of the fastest ways to turn a cute dog wash station into a moisture problem.
Building It Too Small
Your puppy may be tiny now, but if that puppy is a golden retriever, plan for the full-size version. A cramped station makes bath time harder and less safe.
Forgetting Drain Maintenance
Dog hair is powerful. It can clog drains, cling to corners, and form alliances with shampoo residue. Use a removable drain strainer and clean it often.
Using Slippery Flooring
A nervous dog on a slick surface is not a bath; it is a rodeo. Prioritize traction from the beginning.
Mounting Fixtures Too Low or Too High
Place the sprayer and controls where you can reach them comfortably while keeping them out of the dog’s way. Test the motion before final installation.
Dog Bathing Tips for a Happier Wash Day
A great DIY dog wash station is only half the battle. The other half is convincing your dog that bath time is not a historical tragedy.
Introduce your dog to the station before the first bath. Let them sniff it, step inside, and receive treats without water running. Use calm praise and keep early sessions short. When it is time to bathe, brush your dog first to remove loose hair and tangles. Use lukewarm water, dog-safe shampoo, and gentle pressure from the sprayer.
Avoid spraying directly into the eyes, ears, or nose. Rinse thoroughly because leftover shampoo can irritate the skin. Afterward, towel dry as much as possible before your dog performs the traditional full-body shake ceremony.
of Real-Life Experience: What You Learn After Building and Using One
After using a DIY dog wash station for a while, you begin to notice details that rarely appear in glossy renovation photos. The first lesson is that convenience beats perfection. A stunning tiled station is nice, but the real magic is having towels, shampoo, treats, and the sprayer within arm’s reach. The moment you have to step away to grab something, your wet dog will see an opening and launch a freedom campaign.
The second lesson is that height matters more than you expect. If the station is too low, your back complains. If it is too high, lifting the dog becomes the workout you never requested. For small dogs, a raised station can feel life-changing. You can wash, rinse, and dry without crouching like a garden gnome. For big dogs, a walk-in design usually wins. It may not save your back completely, but it saves you from trying to lift 80 pounds of damp resistance.
The third lesson is that splash control deserves serious respect. Even a calm dog can shake with the force of a tiny weather event. Taller back walls, side panels, and a handheld sprayer with adjustable pressure make cleanup much easier. If you think a half wall is high enough, imagine your dog shaking directly at it while making eye contact. Then add a few more inches.
Storage is another detail that becomes more important over time. A built-in niche looks clean, but make sure it is large enough for the bottles you actually use. Tiny decorative niches are adorable until your shampoo bottle has to lie sideways like it fainted. Hooks for towels are essential. A small shelf for brushes and wipes is useful. A drain hair catcher is non-negotiable unless you enjoy conversations with plumbers.
You also learn that dogs respond better when the station feels familiar. Letting your dog stand in the dry station for treats between baths can reduce fear. Some owners use a suction treat mat on the wall to keep the dog focused during shampooing. Others use a helper, especially for young dogs or dramatic bath-time actors. The goal is not perfection; the goal is fewer wet paw prints on the sofa.
Finally, the best dog wash stations are easy to clean after the dog is clean. Smooth walls, sealed corners, removable mats, and good drainage make maintenance simple. If the station takes longer to clean than the dog, something went wrong in the design. Build for real life: fur, mud, shaking, dripping, and the occasional suspicious leaf stuck to your dog’s tail. When the layout works, bath day becomes less of a household crisis and more of a routine. Your dog may still object, but at least your bathroom gets to retire from combat duty.
Conclusion
Building a DIY dog wash station is one of those home projects that feels slightly luxurious until the first muddy day arrives. Then it feels like genius. By choosing the right location, planning the plumbing carefully, waterproofing like you mean it, and adding dog-friendly safety features, you can create a practical wash area that keeps mess under control and makes grooming easier for everyone involved.
The best design is not always the fanciest one. It is the one that fits your dog, your space, your budget, and your patience level. Start with function, add durable materials, keep cleanup simple, and remember that your dog does not care about tile trends. Your dog cares about traction, warm water, treats, and escaping as soon as possible.
Note: This article is written as original, web-ready content based on practical home-improvement and pet-care knowledge. For plumbing, drainage, electrical, or structural changes, follow local building codes and hire qualified professionals when needed.

