
Body Care
DIY – Hand Painted Stripes On the Wall
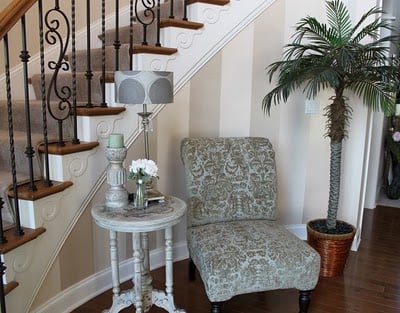
Jul
Note: This guide assumes you are painting a clean, sound interior wall. In a home built before 1978, avoid sanding, scraping, or disturbing peeling paint until you have checked for possible lead-paint risks.
A striped wall is one of those DIY projects that looks expensive, dramatic, and vaguely like it involved a professional designer wearing very clean white sneakers. In reality, it is mostly paint, painter’s tape, patient measuring, and the emotional maturity to resist “eyeballing it.”
Hand-painted wall stripes can turn a plain bedroom, nursery, hallway, office, or living room into a custom feature wall without the commitment of wallpaper. You can go bold with navy and white cabana stripes, soft with tone-on-tone neutrals, playful with candy-colored bands, or modern with one oversized stripe that says, “Yes, I own a level now.”
The secret to a polished striped wall is not a magical paintbrush. It is planning. Clean lines come from thoughtful measurements, good tape placement, smooth paint application, and knowing exactly when to remove the tape before it becomes part of the wall’s permanent personality.
Why Hand-Painted Stripes Work So Well
Stripes add movement, structure, and personality without requiring new furniture, major construction, or a dramatic speech to your spouse about why the living room needs to become a “creative sanctuary.” They are flexible enough for almost any decorating style.
Vertical stripes can make a wall feel more lifted and energetic. Horizontal stripes can make a narrow room feel broader and more relaxed. Wide stripes often look calm and contemporary, while narrow stripes feel more graphic and energetic. Uneven or random-width stripes bring a casual, artistic look that feels less formal and more collected over time.
Best of all, painted stripes are customizable. Wallpaper arrives with a pattern already decided for you. Paint lets you choose the exact width, spacing, colors, and direction that suit your room. Your wall becomes a design project rather than a hostage situation involving paste and air bubbles.
Choose Your Stripe Style Before You Buy Paint
Before you grab tape and begin decorating like a caffeinated raccoon, decide what kind of stripe pattern suits the room.
Vertical Stripes
Vertical hand-painted stripes are a good choice for bedrooms, entryways, and smaller rooms where you want the eye to travel upward. They can feel elegant when painted in soft neutrals, dramatic in black and cream, or cheerful in colors such as sage green, pale blue, blush, or warm yellow.
For a classic look, use equal-width stripes. For a more modern layout, use one wide focal stripe behind a bed, desk, or console table, then surround it with narrower stripes or leave the rest of the wall quiet.
Horizontal Stripes
Horizontal stripes are ideal for hallways, playrooms, bathrooms, and wide accent walls. They can make a space feel more relaxed and visually expansive. A low horizontal stripe can also work like a painted chair rail, especially in a child’s room or dining area.
Try two wide stripes in related shades for a subtle result, or use alternating high-contrast colors for a more graphic design. Just remember that a very busy stripe pattern on all four walls can make a room feel like it is preparing for a minor circus performance.
Tone-on-Tone Stripes
Tone-on-tone stripes use two shades from the same color family. Think warm white and soft beige, pale gray and charcoal gray, or muted blue and dusty navy. This approach creates texture and depth while keeping the room calm.
It is especially useful when you want an accent wall that feels sophisticated instead of shouty. The pattern appears differently as light changes throughout the day, which is considerably more entertaining than watching your laundry pile grow.
Random-Width Stripes
Random-width stripes look best when they are planned, not random in the “I dropped the tape measure” sense. Use a few repeated widths, such as 4 inches, 8 inches, and 12 inches, and arrange them across the wall in a balanced sequence.
This style works beautifully in kids’ rooms, creative studios, reading corners, and modern living spaces. Keep the color palette simple so the varying widths feel intentional rather than accidentally inspired by a barcode.
Tools and Materials for Painting Wall Stripes
- Interior wall paint in a base color and stripe color
- High-quality painter’s tape suited to your wall surface
- Tape measure
- Level, laser level, or long straightedge
- Pencil with a light touch
- Painter’s tray and liners
- Small roller and roller cover
- Angled paintbrush for corners and tight edges
- Drop cloths or plastic sheeting
- Clean cloth, mild soap, and water
- Optional: small artist brush for touch-ups
A quality tape and roller are worth the extra few dollars. Cheap tape can curl, tear, or allow paint to sneak underneath like a tiny liquid criminal. Cheap rollers can shed lint into your finish, which is not the textured luxury look anyone requested.
How to Plan Your Hand-Painted Stripe Layout
Measure the Wall First
Measure the full width for vertical stripes or the full height for horizontal stripes. Write the number down. Do not trust your memory. Your brain is excellent at remembering embarrassing things you said in 2014, but it cannot always remember whether the wall is 92 inches or 96 inches.
Next, decide how many stripes you want. Divide the wall measurement by the number of stripes to find the width of each stripe. For example, if a wall is 96 inches wide and you want six equal vertical stripes, each stripe will be 16 inches wide.
For alternating colors, decide whether you want the first and last stripe to match. Starting and ending with the same color can create a more symmetrical look. Starting and ending with different colors can feel more casual and modern.
Mark the Stripe Locations
Measure from the same starting point every time, usually one side edge of the wall for vertical stripes or the ceiling or baseboard for horizontal stripes. Make small pencil marks at the top, middle, and bottom of each stripe location.
Use a level or straightedge to connect the marks. Even a wall that looks straight may have slight variations, especially in older homes. The level is the boss here. Your eyes are creative directors, but the level is the project manager.
Account for Painter’s Tape Placement
This is where many DIY stripe projects go slightly sideways. Painter’s tape has width, so do not place it directly over the area you plan to paint without thinking about where the final line will land.
Apply the tape on the outside edge of the stripe you plan to paint. In other words, the tape should protect the base-color area, while the open wall area remains the exact width of your stripe. This keeps your finished stripes consistent and prevents your design from shrinking one tape-width at a time.
Prepare the Wall for Crisp Painted Stripes
Paint shows everything. Dust, greasy fingerprints, loose drywall dust, mystery scuffs, and that one tiny bump you never noticed until it became the center of your decorative wall. Clean the surface before painting.
Wipe the wall gently with a cloth dampened with mild soapy water. Let it dry completely. Fill small nail holes or dents with lightweight spackle, sand lightly once dry, and remove dust before painting.
If the wall is currently dark, highly glossy, stained, or uneven in color, apply a primer or a fresh base coat first. The cleaner and more uniform the base color, the sharper your stripe pattern will look.
Move furniture away from the wall, protect floors with drop cloths, and remove outlet covers if they fall within the painted area. Shut off power before removing electrical cover plates, and keep paint away from switches and outlets.
Step-by-Step: How to Paint Stripes on a Wall
Step 1: Paint the Base Color
Paint the entire wall in the lightest color of your design. A lighter base coat makes it easier to cover selected stripes later and gives you more flexibility with the final pattern.
Allow the base coat to dry according to the paint label before applying painter’s tape. Fresh paint can lift if it has not had enough time to set, and nobody wants their new stripe wall to begin shedding like a flaky croissant.
Step 2: Tape the Stripe Boundaries
Follow your pencil lines and press painter’s tape firmly along the edges. Use a putty knife, plastic card, or clean fingertip to smooth the tape edge against the wall.
Work slowly around corners, trim, and outlets. Long tape runs are easier to manage when applied in shorter sections rather than one giant piece that twists into a sticky ribbon of despair.
Step 3: Seal the Tape Edge
For especially crisp lines, paint a thin coat of the original base color along the edge of the tape before applying the stripe color. If a little paint sneaks under the tape, it will be the base color and will blend into the wall instead of creating a fuzzy border.
Let that sealing coat dry briefly according to the paint instructions. This small step can make the difference between “custom feature wall” and “kindergarten art experiment with excellent intentions.”
Step 4: Paint the Stripes
Use an angled brush to paint narrow edges near tape lines, then use a small roller to fill the center of each stripe. Roll in the direction of the stripe whenever possible. For vertical stripes, roll up and down. For horizontal stripes, roll side to side when practical.
Use light, even pressure. Do not overload the roller. Excess paint is the main reason paint pushes under tape edges. Two thin coats usually look better than one thick coat, especially with rich colors such as red, deep blue, emerald, or charcoal.
Step 5: Remove the Tape Carefully
Remove tape after the final coat has set but before the paint fully hardens into a thick bridge between the wall and tape. Follow your paint label’s guidance, and test one short section first.
Pull the tape slowly at roughly a 45-degree angle, directing it back toward the painted stripe. Do not yank it off like you are starting a lawn mower. Slow removal protects the fresh paint edge and gives you a cleaner reveal.
If paint has dried completely over the tape, lightly score the edge with a sharp utility knife before peeling. Keep the blade shallow and controlled so you cut the paint film, not a surprise groove into your wall.
Color Combinations That Make Striped Walls Look Intentional
Classic Navy and White
Navy and white stripes create a coastal, preppy, and polished look. Use them in a bedroom, bathroom, office, or entryway. Keep accessories simple so the wall remains the star.
Warm White and Beige
For subtle elegance, pair creamy white with warm beige or soft taupe. This combination works well in living rooms, guest rooms, and dining spaces where you want texture without visual overload.
Black and Soft Gray
Black and gray stripes feel modern and graphic. Use wide stripes rather than narrow ones to avoid making the room feel too busy. Add warm wood, linen, brass, or soft cream accents to balance the contrast.
Muted Green and Off-White
Sage, olive, or moss green stripes can make a room feel grounded and relaxed. Pair them with ivory, warm white, or pale wood furniture for a natural look that feels fresh without trying too hard.
Playful Pastels
Soft peach, pale yellow, dusty blue, lavender, and light mint work well in nurseries, kids’ rooms, and creative spaces. Limit the palette to two or three colors so the design stays charming rather than turning into a melted box of crayons.
Common Mistakes When Painting Wall Stripes
Skipping the Layout Math
Uneven end stripes are the most common striped-wall surprise. Measure, divide, and test the pattern with painter’s tape before you begin painting. A five-minute layout check can save you from a three-hour repaint.
Using Too Much Paint Near Tape
Heavy paint application encourages bleed-through. Use a lightly loaded brush or roller near tape edges and build coverage with thin coats.
Ignoring Wall Texture
Textured walls are harder to tape perfectly because tiny grooves create openings under the tape. You can still paint stripes, but expect a softer edge. Use a high-quality tape designed for textured surfaces and accept that perfection may not be the goal.
Waiting Too Long to Remove Tape
Leaving tape on until the paint fully cures may increase the chance of pulling up paint or tearing the edge. Remove it at the recommended stage for your paint, working slowly and checking the line as you go.
How to Fix Small Stripe Wall Imperfections
Even careful DIY painters occasionally get a tiny bleed, a wobbly edge, or a roller mark that appears only after they have cleaned up every tool. This is normal. Do not panic. The wall is not judging you.
Wait until the paint is fully dry, then use a small artist brush to touch up uneven edges with the appropriate color. For a faint bleed, carefully paint over the mistake using the base color. For a larger issue, retape the section and repaint it rather than trying to freestyle a correction with a half-dry brush.
Most stripe wall flaws are visible only from six inches away, which is not how guests experience your home unless they are unusually committed to inspecting drywall.
Safety and Cleanup Tips for Indoor Painting
Open windows when possible and use fans or ventilation to keep fresh air moving through the room. Follow all instructions on the paint label, especially those related to ventilation, drying time, and storage.
Choose paint suited to the room. Washable finishes are useful in hallways, kids’ rooms, and frequently touched areas. In bathrooms or other damp spaces, address any moisture issue before painting rather than using decorative stripes to distract from a leak with a suspiciously strong personality.
Seal paint cans tightly, clean brushes and rollers promptly, and store leftover paint with the color name, room location, and date written on the lid. Future-you will be grateful when a mysterious scuff appears six months later.
Hands-On DIY Experience: What Painting Stripes Really Feels Like
Painting hand-painted stripes on a wall is one of those projects that begins with confidence and ends with you standing three feet back, holding a tape roll, whispering, “Actually, that looks pretty good.” The most memorable part is usually not the painting itself. It is the moment the tape comes off.
In a typical DIY project, the first stripe feels slow because every measurement gets checked twice. The second stripe feels easier. By the third stripe, there is a dangerous burst of confidence. This is the stage where people begin thinking, “Maybe I should stripe the entire house.” Resist that urge until you have finished the first wall and cleaned the paint out of your hair.
One of the biggest lessons is that preparation feels boring right until it saves the project. The wall cleaning, pencil marks, level checks, tape smoothing, and drop cloth setup may seem like unnecessary ceremony. Then one clean tape reveal happens, and suddenly the prep work feels like wisdom passed down from ancient painters who absolutely did not have to deal with smartphone notifications while holding a roller.
Another common experience is realizing that paint colors are shape-shifters. A soft gray stripe can look almost white in morning sun, then become noticeably darker at night. A green that seemed calm at the store can become surprisingly bold against warm flooring. Testing sample paint in the actual room is not overthinking. It is simply avoiding a future conversation that starts with, “Why does this wall look like an avocado?”
DIY painters also learn that painter’s tape is helpful, but it is not magical. Tape cannot compensate for a dusty wall, a rough surface, a flood of paint, or a roller loaded like a jelly doughnut. The best results come from using a modest amount of paint near the edge, sealing the tape line with base color, and removing tape with patience. Slow peeling is oddly satisfying, like opening a very expensive present that you wrapped for yourself.
The final reveal is what makes the project worthwhile. Even a simple two-color stripe wall can change how a room feels. A plain bedroom becomes more personal. A small office gets energy. A child’s room becomes playful. A hallway becomes something other than a place where coats go to disappear.
There may be one crooked pencil mark, a tiny paint bleed near an outlet, or a stripe that looks slightly different only because you have stared at it for two hours. That is part of the experience. A handmade wall should not look factory-produced. It should look intentional, warm, and a little bit proud of itself.
Once the furniture goes back, the room is cleaned, and the paint smell fades, the striped wall usually becomes the detail people notice first. Guests may assume it was expensive or professionally installed. You may choose to smile modestly and say, “Oh, that? Just a little DIY project,” while privately remembering the tape, the math, the tiny panic, and the glorious victory of a clean line.
Final Thoughts
A DIY hand-painted striped wall is an affordable way to make a room feel custom, colorful, and genuinely yours. The process is simple when you break it into stages: choose a stripe design, measure carefully, prepare the wall, tape with precision, paint thin coats, and remove the tape slowly.
Do not rush the layout. Do not overload the roller. Do not trust a crooked line just because it “looks close enough.” With a little patience, hand-painted wall stripes can deliver a high-impact update that feels tailored to your home and far more interesting than another plain beige wall pretending it has a personality.

