
Body Care
Easy DIY Button and Bead Elephant Nursery Wall Art
Aug
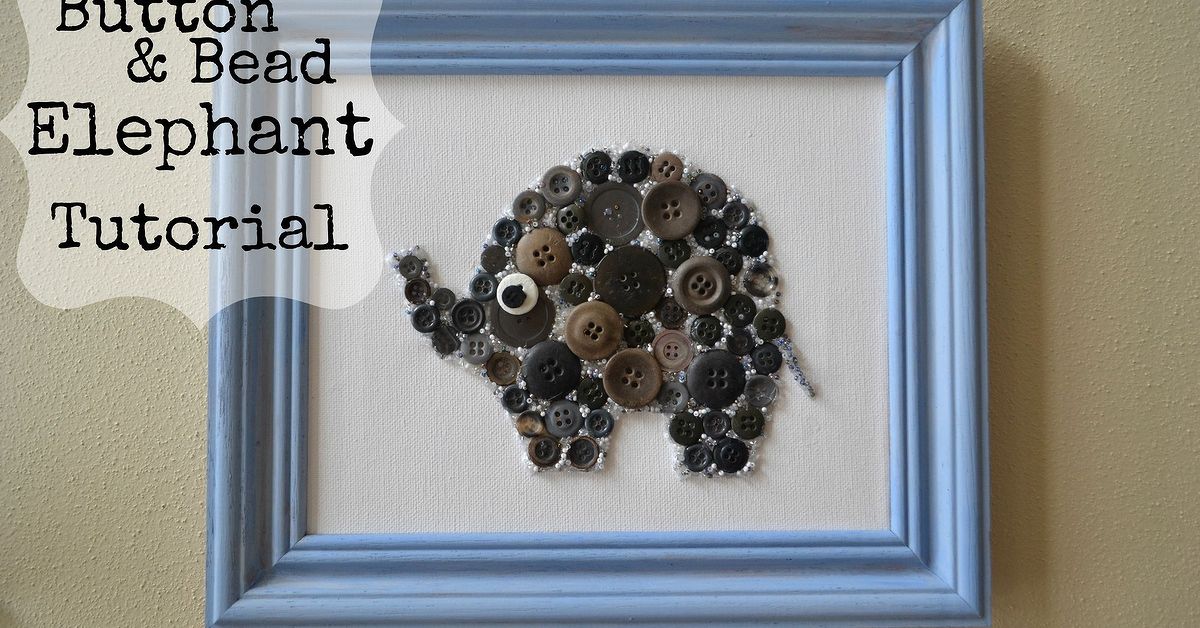
Nursery artwork should feel playful, personal, and soothing without requiring the budget of a tiny royal palace. This easy DIY button and bead elephant nursery wall art checks every box. It transforms an inexpensive canvas, a handful of colorful notions, and a simple elephant outline into textured artwork that looks wonderfully custom.
The project is beginner-friendly, adaptable to almost any nursery color scheme, and forgiving of small imperfections. In fact, slightly mismatched buttons often give the elephant more character. Apparently, elephants also understand that perfectly coordinated outfits are overrated.
This tutorial explains how to choose materials, create a balanced design, attach the embellishments securely, personalize the artwork, and hang it safely. No advanced drawing skills are necessary, and there is no need to sew a single button.
Why Button and Bead Elephant Art Works in a Nursery
Elephants remain popular in nursery decor because their rounded shapes, oversized ears, and gentle expressions translate naturally into friendly artwork. They also complement safari, woodland, bohemian, modern, gender-neutral, and traditional baby-room themes.
Buttons establish the main shape and provide bold areas of color. Smaller beads fill awkward gaps and create highlights around the ear, trunk, feet, or tail. The combination produces more visual depth than a flat painting while remaining simple enough for a first-time crafter.
Handmade wall art can also connect the nursery palette without making every item identical. A gray elephant might contain a few sage, cream, and dusty-blue buttons that echo the rug, curtains, and crib sheet. That subtle repetition helps the room feel coordinated rather than suspiciously matched by a committee.
Materials and Tools
A 12-by-16-inch canvas is a practical size for this project. It provides enough room for details but does not require hundreds of buttons. For denser embellishment or a larger statement piece, use a 16-by-20-inch canvas.
Essential supplies
- One stretched canvas or rigid canvas panel
- A simple side-profile elephant template
- Assorted flat-backed buttons in several sizes
- Seed beads, pony beads, flat pearls, or small craft gems
- Water-based acrylic craft paint
- A wide flat paintbrush and a small detail brush
- Thick tacky craft glue suitable for fabric or canvas
- Transfer paper, chalk, or a soft graphite pencil
- Painter’s tape
- Tweezers or a wax-tipped bead picker
- Paper plates or shallow containers for sorting
- Picture-hanging hardware appropriate for the wall
Choose buttons with mostly flat backs. Shank buttons can be used as accents, but their raised loops prevent them from resting evenly on the canvas. If the design will be heavily covered with glass beads or metal embellishments, choose a rigid canvas panel or place firm support behind a stretched canvas while working.
Choosing an adhesive
A thick, clear-drying tacky glue provides control and allows a short repositioning window. Hot glue works quickly, but it should be handled only by an adult and can leave bulky ridges beneath small beads. Whichever adhesive you select, read its label, confirm that it is appropriate for the materials, and follow the stated drying and ventilation instructions.
Elmer’s demonstrates that buttons and beads can be glued to decorative craft surfaces, while beginner button-art guides commonly recommend painting and drying the background before attaching embellishments. Testing the entire combination on a spare button and a scrap of painted canvas is still wise. Adhesives have personalities, and a few of them are surprisingly dramatic.
Plan the Elephant Design
Start with a clean silhouette rather than an anatomically complicated elephant. A rounded body, large ear, short legs, curved trunk, and small tail will remain recognizable after the shape is filled with buttons.
Print the template at the approximate finished size. Place it on the canvas and check the proportions before tracing. Leave at least 1.5 inches of open space around the elephant so the artwork does not feel crowded. If a name or birth date will be added, reserve a wider margin beneath or above the animal.
Select a nursery-friendly palette
Limit the main palette to three or four colors for a polished result. Variations within those colors can provide plenty of interest.
- Modern neutral: gray, ivory, taupe, and pale wood
- Soft botanical: sage, cream, muted gold, and dusty blue
- Playful pastel: blush, lavender, mint, and butter yellow
- Colorful safari: teal, coral, mustard, and navy
- Monochromatic: several shades of blue, green, pink, or gray
Sorting the buttons before gluing saves time and reveals whether one color is dominating the collection. Separate large, medium, and small pieces into shallow dishes. Keep the tiniest beads in a container with raised sides unless you enjoy discovering them under furniture until the child starts kindergarten.
How to Make DIY Button and Bead Elephant Wall Art
1. Prepare and paint the canvas
Protect the work surface and apply one or two thin coats of acrylic paint to the front and visible edges of the canvas. A foam brush creates a smooth finish, while a bristle brush leaves subtle texture. Let each coat dry completely before continuing.
White, cream, pale gray, and very light blue make reliable backgrounds because they allow the embellishments to stand out. A darker background can be striking, but confirm that the elephant colors provide enough contrast.
2. Transfer the elephant outline
Center the printed template and secure one edge with painter’s tape. Slide transfer paper beneath it and trace the major lines with gentle pressure. Alternatively, shade the back of the template with graphite, tape it in position, and trace over the outline.
Keep the transferred line faint. It only needs to guide button placement. Include the body, ear, legs, trunk, and tail, but skip tiny features that will disappear beneath the embellishments.
3. Create a complete dry layout
Arrange the buttons without glue. Begin with larger pieces along the body and ear, where broad shapes can accommodate them. Use medium buttons around curved areas and save the smallest pieces for the trunk, feet, and tail.
Stay slightly inside the traced outline. Buttons that extend too far beyond it can make the silhouette appear lumpy. An elephant may be large, but it should not look as though it swallowed a sofa.
Place buttons close together without forcing every space closed. Small gaps create breathing room and can later be filled with beads. When the composition looks balanced, take a clear photograph. The photo becomes a reference if an accidental elbow, curious cat, or sudden sneeze rearranges the entire herd.
4. Glue the buttons in manageable sections
Work from the center outward in sections approximately the size of your palm. Lift one button, place a modest dot of adhesive on its back, and return it to the layout. Press gently without squeezing glue around the edges.
Support the back of a stretched canvas while pressing. A book wrapped in parchment paper or a clean rigid board can provide a temporary working surface beneath the fabric. Continue until the large and medium buttons are secured.
Recheck the silhouette every few minutes. It is easier to correct the curve of the back or trunk while the adhesive remains workable than after it has cured.
5. Fill gaps with beads and small accents
Use tweezers or a bead picker to place beads between buttons. Add them selectively instead of packing every opening. Controlled negative space keeps the design from looking overly busy and reduces its finished weight.
A dark bead can form the eye. Three or four pale beads may highlight the ear, while a short line of tiny beads can define the trunk. Flat pearls produce a soft, elegant effect; seed beads add sparkle; and wooden beads suit a natural or bohemian nursery.
6. Add optional personalized details
Paint the baby’s first name, initials, or birth date beneath the elephant using a small brush or stencil. Other possibilities include a tiny button heart, three floating balloons, a crown, stars, flowers, or a moon.
Keep these additions visually lighter than the elephant. One focal point is charming; six focal points look like the nursery art has started an argument with itself.
7. Let the artwork cure flat
Leave the finished canvas on a level surface for the full curing period specified by the adhesive manufacturer. Dry to the touch does not necessarily mean fully cured. Avoid standing the piece upright too early, because gravity is extremely patient.
Once cured, gently test several buttons around the outline. Reglue anything that shifts. A clear protective coating is optional and should only be used if it is compatible with the paint, adhesive, buttons, and beads. Test it first because some finishes can cloud plastic or alter its color.
Framing and Display Options
A stretched canvas can be displayed without a frame for a clean, lightweight finish. A simple floating frame gives it a more polished appearance. If the elephant is created on a canvas panel, consider a deep shadow-box frame that leaves space between the embellishments and glazing.
Do not force raised buttons beneath ordinary picture-frame glass. Pressure can crack beads, weaken adhesive bonds, or distort the backing. If using a shadow box, fasten the artwork securely inside the frame rather than relying on loose tabs.
Use picture-hanging hardware rated for the finished weight and compatible with the wall material. Drywall may require an anchor or specialized hanger, while masonry, plaster, and wood call for different fasteners. The Home Depot’s hanging guidance recommends measuring, leveling, and selecting hardware suited to both the object and wall.
Common Problems and Easy Fixes
The elephant outline looks uneven
Step back several feet or photograph the canvas. Distance makes irregular curves easier to spot. Adjust the outermost buttons before filling internal gaps. Small beads can smooth a curve, but they cannot completely rescue a badly wandering trunk.
The buttons keep sliding
The adhesive may be too thin, too plentiful, or unsuitable for one of the surfaces. Remove excess glue, work with the canvas flat, and allow one section to set before rotating the piece. A thicker tacky adhesive generally offers better initial grip.
The design looks cluttered
Remove several decorative buttons and repeat a few plain shapes or colors. Consistency gives the eye somewhere to rest. Leaving narrow spaces between selected pieces can also improve clarity.
The background shows through too much
Add seed beads only in the most distracting gaps. Another option is to paint the elephant silhouette in a color similar to the buttons before gluing. Any remaining spaces will then blend into the design instead of appearing unfinished.
Research Note
This original tutorial synthesizes established craft, decorating, and safety guidance from Martha Stewart, Better Homes & Gardens, The Spruce Crafts, Crayola, the U.S. Consumer Product Safety Commission, The Home Depot, Elmer’s, Mod Podge Rocks, Michaels, HGTV, and Apartment Therapy.
Practical Experience Notes From the Craft Table
The most useful lesson from button-and-bead projects is that preparation affects the finished result more than artistic talent. Beginners often want to start gluing immediately because arranging colorful buttons feels like the easy part. A complete dry layout, however, prevents most of the problems that later make a design look unbalanced.
Large buttons should be introduced first, but they should not all gather in the elephant’s belly. Spreading them between the body, head, and ear creates a visual rhythm. Medium buttons then connect those larger shapes, while beads perform the final detail work. Reversing that order usually leads to frustration because carefully positioned beads must be moved whenever a larger button refuses to fit.
Another recurring experience is that the elephant looks different from across the room. Up close, the eye notices every tiny opening and slightly crooked button. From the nursery doorway, those details merge into a clear silhouette. Checking the canvas from several feet away is therefore more valuable than trying to eliminate every microscopic gap.
Color balance can also change during assembly. A button mixture that appears mostly sage green in a container may become surprisingly yellow once spread across a cream canvas. Photographing the dry arrangement in natural light helps reveal dominant colors. Converting the photograph to grayscale is another useful trick: if the head, ear, and body blend into one shapeless patch, add contrast through button size or value.
Glue control is the less glamorous secret behind attractive button art. Oversized blobs make lightweight buttons float, tilt, and slide. Small controlled dots create cleaner bonds and reduce shiny residue. A toothpick can deliver adhesive to tiny beads with far more precision than a large bottle nozzle. It is slower, but so is removing dried glue with the determination of an archaeologist.
Working in short sessions often produces better results than completing the project in one marathon. Paint the background during one session, plan the layout during another, and glue when there is enough time to work calmly. This approach also allows the materials to dry properly and makes the project manageable for expectant parents with busy schedules.
Personalization works best when it supports the elephant instead of competing with it. A small painted name, one button heart, or a few stars generally feels more timeless than numerous slogans and decorative motifs. Nursery preferences can change quickly, while a simple animal silhouette may continue working in a toddler’s room or reading corner.
Finally, successful nursery wall art must be treated as more than a craft project. Inspect every bond after curing, use dependable hanging hardware, and choose a display location outside the child’s reach. Recheck the piece periodically as the baby grows and furniture moves. A newborn who cannot lift their head eventually becomes a toddler capable of climbing furniture with the confidence of a professional stunt performer.
The finished elephant does not need factory-perfect spacing to feel special. Its variations are evidence that someone selected, arranged, and attached every little piece by hand. That combination of texture, care, and personality is precisely what makes easy DIY button and bead elephant nursery wall art such a memorable addition to a baby’s room.

