
Makeup
How to Do a Reverse French Braid: 5 Steps
Jul
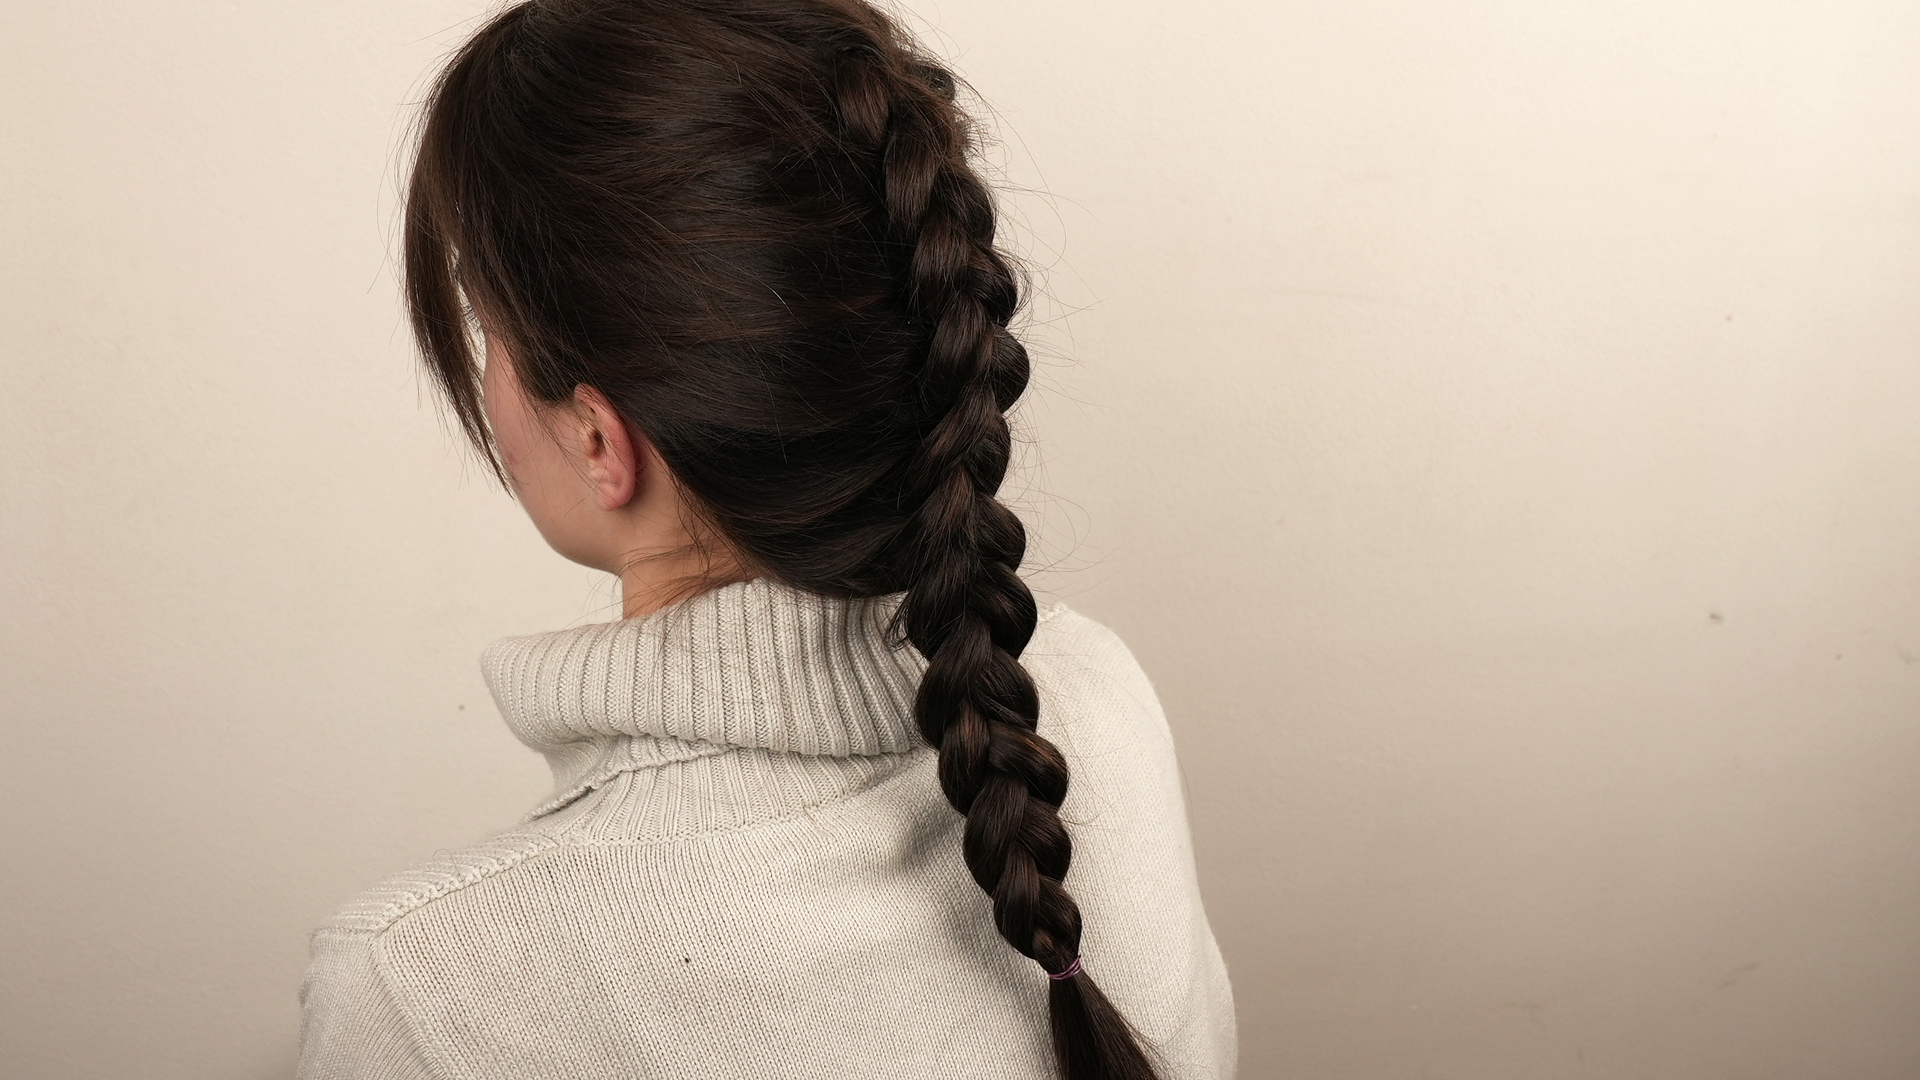
A reverse French braid sounds like something invented by a hairstylist with three mirrors, five hands, and a dramatic playlist. Good news: it is much simpler than it looks. Also called a Dutch braid or inside-out French braid, this raised, beautiful braid is created by crossing hair sections under the middle strand instead of over it.
The result is that signature braid-on-top effect: polished enough for school, work, brunch, workouts, weddings, and “I washed my hair two days ago but nobody needs to know” moments. Once you understand the rhythm, the reverse French braid becomes one of the most useful hairstyles in your personal beauty toolbox.
What Is a Reverse French Braid?
A reverse French braid is basically the French braid’s cooler cousin who wears sunglasses indoors but somehow pulls it off. In a traditional French braid, the side sections cross over the center strand. In a reverse French braid, the side sections cross under the center strand. That one change makes the braid sit visibly on top of the hair instead of blending into it.
This braid is also widely known as a Dutch braid. If you have heard terms like “boxer braids,” “inside-out braid,” or “3D braid,” they often refer to variations of the same underhand braiding technique. You can wear one reverse French braid down the center of your head, two braids parted down the middle, a side braid, a crown braid, or even a reverse French braid ponytail.
The best part? It works on many hair textures and lengths, although medium to long hair usually gives the easiest learning experience. Shorter layers may need more styling cream, pins, or patience. Patience, unfortunately, is not sold in a bottle. If it were, it would be next to the dry shampoo.
Why Learn How to Do a Reverse French Braid?
Learning how to do a reverse French braid gives you a hairstyle that is practical, pretty, and surprisingly adaptable. It keeps hair out of your face, adds texture and shape, and can look sleek or casual depending on how tightly you braid and how much you loosen the braid afterward.
It is also a heat-free hairstyle, which makes it useful for days when you want a break from curling irons, straighteners, and blow dryers. If you leave the braid in for a few hours, you may even get soft waves after taking it out, especially if your hair has natural texture or you braid it while slightly damp.
Best Occasions for a Reverse French Braid
A reverse French braid works well for everyday wear, workouts, travel days, second-day hair, festivals, casual parties, and even formal events when styled neatly. Add a ribbon, decorative pins, a low bun, or a wrapped ponytail, and suddenly the braid goes from “running errands” to “yes, I totally planned this look.”
Before You Start: Tools and Prep
You do not need a salon station to create a reverse French braid. You need a brush or wide-tooth comb, a hair elastic, and optionally a styling cream, lightweight gel, texture spray, serum, or hair spray. A mirror helps. Two mirrors help more. A friend with calm hands helps most, but let’s assume independence is the goal.
Start with detangled hair. Knots are the tiny villains of braiding. Brush from the ends upward to avoid unnecessary pulling, especially if your hair is fragile, curly, bleached, or prone to breakage. If your hair is freshly washed and slippery, add a small amount of texture spray or styling cream for grip. If your hair is dry or frizzy, use a little smoothing serum on the mid-lengths and ends.
Should Hair Be Wet or Dry?
Dry hair is usually easier for beginners because you can feel the sections more clearly. Slightly damp hair can create a smoother braid and stronger waves later, but it may also tangle if you pull too hard. Avoid braiding soaking-wet hair tightly, because wet hair can be more vulnerable to stretching and breakage.
A Quick Comfort Rule
Your braid should feel secure, not painful. If your scalp feels sore, your hairline feels strained, or you notice tiny bumps after wearing tight braids, loosen the style. A reverse French braid can look polished without turning your scalp into a tug-of-war arena.
How to Do a Reverse French Braid in 5 Steps
Step 1: Brush, Part, and Choose Your Starting Section
Begin by brushing or combing your hair until it is smooth enough to separate cleanly. Decide where you want the braid to start. For a classic single reverse French braid, begin near the front hairline or crown. For double reverse French braids, part the hair down the center and clip one side away while you work on the other.
Take a small triangle or rectangular section of hair near the front of your head. Divide that section into three equal strands: left, middle, and right. Try to keep the strands similar in size. Uneven sections are not a disaster, but they can make the braid look a little like it made its own creative decisions.
Step 2: Cross the Right Strand Under the Middle
Take the right strand and cross it under the middle strand. The right strand now becomes the new middle strand. This “under” movement is the key difference between a reverse French braid and a regular French braid.
Beginners often accidentally cross over because muscle memory loves to sabotage personal growth. Say “under, under, under” in your head if you need to. It may feel silly, but so does redoing half a braid because your hands went rogue.
Step 3: Cross the Left Strand Under the Middle
Now take the left strand and cross it under the new middle strand. You have created the first full stitch of the reverse braid. Keep your hands close to your scalp so the braid stays neat and follows the shape of your head.
At this stage, focus on the pattern, not perfection. The braid may look small and unimpressive at first. That is normal. Braids are like pancakes: the first one is often a little weird, but it still counts as progress.
Step 4: Add Hair to Each Side Before Crossing Under
Here is where the reverse French braid becomes a real scalp braid. Before crossing the right strand under the middle again, pick up a small section of loose hair from the right side and add it to the right strand. Then cross the combined right strand under the middle.
Repeat on the left side. Pick up a small section of loose hair from the left side, add it to the left strand, and cross the combined left strand under the middle. Continue this pattern as you move down the head: add hair, cross under, add hair, cross under.
For the neatest look, try to add similar amounts of hair each time. Smaller additions create a tighter, more detailed braid. Larger additions create a chunkier, faster braid. Neither is wrong; one is just more “sleek ballet recital,” while the other is more “effortless coffee-run chic.”
Step 5: Finish, Secure, and Gently Loosen
Once you reach the nape of your neck and have added all loose hair into the braid, continue with a regular three-strand braid using the same underhand motion. Braid down to the ends, then secure with a small elastic.
For a fuller look, gently tug the outer edges of the braid. This technique is often called pancaking. Pull slowly and evenly from the bottom upward. Do not yank the braid apart like you are opening a stubborn snack bag. A little loosening gives the braid volume, softness, and that “I woke up talented” finish.
Common Reverse French Braid Mistakes and How to Fix Them
Mistake 1: Crossing Over Instead of Under
If your braid disappears into the hair instead of sitting on top, you are probably crossing the side strands over the middle. Reset your hands and remember: outside strand goes under the middle strand every time.
Mistake 2: Adding Too Much Hair at Once
Large sections can make the braid look uneven or lumpy. Try picking up smaller, cleaner pieces from each side. This gives you more control and helps the braid follow a smoother path.
Mistake 3: Holding the Hair Too Loosely
If your braid collapses before you secure it, keep your fingers closer to the scalp and maintain gentle tension. The goal is controlled, not tight enough to make your eyebrows question their future.
Mistake 4: Starting With Slippery Hair
Freshly conditioned hair can be too silky for braiding. Add a tiny amount of dry shampoo, texture spray, mousse, or styling cream to give the strands more grip. Second-day hair is often easier to braid than freshly washed hair.
Mistake 5: Giving Up Too Soon
The first few attempts may look more “abstract rope sculpture” than Pinterest masterpiece. That is normal. Reverse French braiding is a hand-skill, and hand-skills improve with repetition. Practice when you are not in a rush, because panic-braiding five minutes before leaving the house is a sport nobody wins.
Tips for Different Hair Types
Fine Hair
Fine hair can look fuller with a little texture spray before braiding and gentle pancaking afterward. Avoid heavy oils near the roots because they may flatten the braid. Clear elastics work well because they are less noticeable.
Thick Hair
Thick hair may need stronger clips and elastics. Work in clean sections and keep the strand sizes balanced. If your arms get tired, pause at the nape, secure the braid temporarily, and continue after a quick stretch. Hairstyling should not require a gym membership, but sometimes thick hair has other plans.
Curly or Coily Hair
Curly and coily hair often benefits from moisture and slip before braiding. Use a leave-in conditioner, curl cream, or light gel that suits your hair type. Detangle gently and avoid pulling the braid too tightly at the hairline. A reverse French braid can look beautiful with natural texture, so do not feel pressured to smooth every curl into submission.
Layered Hair
Layers may poke out of the braid, especially around the face and crown. Use a styling cream or pomade to control shorter pieces. Bobby pins can tuck in stubborn strands. Or let a few pieces fall naturally for a softer, romantic look. Sometimes “messy” is just “styled with confidence.”
Reverse French Braid Variations to Try
Classic Single Reverse French Braid
This is the standard version: one braid running from the front or crown down the back of the head. It is simple, balanced, and works for casual or dressed-up looks.
Double Reverse French Braids
Part the hair down the middle and create one reverse French braid on each side. This style is secure, sporty, and excellent for keeping hair in place. It is also popular for workouts, school days, and travel.
Side Reverse French Braid
Start near one temple and braid diagonally toward the opposite side. This creates a softer, more romantic shape and works beautifully with loose waves or a low bun.
Reverse French Braid Ponytail
Braid from the front to the crown or nape, then secure the remaining hair into a ponytail. Wrap a small piece of hair around the elastic for a more polished finish.
Reverse French Braid Bun
After braiding to the nape, twist the remaining hair into a bun and pin it in place. This variation is great for formal events, hot weather, or days when you want your hair completely off your neck.
How to Make Your Reverse French Braid Last Longer
To help your reverse French braid last, begin with hair that has some grip. Use a light styling product before braiding and finish with flexible-hold hairspray if needed. Avoid touching the braid constantly, because fingers can loosen the structure and add frizz.
If you plan to sleep in the braid, use a soft scrunchie or gentle elastic at the end. A silk or satin pillowcase can help reduce friction. In the morning, smooth flyaways with a tiny amount of serum or cream, then gently tighten or pin any loose areas.
For a softer second-day look, loosen the braid slightly and pull out a few face-framing pieces. For a cleaner look, redo only the front section and blend it into the existing braid. This little refresh can make the style look intentional instead of “survived the night and saw things.”
Experience-Based Tips: What Really Helps When Learning a Reverse French Braid
The biggest lesson from learning how to do a reverse French braid is that your hands need time to understand what your brain already knows. Reading the steps is easy. Actually making your fingers hold three sections, add new hair, cross under, and not drop everything like a startled raccoon takes practice.
One helpful experience is to practice the motion on someone else first, a wig, or even three thick ribbons tied to a chair. That sounds dramatic, but it trains the pattern without forcing your arms over your head. Once the underhand motion feels natural, doing it on your own hair becomes much easier.
Another practical tip is to start with a side reverse French braid instead of a straight-back braid. A side braid lets you see more of what you are doing in the mirror. It also reduces arm fatigue, which is real. There is a specific moment in every beginner’s journey when both arms are in the air and one thinks, “So this is how fitness begins.”
Product choice matters too. Extremely clean hair can slip out of your fingers, while heavily oiled hair can feel too slick or weighed down. The sweet spot is hair with a little texture. Second-day hair, a touch of dry shampoo, or a lightweight styling cream can make the braid easier to control. For frizz-prone hair, smoothing the outer layer before braiding helps the finished style look cleaner.
Section size is another detail beginners often overlook. If the added pieces are too big, the braid may look bulky at the top and thin at the bottom. If the pieces are too tiny, the braid may take forever and test your emotional stability. Aim for medium, even sections until your hands get faster.
It also helps to braid with your elbows pointing downward as much as possible. Many beginners raise their elbows too high and create unnecessary tension in their shoulders. Keep your hands close to your scalp, move slowly, and pause when needed. The braid will not file a complaint if you take a break.
When the braid looks uneven, resist the urge to destroy it immediately. Sometimes a braid that looks questionable halfway through becomes surprisingly cute after you secure it and gently pull the edges. Pancaking can hide minor unevenness and make the braid look fuller. Think of it as photo editing, but with hair and fewer questionable filters.
Finally, remember that a reverse French braid does not need to be perfect to be wearable. A slightly loose braid can look relaxed and stylish. A few face-framing pieces can make the style softer. A decorative clip can distract from a bumpy section. Confidence is the final accessory, and unlike elastics, it does not vanish mysteriously into the bathroom drawer.
Conclusion
Mastering how to do a reverse French braid comes down to one simple rule: cross the strands under the middle, not over. Once that movement clicks, the rest becomes a rhythm of adding hair, crossing under, and working down the head until the braid takes shape.
This hairstyle is popular because it is practical, attractive, heat-free, and flexible enough for many occasions. Whether you want a sleek single braid, sporty double braids, a romantic side braid, or a braided bun, the reverse French braid gives you a strong foundation to build on.
Be patient with your first attempts. Your first braid may not belong on a magazine cover, but it belongs in the learning process. Keep practicing, use the right prep products for your hair type, avoid painful tension, and let the braid be a little imperfect when needed. After all, hair is supposed to move, live, and occasionally have a sense of humor.
SEO Tags

