Body Care
Any Old TV Can Be A Clock With Arduino
Jun
Note: This article is original, publication-ready editorial content synthesized from real Arduino, RTC, composite video, and maker-project information, without source-link markup or citation artifacts.
Somewhere in a closet, garage, thrift store, or suspiciously dusty corner of your grandparents’ house, there is an old television waiting for its comeback tour. It may not stream 4K movies. It may not understand Wi-Fi. It may not even know what an app is. But give it an Arduino, a bit of composite video magic, and a real-time clock module, and that forgotten screen can become a gloriously retro digital clock.
The idea behind “Any Old TV Can Be A Clock With Arduino” is wonderfully simple: instead of buying another tiny desk clock or yet another smart display that asks for your email address before showing the time, you can reuse an old TV as a big, readable, personality-packed clock. The project combines the charm of vintage electronics with the flexibility of Arduino programming, creating a functional display that feels part science experiment, part home decor, and part “I found this in the basement and gave it a job.”
At its core, this project is about generating a video signal from an Arduino and sending that signal to a television’s composite video input. With the right library, an Arduino board can output simple black-and-white graphics, text, and shapes. Add a real-time clock module such as the DS3231, and the TV can show accurate time even after the Arduino has been unplugged. Suddenly, the old TV is not obsolete. It is a clock with dramatic screen presence.
Why Turn an Old TV Into an Arduino Clock?
Because it is useful, nostalgic, and just a little ridiculousin the best possible way. Modern clocks are everywhere, but most are forgettable. A clock made from an old television has character. It glows. It hums. It makes people ask questions. It turns “What time is it?” into “Why is that TV judging me from across the room?”
There is also a practical maker-friendly reason: old TVs with composite video inputs are surprisingly easy to use as displays. Composite video is the familiar yellow RCA connector found on many older televisions, VCRs, DVD players, game consoles, and security monitors. It carries a standard-definition video signal over one cable. For an Arduino clock, that is more than enough.
Unlike HDMI displays, which require complex digital signaling, composite video is low-resolution and analog. That makes it friendly to small microcontrollers, especially classic AVR-based boards like the Arduino Uno or Nano. The result will not look like a modern retina display, but that is the charm. Big blocky digits on a vintage TV screen look intentional, like the user interface of a spaceship built in 1983.
How the Arduino Makes Video
An Arduino is not a graphics card. It does not have a powerful GPU, a huge frame buffer, or the ability to render cinematic explosions unless those explosions are made of tiny monochrome pixels. But with clever timing, it can generate a basic composite video signal.
Libraries such as TVout use carefully timed interrupts to produce NTSC or PAL video. NTSC is common in the United States, while PAL is used in many other regions. The Arduino rapidly switches output pins to create sync pulses and video levels that a television can interpret. In plain English: the Arduino wiggles electricity at exactly the right rhythm, and the old TV says, “Ah yes, television.”
The typical TVout-style setup uses a small resistor network between the Arduino pins and the composite input. This helps create the voltage levels needed for the video signal. The output is usually black and white, with a modest resolution such as 128 by 96 pixels. That sounds tiny, but for a clock it is plenty. You only need numbers, maybe a date, maybe a blinking colon, and perhaps a decorative border if you are feeling fancy.
The Parts Behind the Project
1. An Arduino Board
The classic choice is an Arduino Uno or Nano using an AVR microcontroller. These boards are popular because the TVout library ecosystem was built around that family of chips. They are inexpensive, widely documented, and forgiving enough for weekend tinkering. A Nano is especially nice if you want to tuck the electronics inside a small project box behind the TV.
2. An Old TV With Composite Input
The television needs a composite video input, usually the yellow RCA jack. Many CRT televisions have one on the front or back. Older flat-panel TVs may have composite too, though newer models increasingly leave it out. If the TV has only HDMI, this specific Arduino video trick becomes more complicated and may require converters or a different approach.
Important safety reminder: do not open a CRT television unless you are trained to work around high-voltage electronics. A tube TV can hold dangerous voltages even after it is unplugged. For this project, you only need to connect to the external video input. The best way to modify a CRT is usually not to modify it at all.
3. A Real-Time Clock Module
An Arduino can count milliseconds after it powers up, but it does not naturally know the actual time. If you unplug it, it forgets. That is where a real-time clock, or RTC, comes in. The DS3231 module is a favorite for Arduino clocks because it communicates over I2C, keeps time accurately, and can run from a coin-cell backup battery.
The DS3231 includes a temperature-compensated crystal oscillator, which helps it keep better time than many cheaper clock modules. For a display clock, that matters. Nobody wants a clock that slowly drifts into its own private time zone.
4. A Few Resistors and an RCA Cable
The video output circuit is usually simple, often involving only a couple of resistors and an RCA connector or cable. The resistors help combine sync and video signals into something the TV understands. This is one of the reasons the project feels magical: the bridge between microcontroller and television can be built with pocket-change components.
5. Optional Buttons or Controls
Buttons can be added for setting the time, switching between 12-hour and 24-hour formats, changing display modes, or activating a dimmer screen. A basic version can be programmed once and left alone, but controls make the clock more convenient for everyday use.
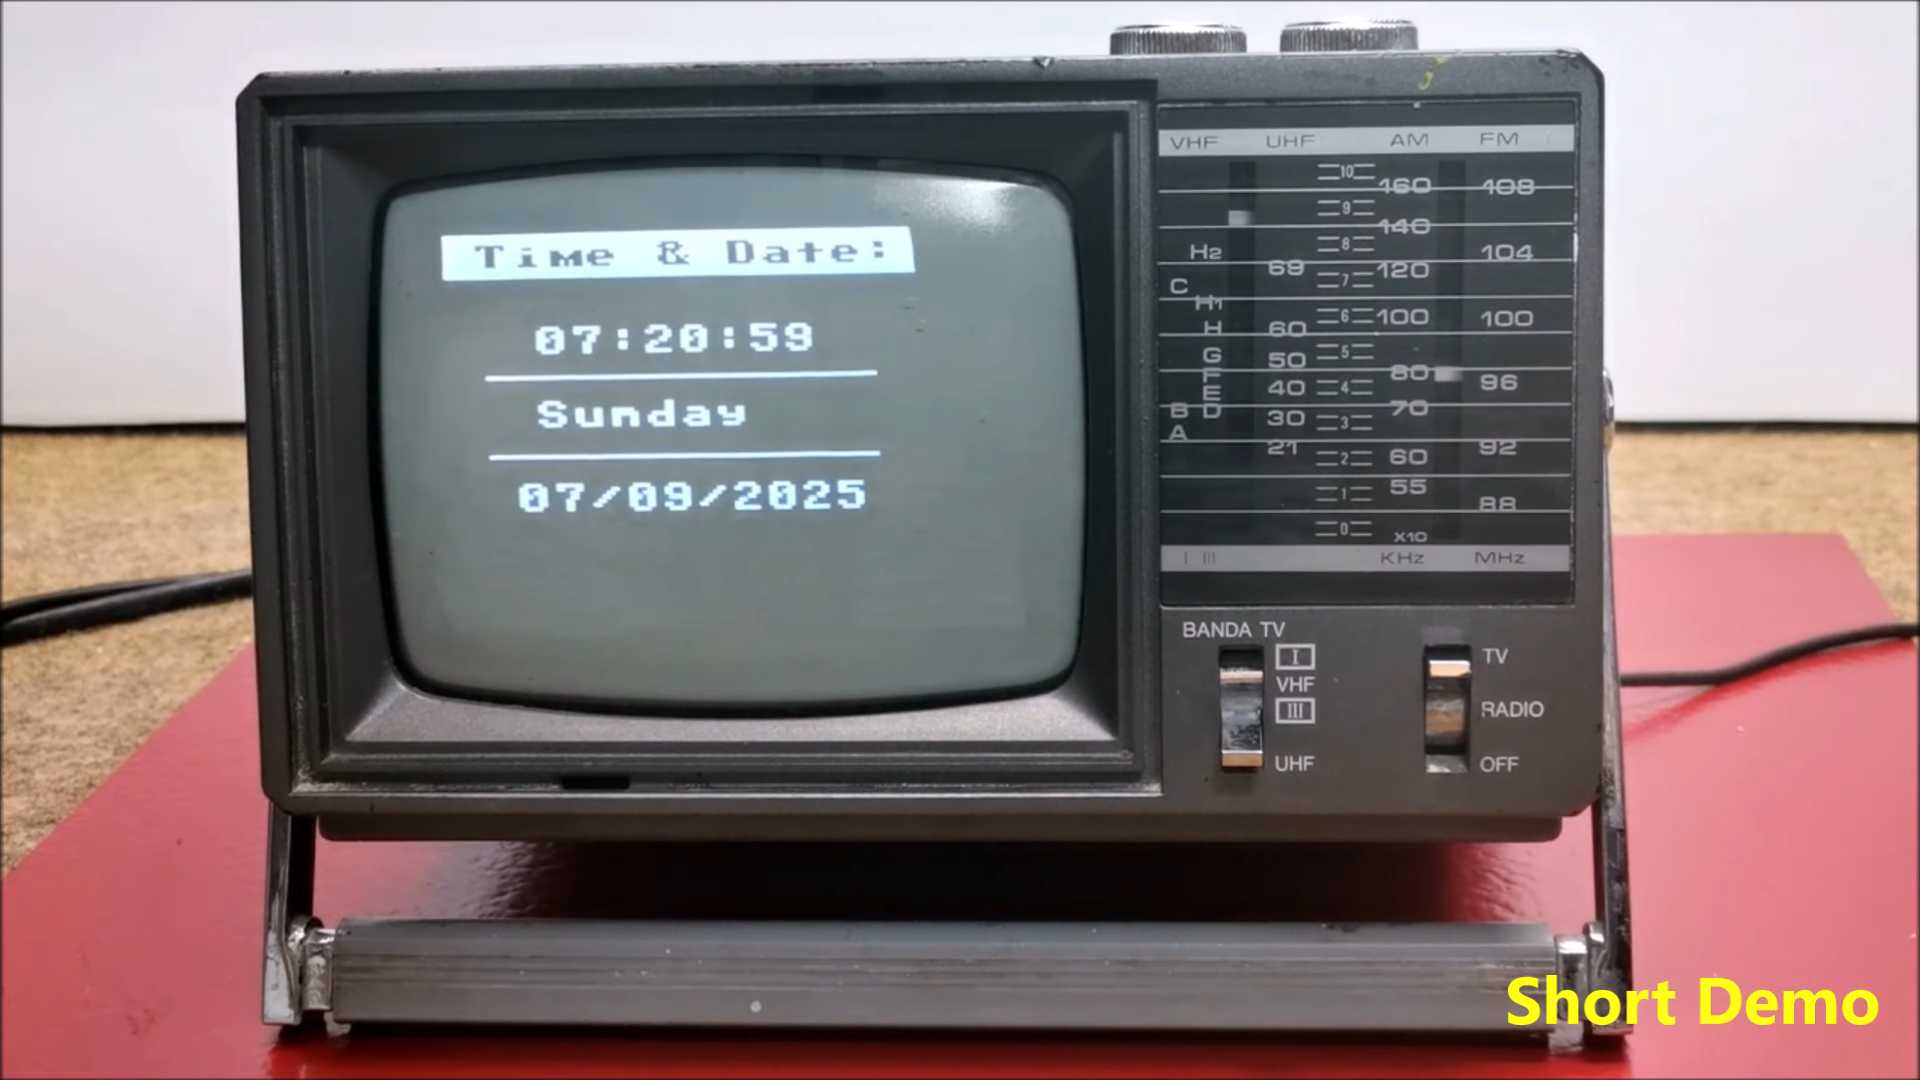
What the Clock Can Display
The obvious answer is the time, but that is only the beginning. Since the screen is controlled by code, the Arduino can draw different layouts. It can show hours and minutes in large digits, seconds in a smaller corner, the date underneath, or even a tiny animated icon that blinks once per second like it is proud of itself.
A simple display might look like a giant digital alarm clock:
A more playful version could use a retro terminal style:
The low resolution encourages creativity. You cannot rely on smooth curves or detailed graphics, so you design with bold shapes, readable fonts, and high contrast. In a strange way, the limitations make the project better. It forces the clock to have a style instead of becoming another boring rectangle of pixels.
Why TVout Works So Well for a Clock
TVout-style video output is not ideal for everything. It is not meant for high-resolution photography, colorful dashboards, or watching videos. But for a clock, it is a great fit. A clock display changes slowly. The digits update once per second or once per minute. The graphics can be simple. The TV does most of the visual heavy lifting by turning that little signal into a large glowing display.
The Arduino’s limited memory also matters. On an Arduino Uno, memory is precious. A full-screen buffer at even a modest resolution takes up a meaningful amount of RAM. That is why clock graphics should stay efficient. Large numeric characters can be drawn from simple shapes, stored bitmaps, or library fonts. Clean design beats clutter every time.
Design Ideas for a Better Arduino TV Clock
Go Big With the Digits
If the clock is across the room, size matters. Use large, chunky numbers that are easy to read from a couch, workbench, or kitchen table. A tiny elegant font may look nice in code, but from ten feet away it becomes pixel soup.
Add a Screen Saver Mode
Old displays can suffer from burn-in if the same bright image sits in one place for long periods. A good Arduino TV clock should move the display slightly, invert colors occasionally, or dim during certain hours. A slow bouncing clock layout can look charming and help reduce static image wear.
Use a Retro Theme
The screen already feels vintage, so lean into it. Add scanline-inspired borders, terminal-style labels, blocky numerals, or a fake “system boot” message when the Arduino powers on. A clock that says “INITIALIZING TEMPORAL DISPLAY” is objectively more fun than one that just says “12:00.”
Include Date and Day
The time is useful, but the date makes the clock feel finished. Showing the day of the week is especially helpful in workshops, dorm rooms, and home offices where time can become a mysterious fog.
Add Alarm or Chime Features
With a small buzzer, the Arduino can become an alarm clock. With a relay or transistor-controlled output, it could trigger a lamp or another low-voltage accessory. Keep the project safe and low-voltage, and avoid directly switching household AC unless you know exactly what you are doing and use properly rated modules.
Common Challenges and How to Think About Them
The TV Shows No Signal
This usually means the TV is on the wrong input, the video connection is incorrect, the region format is wrong, or the sketch is not outputting video properly. NTSC and PAL settings matter. A U.S. television generally expects NTSC. A mismatch can produce rolling, unstable, or absent video.
The Image Rolls or Flickers
Composite video is timing-sensitive. If the Arduino code spends too much time doing other tasks, the video timing can suffer. Libraries that generate video often rely heavily on interrupts, so avoid adding code that blocks for long periods. Keep the clock update logic simple and efficient.
The Clock Loses Time
If the project uses only the Arduino’s internal timing, it may drift or reset when power is removed. A DS3231 RTC module solves this by keeping time independently. Make sure the backup coin cell is installed correctly and that the code reads time from the RTC instead of merely counting seconds after startup.
The Text Is Hard to Read
Composite video on an old TV is not razor-sharp. Use bold layouts, generous spacing, and simple characters. Avoid tiny text, thin lines, and overcrowded screens. This is a clock, not a spreadsheet. The TV did not retire from Saturday morning cartoons just to display columns.
Why This Project Is Great for Learning
An Arduino TV clock teaches several useful electronics and programming concepts without becoming overwhelming. You learn how microcontrollers communicate with displays, how timing affects video signals, how I2C devices like RTC modules work, and how to design a readable user interface with limited pixels.
It also teaches an underrated maker skill: restraint. When resources are limited, you cannot add everything. You decide what matters. Big digits matter. Accurate time matters. A clean layout matters. A spinning animated 3D moon probably does not, unless you are building the clock for a wizard.
The project is also an excellent introduction to repurposing electronics. Instead of treating old technology as useless, you give it a new role. A discarded TV becomes a display. A tiny Arduino becomes a video generator. A clock module becomes the timekeeper. The result is a useful object with a story.
Real-World Uses for an Arduino TV Clock
In a workshop, the clock can sit on a shelf and show time in large, readable digits while you solder, 3D print, or search for the screwdriver you were holding eight seconds ago. In a classroom, it can demonstrate video signals and embedded systems in a way students can actually see. In a bedroom, it can become a bold retro alarm clock. In a makerspace, it can be a conversation piece that quietly proves old hardware still has plenty to offer.
It can also work as themed decor. A vintage TV clock fits beautifully in a retro gaming room, recording studio, garage bar, electronics lab, or sci-fi-inspired office. Add a custom startup message, and the clock becomes part of the room’s personality.
Is This Better Than Buying a Clock?
Financially? Maybe not always. Emotionally? Absolutely. You can buy a clock in five minutes. But buying a clock does not teach you how video timing works. It does not make an old TV useful again. It does not give you the quiet satisfaction of seeing your own code appear on a screen that was built long before smartphones took over the planet.
The value of an Arduino TV clock is not just the time it displays. The value is the process: wiring the circuit, loading the sketch, adjusting the format, seeing the first flickering characters appear, and realizing that a microcontroller smaller than a candy bar is now speaking fluent television.
Experience Notes: Building and Living With an Arduino TV Clock
The first thing you notice when working on a project like this is that old televisions have opinions. A modern monitor either displays the signal or politely refuses. A vintage TV, on the other hand, may roll, buzz, stretch, wobble, or briefly act like it is receiving messages from a submarine. That is part of the experience. Composite video is forgiving in some ways and fussy in others, which makes the first stable picture feel like a small victory parade.
One practical lesson is to start simple. Before building a beautiful clock layout, test the video output with basic text. Display a few characters, confirm the TV input works, and make sure the Arduino is producing the correct NTSC or PAL signal. It is tempting to write the whole clock program first, but debugging graphics, timekeeping, wiring, and display settings all at once is how projects turn into dramatic sighing contests.
Another useful experience is learning how important readability is. On a computer screen, a compact clock layout may look clean. On an old TV, it may look like a weather report viewed through soup. Large numbers, strong spacing, and minimal decoration usually win. The best versions of this project embrace the TV’s softness instead of fighting it. Big block digits look amazing. Tiny labels do not.
The DS3231 RTC module also makes the project feel much more polished. Without it, the Arduino has to be reset and corrected after power loss. With it, the clock behaves like a real appliance. You plug it in, and it knows the time. That small bit of reliability changes the project from “fun demo” to “I might actually use this every day.”
Button placement is another detail that matters more than expected. If you add time-setting buttons, put them somewhere reachable but not too easy to press by accident. Nothing ruins confidence in a clock like brushing the wrong button and sending it three hours into the future. A simple menu system, or even a hidden setup button, can make the clock feel cleaner.
Power management is worth considering too. A full-size TV used only as a clock is not the most energy-efficient choice, especially if it is a CRT. This project makes the most sense when the TV is part of a themed room, a workshop display, a temporary installation, or a piece of functional art. For daily overnight use, consider brightness, heat, and electricity consumption. A screen saver mode or scheduled shutoff can make the setup more sensible.
The best part is the reaction. People understand clocks. People understand TVs. But when they see an old TV acting as a giant Arduino-powered clock, their brain pauses for a second. It feels familiar and strange at the same time. That is the sweet spot for a maker project: practical enough to explain in one sentence, unusual enough that nobody ignores it.
Conclusion
Any old TV can be a clock with Arduino, as long as it has the right kind of video input and you are willing to let a little retro weirdness into your life. By combining an Arduino board, a composite video library, a real-time clock module, and a television that still has some glow left in it, you can build a display that is useful, educational, and delightfully nostalgic.
This project is not about making the world’s most efficient clock. It is about making a clock with character. It turns obsolete hardware into something visible, useful, and fun. It teaches real electronics concepts while leaving room for creativity. And perhaps most importantly, it gives that old TV a reason to exist beyond collecting dust and silently judging your cable management.
If you enjoy Arduino projects, vintage displays, retro tech, or practical builds with a sense of humor, an Arduino TV clock is a fantastic weekend experiment. It proves that old screens still have stories to telleven if the story is mostly “It is 12:45, and yes, I still work.”
