Makeup
How to Make and Install a Motion Sensor Light: 3 DIY Methods
Jun
A motion sensor light is one of those small home upgrades that makes you feel wildly sophisticated for about the price of dinner and a screwdriver. Walk into the garage with full hands? The light pops on. Step onto the porch at night? Instant visibility. Sneaky raccoon approaching the trash cans like it owns the deed? Exposed.
Better yet, learning how to make and install a motion sensor light does not require turning your house into a science fair project. Depending on your comfort level, budget, and existing wiring, you can choose from three practical DIY methods: replacing an existing outdoor fixture with a hardwired motion sensor light, installing a motion sensor switch that controls an existing light, or building a no-wiring setup using solar, battery-powered, or low-voltage LED components.
This guide walks through all three methods in plain American English, with real-world tips, safety notes, examples, and enough practical detail to keep your project from becoming a “why is the breaker buzzing?” situation.
What Is a Motion Sensor Light?
A motion sensor light is a lighting setup that turns on when it detects movement and turns off after a set amount of time. Most residential motion lights use passive infrared technology, often called PIR. PIR sensors detect changes in heat patterns, which is why they notice people, pets, and occasionally one dramatic tree branch waving in the wind like it has breaking news.
Many modern fixtures also include a photocell, which keeps the light from turning on during daylight. Others offer adjustable settings for detection range, sensitivity, timer duration, dusk-to-dawn operation, and manual override. The best motion sensor lighting setup is not just bright; it is aimed correctly, weather-safe, code-conscious, and matched to the location.
Before You Start: Choose the Right DIY Method
Before buying anything, decide what kind of installation makes sense for your home. A front porch with an existing wall fixture is a good candidate for a hardwired motion sensor light. A garage with a normal wall switch may be better served by a motion sensor switch. A shed, fence, side yard, closet, or dark corner with no wiring nearby may be ideal for a solar, battery, or low-voltage motion light.
Method 1: Hardwired Outdoor Motion Sensor Light
Best for replacing an existing porch light, garage floodlight, patio light, or driveway fixture. This method gives you the most permanent and powerful result, but it involves household electrical wiring.
Method 2: Motion Sensor Light Switch
Best for garages, laundry rooms, closets, pantries, hallways, mudrooms, bathrooms, and workshops where you already have a switch controlling a light.
Method 3: No-Wiring Motion Sensor Light
Best for renters, sheds, fences, cabinets, stairs, dark closets, garden paths, or places where adding electrical wiring would cost more than the light itself.
Basic Tools and Materials
The exact supplies depend on the method, but most DIY motion sensor light projects use a few common items:
- Motion sensor light fixture, motion sensor switch, solar light, battery light, or low-voltage LED kit
- Screwdriver set
- Voltage tester for wired projects
- Wire connectors rated for the wire type and fixture
- Electrical tape, if recommended by the device instructions
- Drill and bits for mounting hardware
- Exterior-rated caulk for outdoor hardwired fixtures
- Ladder with stable footing
- Safety glasses
For any hardwired installation, turn power off at the breaker and verify that the circuit is dead before touching wires. Do not rely only on a wall switch. Wall switches are convenient; breakers are serious. For confusing wiring, damaged boxes, aluminum wiring, missing grounds, or anything that feels beyond your skill level, hire a licensed electrician.
Method 1: Replace an Existing Outdoor Fixture With a Hardwired Motion Sensor Light
This is the classic driveway or garage upgrade: remove an old light and install a motion sensor floodlight or wall lantern in its place. It works well when there is already a code-compliant electrical box and weather-rated wiring at the location.
Step 1: Pick the Right Fixture
Choose a fixture rated for outdoor use and suitable for the mounting location. A wall-mounted floodlight may be perfect above a garage door, while a decorative motion sensor wall light may look better beside a front entry. Check the lumen output, beam spread, weather rating, mounting height range, detection angle, and whether the fixture works with LED bulbs or has integrated LEDs.
For security and visibility, brighter is not always better. A light that blasts the neighbor’s bedroom window like a stadium spotlight is not “safer”; it is an invitation to a neighborhood meeting. Aim for useful coverage across walkways, steps, gates, and driveways.
Step 2: Turn Off Power and Test
Switch off the breaker that controls the existing light. Then test the fixture with a voltage tester before removing it. If the tester shows voltage, stop and find the correct breaker. Never work on a live circuit.
Step 3: Remove the Old Fixture
Unscrew the old fixture from the mounting plate. Carefully pull it away from the wall or ceiling box. Disconnect the wires by removing the wire connectors. You will usually see a black hot wire, a white neutral wire, and a bare copper or green ground wire. Older homes may vary, which is another reason to take your time.
Step 4: Inspect the Electrical Box
The electrical box should be secure, properly mounted, and suitable for the fixture. Outdoor boxes need protection from moisture. If the box is loose, cracked, corroded, or not appropriate for exterior use, repair or replace it before installing the new light.
Step 5: Install the Mounting Bracket
Attach the new mounting bracket according to the fixture instructions. Most motion sensor lights include a crossbar or mounting plate. Make sure the gasket sits properly so water does not sneak behind the fixture. Water is very talented at finding lazy caulk jobs.
Step 6: Connect the Wires
Connect black to black, white to white, and ground to ground, unless your fixture instructions say otherwise. Use properly sized wire connectors and tug gently on each connection to confirm it is secure. Fold the wires neatly into the box without crushing them.
Step 7: Mount and Seal the Fixture
Fasten the fixture to the bracket. For outdoor wall fixtures, use the provided gasket and apply exterior-rated caulk around the top and sides where the fixture meets the wall. Leave the bottom unsealed when recommended so moisture can drain instead of becoming trapped.
Step 8: Aim the Lights and Sensor
Point the light heads toward the area you want illuminated, such as the driveway, walkway, gate, or steps. Aim the sensor across the expected path of movement rather than directly at the person walking toward it. Many PIR sensors detect side-to-side motion better than straight-on motion.
Step 9: Restore Power and Test
Turn the breaker back on. Use test mode if the fixture has one. Walk across the detection zone and adjust sensitivity, range, and timer settings. A common setup is a moderate detection range and a timer of one to five minutes, but the best setting depends on the space.
Method 2: Install a Motion Sensor Light Switch
A motion sensor switch replaces a standard wall switch and controls the existing light fixture. This is one of the cleanest upgrades for indoor spaces because you do not have to change the light itself. The switch becomes the brain, and the fixture simply obeys. Finally, a chain of command your garage can understand.
Best Places for a Motion Sensor Switch
Motion sensor switches work beautifully in garages, laundry rooms, pantries, closets, mudrooms, basements, utility rooms, and bathrooms. They are especially helpful in rooms where people often enter with full hands or forget to turn lights off.
Step 1: Buy the Correct Switch
Check whether your current switch is single-pole or three-way. A single-pole switch controls one light from one location. A three-way setup controls one light from two locations, such as both ends of a hallway. Buy a sensor switch rated for your wiring type and lighting load.
Also check whether the switch requires a neutral wire. Some modern sensor switches can work with a ground or neutral, while others require a neutral. Do not guess. Open the switch box only after turning off power, inspect the wiring, and compare it with the product instructions.
Step 2: Turn Off Power
Switch off the circuit breaker, remove the wall plate, and test the wires with a voltage tester. Again, the goal is boring safety. Boring safety is excellent. Exciting electricity is not.
Step 3: Remove the Old Switch
Unscrew the old switch and gently pull it out. Take a photo before disconnecting anything. Label wires if needed. This is especially helpful in three-way installations, where travelers and common wires matter.
Step 4: Connect the Motion Sensor Switch
Follow the wiring diagram included with the switch. Typical connections may include line, load, ground, and sometimes neutral. Some devices use interchangeable line and load wires, but not all do. Secure each connection with approved wire connectors or screw terminals as directed.
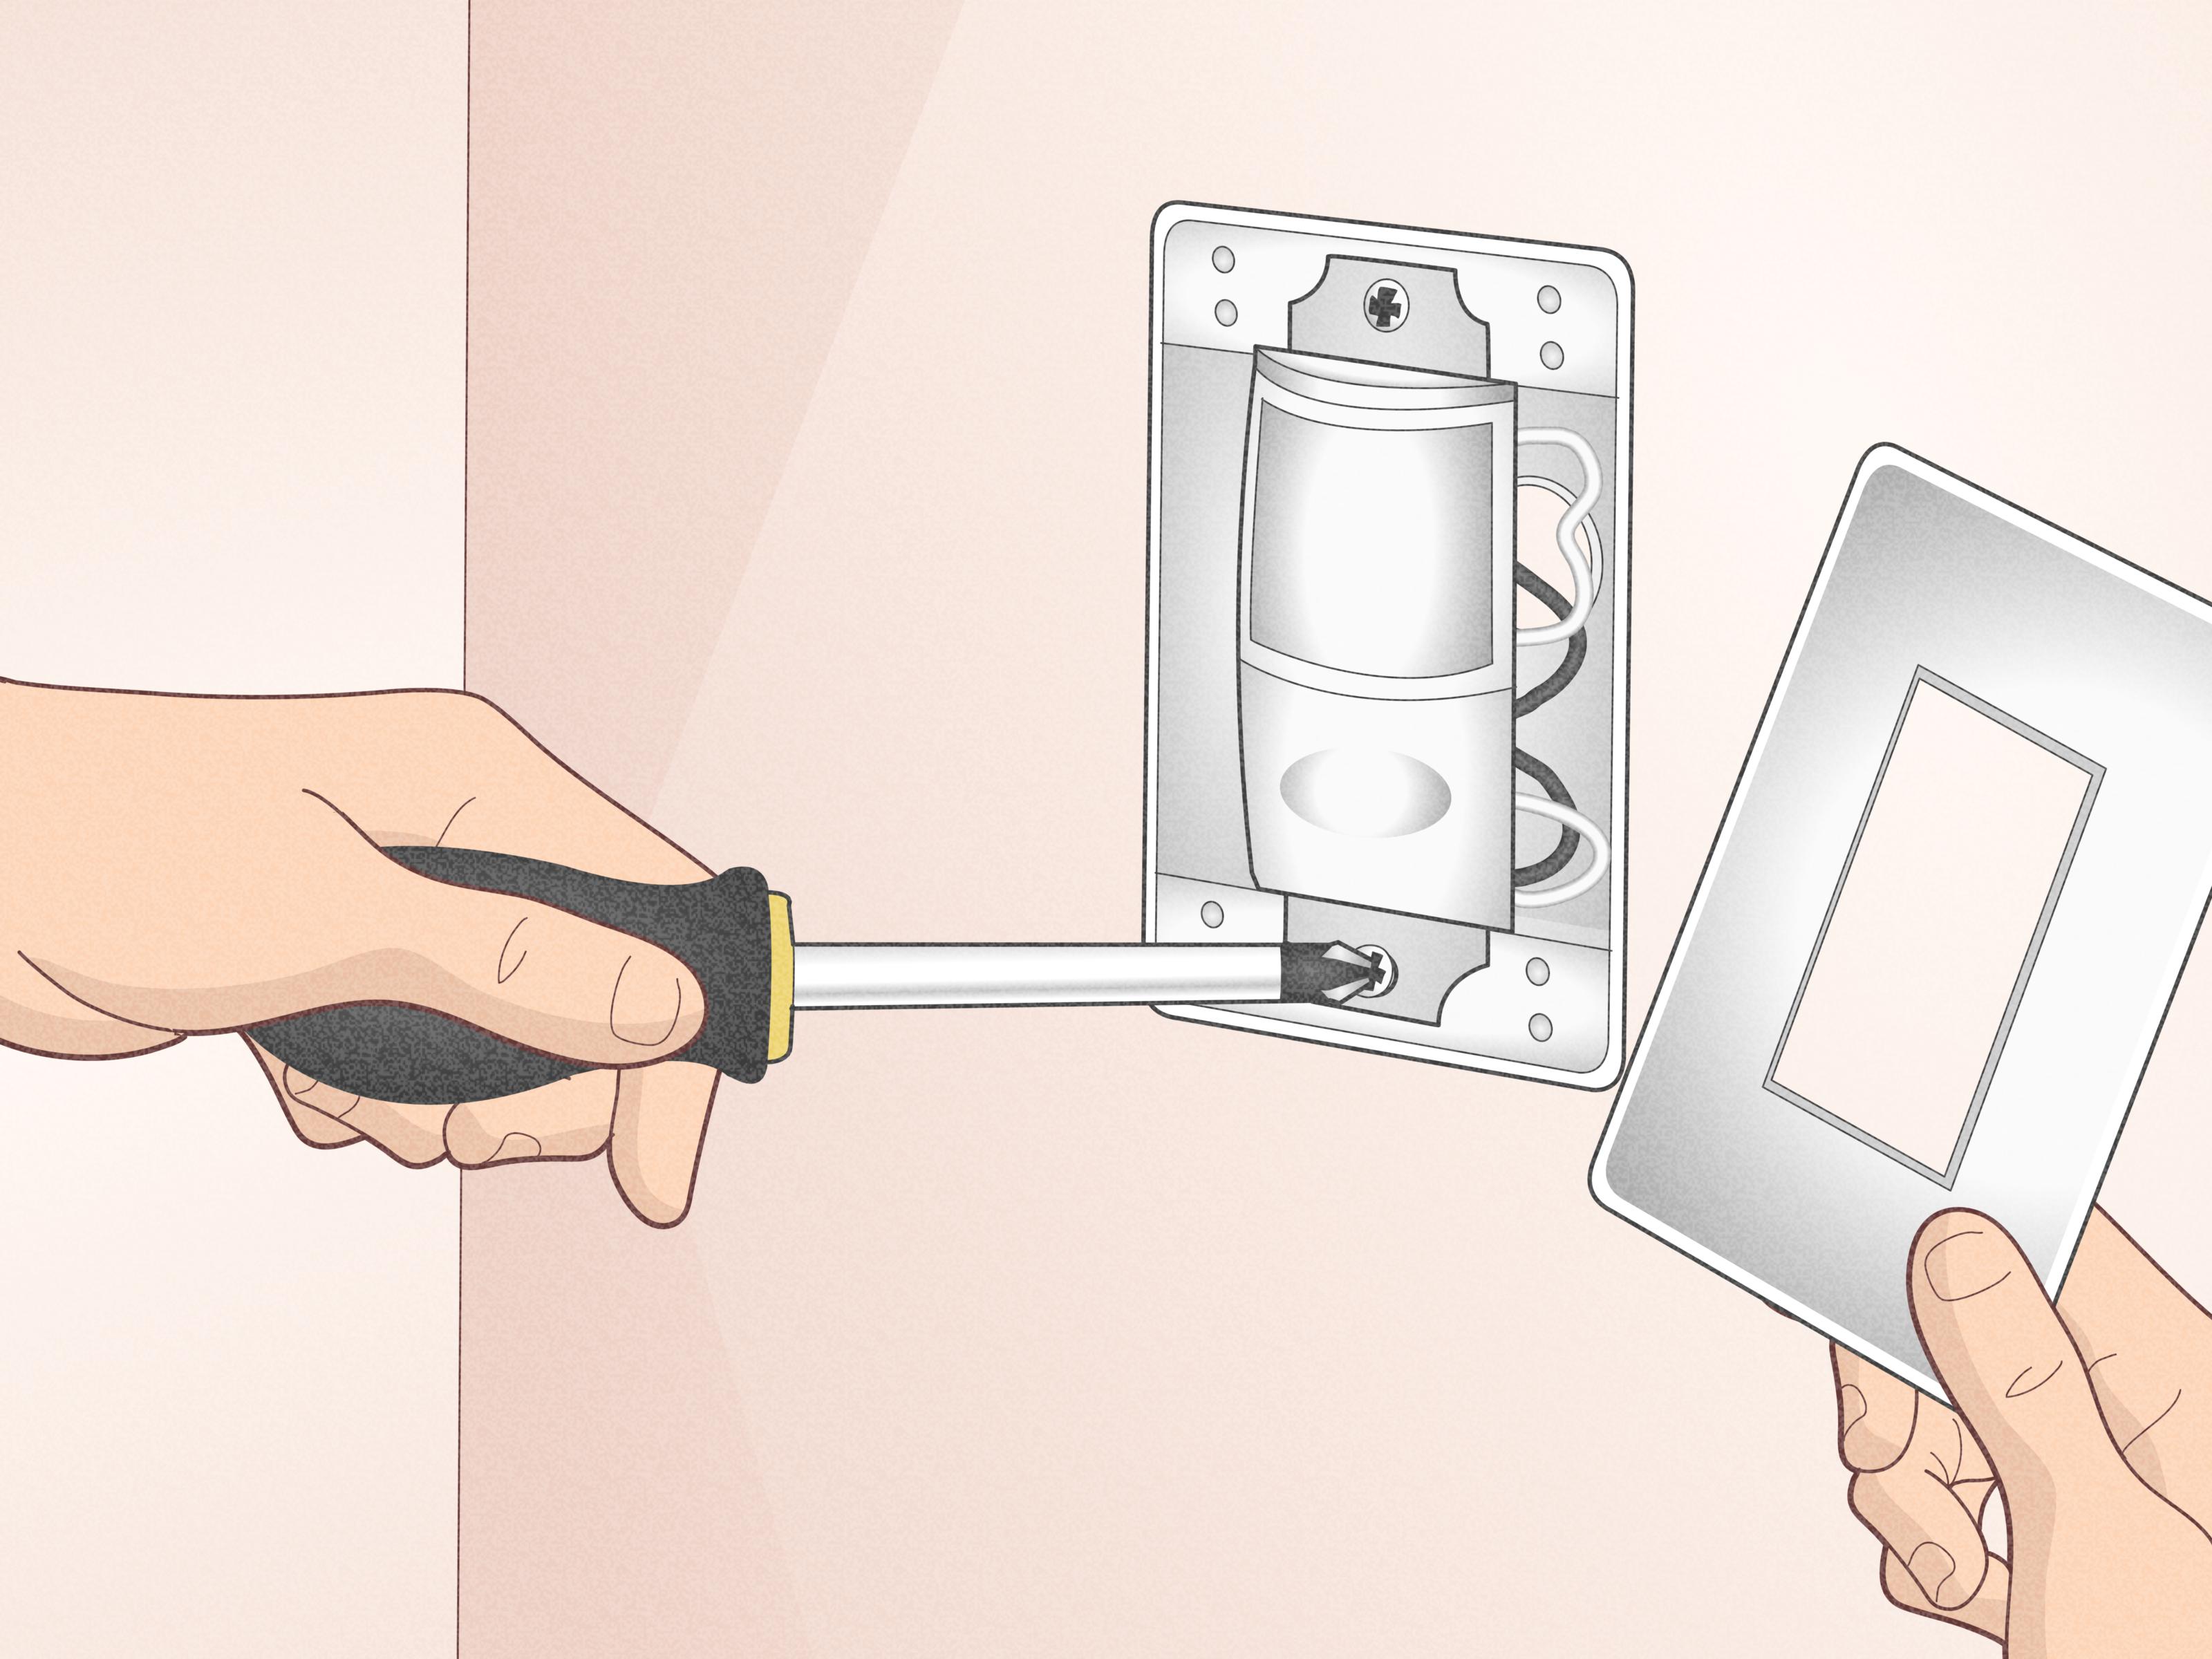
Step 5: Mount the Switch and Restore Power
Carefully fold the wires back into the box, mount the sensor switch, attach the wall plate, and turn the breaker back on. If the switch does not work, turn the power off again before troubleshooting.
Step 6: Adjust the Settings
Most motion sensor switches let you adjust timeout, sensitivity, ambient light detection, and occupancy or vacancy mode. Occupancy mode turns the light on automatically when motion is detected. Vacancy mode requires manual turn-on but turns the light off automatically after the room is empty. Vacancy mode is often better for bedrooms, bathrooms, or spaces where you do not want the light popping on every time someone passes nearby.
Method 3: Make a No-Wiring Motion Sensor Light
No-wiring motion sensor lights are perfect when you want convenience without opening an electrical box. This category includes solar security lights, battery-powered closet lights, stick-on stair lights, and low-voltage LED strip systems with a plug-in motion sensor.
Option A: Solar Motion Sensor Light
A solar motion sensor light has a solar panel, rechargeable battery, LEDs, and sensor built into one unit or connected by a cable. It is great for sheds, fences, gates, side yards, patios, and trash areas.
- Choose a location with direct sunlight for the solar panel.
- Hold the light in position and mark the screw holes.
- Drill pilot holes if mounting into wood, siding, or masonry.
- Attach the light securely with exterior-rated screws or anchors.
- Turn the unit on and allow it to charge fully.
- Test the detection zone after dark and adjust the angle.
Solar lights are easy, but they are not magic. A panel placed under a deep roof overhang or shady tree will charge poorly. If winter sunlight is limited in your area, choose a model with a separate panel that can be placed in a brighter spot.
Option B: Battery-Powered Motion Sensor Light
Battery-powered motion lights are ideal for closets, cabinets, stairways, under-sink areas, pantries, and rental homes. Many install with screws, magnets, or adhesive strips.
- Clean the mounting surface so adhesive can bond properly.
- Install fresh batteries or charge the built-in battery.
- Mount the light where the sensor can see the entry point.
- Test it by walking into the space naturally.
- Adjust the position if doors, shelves, or stored items block the sensor.
The most common mistake is mounting the light where the sensor points at a wall instead of the person entering. Give the sensor a clear view, not a tragic career in darkness.
Option C: Low-Voltage LED Strip With PIR Sensor
For a custom DIY build, use a low-voltage LED strip, compatible plug-in power supply, and inline PIR motion sensor controller. This setup works well under cabinets, inside wardrobes, along stairs, behind garage shelving, or inside a pantry.
- Choose a UL-listed or safety-certified low-voltage LED strip kit.
- Match the power supply voltage to the LED strip, commonly 12V or 24V.
- Plug the motion sensor controller between the power supply and LED strip.
- Clean the installation surface with rubbing alcohol.
- Stick the LED strip in place, avoiding sharp bends.
- Mount the sensor so it faces the entry path.
- Plug in the power supply and test the motion activation.
Do not modify household line-voltage wiring to “invent” your own fixture. A safe DIY motion light uses listed components, proper power supplies, and low-voltage parts designed to work together.
How to Aim and Adjust Motion Sensor Lights
Installation is only half the job. A poorly aimed motion sensor light can turn into a neighborhood disco machine. After mounting, spend time adjusting the sensor.
Adjust Detection Range
Start with medium sensitivity. If the light turns on every time a car passes, reduce the range or angle the sensor away from the street. If it misses people walking up the steps, increase sensitivity or aim it lower.
Set the Timer
For entryways, one to three minutes is usually enough. For work areas, patios, and driveways, five to ten minutes may be more practical. Long timers are convenient, but they use more energy.
Use the Daylight Setting
If your light has a lux or daylight dial, adjust it so the light activates only when it is actually dark. This prevents daytime triggering and keeps the system efficient.
Do a Walk Test
Walk through the area from multiple directions. Approach from the driveway, sidewalk, side gate, garage door, and any likely path. Adjust until the light turns on where you need visibility, not halfway down the block.
Common Motion Sensor Light Problems and Fixes
| Problem | Likely Cause | DIY Fix |
|---|---|---|
| Light will not turn on | No power, wrong wiring, daylight setting, dead battery, or poor solar charge | Check breaker, test wiring, adjust lux setting, replace or recharge battery |
| Light stays on | Manual override, high sensitivity, sensor aimed at movement, or timer setting | Reset fixture, lower sensitivity, aim away from trees, vents, roads, or flags |
| Light flickers | Loose connection, incompatible bulb, weak battery, or failing LED driver | Turn power off, inspect connections, use compatible bulbs, replace weak batteries |
| Sensor misses motion | Poor angle, blocked sensor, low sensitivity, or mounting too high | Clean lens, reposition sensor, adjust range, follow recommended mounting height |
| Solar light is dim | Insufficient sunlight, dirty panel, old battery, or winter conditions | Clean panel, move to sunnier location, replace rechargeable battery if supported |
Cost and Difficulty Comparison
A hardwired outdoor motion sensor fixture usually costs more than a simple battery light, but it is more powerful and permanent. Expect the fixture itself to range from budget-friendly basic floodlights to higher-end smart security lights. A motion sensor switch is often a mid-cost upgrade and can be installed quickly when the wiring is straightforward. Solar and battery lights are usually the easiest and cheapest, though quality varies widely.
In general, the easiest method is battery-powered lighting. The most balanced method is a motion sensor switch. The strongest and most permanent method is a hardwired outdoor fixture.
Best Places to Install Motion Sensor Lights
Motion sensor lights work best where they improve safety, convenience, and visibility. Good locations include front doors, back doors, garage entries, driveways, walkways, side yards, patios, trash storage areas, sheds, stairways, closets, laundry rooms, and pantries.
Avoid pointing sensors at heat vents, air conditioning units, dryer exhaust, busy streets, reflective windows, moving branches, hanging decorations, or areas where pets constantly wander. A sensor does not understand that your inflatable holiday snowman is not an intruder. It simply sees movement and commits to drama.
Maintenance Tips for Long-Term Performance
Motion sensor lights need occasional maintenance. Clean the sensor lens and light cover with a soft cloth. Check outdoor caulk and gaskets once or twice a year. Remove leaves, spiderwebs, and dirt from around the fixture. For solar models, clean the panel regularly and replace rechargeable batteries when performance drops. For battery-powered lights, keep spare batteries or charging cables handy.
If a hardwired fixture repeatedly trips a breaker, smells hot, flickers after new bulbs are installed, or shows signs of water inside the housing, stop using it until the issue is inspected. Electrical problems rarely fix themselves. They usually just become more expensive while wearing a tiny villain cape.
Real-World Experience: What Homeowners Learn After Installing Motion Sensor Lights
The first lesson most DIYers learn is that placement matters more than brightness. A 2,000-lumen light aimed poorly is less useful than a modest light aimed exactly at the steps, lock, or walkway. Many people install their first motion sensor light too high, point it too far outward, and then wonder why it detects passing cars but ignores someone standing at the door. The sweet spot is practical coverage, not maximum chaos.
The second lesson is that motion sensor lights are not just for security. They are convenience tools. A garage light that turns on when you carry groceries inside feels luxurious. A pantry light that activates automatically makes midnight cereal missions safer and less embarrassing. A stair light that glows when someone approaches can prevent trips without leaving lights on all night.
The third lesson is that sensitivity settings deserve patience. Many homeowners install the light, test it once, and call the job done. Then the light turns on all night because a bush is dancing in the wind. The better approach is to test the sensor for several evenings. Watch what triggers it. Adjust the range, angle, and timer. Small changes often solve big annoyances.
Solar motion lights teach another practical lesson: sunlight is the fuel. A solar light installed in shade may work during summer but struggle during cloudy weeks or winter. If the model has a separate solar panel, mount the panel where it gets strong sun and place the light where illumination is needed. Do not assume the best lighting spot is also the best charging spot.
Battery-powered lights are wonderfully easy, but battery access matters. If you install one above a tall shelf, behind storage bins, or high on a stairwell, replacing batteries becomes a tiny home maintenance obstacle course. Before mounting, ask yourself, “Will I hate myself in six months when this needs charging?” If the answer is yes, lower it or choose a rechargeable model with easier access.
For hardwired fixtures, the biggest experience-based tip is to inspect the old box before buying the fanciest new light. Sometimes the existing electrical box is loose, shallow, oddly placed, or not weather-sealed. The new fixture may be perfect, but the mounting surface may need attention first. A secure, weather-resistant installation is more important than a trendy fixture head.
Finally, motion sensor lights work best when they are part of a thoughtful lighting plan. Use them to guide people safely, discourage unwanted activity, and reduce wasted electricity. Do not use them to blind guests, startle delivery drivers, or illuminate half the county. The goal is smart lighting, not a UFO landing pad.
Conclusion
Learning how to make and install a motion sensor light is a practical DIY upgrade with three solid paths. Replace an existing outdoor fixture when you want permanent, powerful security lighting. Install a motion sensor switch when you want hands-free control of an existing indoor or garage light. Choose solar, battery, or low-voltage motion lighting when you need a fast, flexible option without wiring.
The best results come from safe installation, smart placement, patient testing, and realistic expectations. Turn off power when wiring, follow manufacturer instructions, use outdoor-rated materials outside, and call an electrician when the wiring does not match the diagram. Your future self will appreciate the convenience every time the light turns on before you fumble for a switch.
Note: This article is for general DIY education. Local electrical codes, product instructions, and home wiring conditions vary. For hardwired installations, consult a licensed electrician if you are unsure about any part of the project.
