Skincare
Garden Edging Idea With Bricks
Jun
A garden without edging is a little like a haircut without a neckline: technically finished, but not quite ready for its close-up. Brick garden edging is one of the simplest ways to give flower beds, vegetable patches, walkways, patios, and tree rings a clean, polished border without making your yard look like it hired a full-time butler. It is classic, durable, budget-friendly, and surprisingly flexible for both formal landscapes and cottage-style gardens.
The beauty of a brick border is that it does two jobs at once. First, it adds structure. A line of brick tells the eye, “This is the garden bed, that is the lawn, and nobody needs to panic.” Second, it helps solve practical yard problems: grass creeping into beds, mulch spilling onto walkways, soil washing away after heavy rain, and mower wheels nibbling at your favorite perennials like an overenthusiastic goat.
Whether you are working with new clay bricks, concrete pavers, reclaimed bricks, or leftover patio blocks, a well-planned brick edging project can make your garden look more intentional in a single weekend. Even better, you do not need to be a professional mason. You need a clear layout, a level base, patience, and the emotional strength to accept that dirt will somehow end up in your shoes.
Why Brick Garden Edging Works So Well
Brick has remained popular in American landscapes because it balances charm and strength. Unlike thin plastic edging that can warp or pop out of the ground, bricks have enough weight to stay put when installed correctly. Unlike poured concrete, brick edging feels warm and approachable. It can be rustic, traditional, modern, or playful depending on the pattern and color you choose.
Brick edging is especially useful around flower beds, herb gardens, vegetable beds, foundation plantings, and front walkways. It creates a visual frame that makes the plants look fuller and the yard look tidier. In small gardens, the effect is even more dramatic because strong borders help each area feel organized rather than crowded.
Key Benefits of Brick Landscape Edging
Brick garden edging provides several practical advantages:
- It defines garden beds clearly. A crisp line separates lawn, mulch, gravel, and planting areas.
- It helps control grass creep. When bricks are partially buried, they slow turf roots from sneaking into flower beds.
- It keeps mulch in place. Raised or angled bricks help prevent mulch from washing onto the lawn after rain.
- It creates a mowing strip. Flat brick edging lets a mower wheel ride along the border for easier trimming.
- It adds curb appeal. Brick instantly makes a garden look more finished, even if your roses are still “finding themselves.”
- It can be reused or repaired. If one brick shifts, you can lift and reset it without demolishing the entire border.
Best Brick Garden Edging Ideas for Your Yard
The phrase “brick edging” may sound simple, but there are several design styles to choose from. The right one depends on your garden shape, soil, budget, maintenance preferences, and how dramatic you want the border to look.
1. Flat Brick Mowing Strip
A flat brick mowing strip is one of the most practical garden edging ideas with bricks. Bricks are laid horizontally at ground level, creating a smooth band between the lawn and the garden bed. This design is ideal for homeowners who want clean lines without a raised barrier.
The biggest advantage is maintenance. A mower wheel can roll directly over the bricks, reducing the need for string trimming. It works beautifully along straight beds, vegetable gardens, and formal front-yard borders.
For the best result, dig the trench deep enough so the top of the bricks sits level with the lawn. Add compacted gravel and a layer of sand underneath to reduce sinking and shifting.
2. Angled Brick Edging
Angled brick edging is the classic sawtooth border many people remember from older homes, cottage gardens, and charming neighborhoods where someone probably owns a very serious birdbath. Bricks are set diagonally into the soil so one corner points upward, creating a zigzag effect.
This style is decorative and eye-catching. It works well around flower beds, mailbox gardens, and curved borders. It also gives extra height, which helps hold mulch inside the bed. The downside is that mowing around angled bricks may require more trimming, so it is best for areas where visual charm matters more than speed.
3. Soldier Course Brick Border
A soldier course border uses bricks standing upright in a straight row. This creates a strong vertical edge and works nicely for raised beds, formal gardens, and borders that need more presence. Because the bricks are taller, they can hold back more soil and mulch than flat edging.
However, upright bricks need a stable trench and careful backfilling. If the ground freezes and thaws in your region, poor installation can cause bricks to lean over time. Think of them like garden soldiers: impressive, but they need good footing.
4. Double-Row Brick Edging
A double-row brick border uses two lines of bricks, either side by side or staggered. This creates a wider, more substantial edge that feels intentional and high-end. It can be used as a mowing strip, a transition between lawn and gravel, or a decorative frame around a front entry garden.
For added interest, lay the first row lengthwise and the second row crosswise, or use a basket-weave style. A double-row pattern takes more bricks and more digging, but it also looks more custom. It is a smart choice when you want your edging to be noticed, not just politely present.
5. Curved Brick Garden Border
Curved brick edging softens the landscape and helps garden beds look natural. It is excellent for cottage gardens, pollinator beds, tree rings, and informal paths. The key is planning the curve before digging. Use a garden hose or rope to lay out the shape, then step back and look at it from several angles.
For tight curves, you may need to leave small wedge-shaped gaps, use smaller pavers, or cut bricks to fit. Gentle curves are easier to install and usually look more graceful. A curve should feel relaxed, not like it lost a wrestling match with geometry.
6. Reclaimed Brick Edging
Reclaimed bricks bring instant character to a garden. Their weathered edges, color variation, and worn surfaces make them perfect for cottage gardens, farmhouse landscapes, historic homes, and relaxed backyard beds.
Before using old bricks, inspect them carefully. Avoid bricks that crumble easily, contain unknown coatings, or were exposed to chemicals. For vegetable gardens, be extra cautious with salvaged materials, especially from old industrial sites or painted structures. When in doubt, use new clay bricks or concrete pavers designed for landscaping.
How to Install Brick Garden Edging Step by Step
Brick edging is beginner-friendly, but the secret to success is preparation. The bricks you see above ground are only half the story. The base beneath them is what keeps the border level, stable, and attractive over time.
Tools and Materials You May Need
- Bricks, clay pavers, or concrete landscape blocks
- Garden hose, rope, or marking paint
- Flat spade or half-moon edger
- Shovel and hand trowel
- Landscape fabric, optional for some applications
- Crushed gravel or paver base
- Leveling sand
- Rubber mallet
- Level
- Tape measure
- Work gloves and safety glasses
- Masonry chisel or saw if cutting is needed
Step 1: Plan the Border
Start by deciding where the brick edging should go. For straight lines, use stakes and string. For curves, use a garden hose because it bends naturally and can be adjusted easily. Look at the layout from the patio, sidewalk, driveway, and street. A border that looks perfect from one angle may look wobbly from another.
Once you like the shape, mark the line with landscape marking paint or cut a shallow guide line with a spade. Measure the length so you can estimate how many bricks you need. Always buy a few extras for cuts, breaks, and future repairs. Future you will be grateful, and future you is notoriously hard to impress.
Step 2: Dig the Trench
Dig a trench slightly wider than your bricks and deep enough for the brick height plus the base material. For a flat mowing strip, the finished top should sit level with the lawn. For raised edging, decide how much brick should remain above ground and dig accordingly.
Remove roots, rocks, and loose soil from the trench. Keep the bottom as even as possible. If the soil is soft or poorly draining, a deeper gravel base can improve stability.
Step 3: Add a Stable Base
A compacted base helps prevent the bricks from sinking, tilting, and heaving. Add crushed gravel or paver base first, then tamp it firmly. Follow with a layer of sand to make leveling easier. The sand should be smooth but not fluffy; bricks need a firm bed, not a spa pillow.
In mild climates, a shallow base may work for light-duty edging. In areas with freeze-thaw cycles, a stronger base is worth the extra effort. Water, ice, and shifting soil can move poorly installed bricks over time.
Step 4: Set the Bricks
Place the bricks one at a time, checking alignment as you go. Use a rubber mallet to tap each brick into position. For straight borders, keep the line tight and consistent. For curves, adjust the spacing gradually so the curve feels smooth.
Use a level frequently. Small errors become more obvious as the border grows. If one brick sits too high, remove it and adjust the sand beneath it. If it sits too low, add sand and reset it.
Step 5: Fill Gaps and Backfill
Once the bricks are set, sweep sand or soil into the joints. Backfill both sides of the border with soil, mulch, or lawn soil, depending on the location. Press the backfill firmly to lock the bricks in place.
Water the area lightly to settle the soil and sand. After a few days, check for low spots and add more material where needed.
Design Tips for Better Brick Edging
Match Brick Color to Your Home
Brick edging looks most intentional when it connects with existing hardscape. If your home has red brick, matching red clay pavers can create a classic look. If your patio uses gray pavers, consider gray or charcoal bricks for a more modern edge. For warm cottage gardens, mixed reclaimed bricks can look wonderfully relaxed.
Use Brick Edging to Guide the Eye
Garden borders do more than contain mulch. They guide movement through the landscape. A curved brick edge can lead visitors toward a front door, bench, arbor, or fountain. A straight brick edge can emphasize symmetry and make a small yard feel orderly.
Combine Bricks With Gravel or Mulch
Brick pairs beautifully with pea gravel, bark mulch, crushed stone, and stepping stones. A brick edge around a gravel path keeps loose material from scattering into the lawn. Around mulched beds, brick provides contrast and helps hold the mulch where it belongs.
Let Plants Spill Over Slightly
For a softer look, plant low-growing flowers or herbs near the brick edge. Creeping thyme, alyssum, sedum, dwarf mondo grass, and compact lavender can soften the hard line. Just avoid plants so aggressive they swallow the border whole. A little romance is nice; a botanical takeover is another matter.
Common Mistakes to Avoid
Skipping the Base
Laying bricks directly on soil may seem faster, but it often leads to uneven edging. Soil expands, settles, washes away, and invites weeds. A gravel-and-sand base improves drainage and keeps the border level longer.
Making Curves Too Tight
Tight curves are harder to build with rectangular bricks. They create large gaps unless the bricks are cut. Use gradual curves for a cleaner, more professional look.
Ignoring Drainage
Brick edging should not trap water against plant crowns, foundations, or tree trunks. Leave room for water to move through the bed, and avoid building a raised edge that turns your flower bed into a decorative soup bowl.
Using Unsafe Salvaged Bricks
Old bricks can be beautiful, but not every old material belongs in a garden. Avoid salvaged bricks with paint, oily residue, chemical staining, or unknown industrial history, especially near edible plants.
Forgetting Maintenance Access
Before installing edging, think about mowing, trimming, weeding, and mulching. A border that looks lovely but blocks basic maintenance will quickly become annoying. The best garden edging idea with bricks is one that looks good and behaves itself.
Brick Edging for Different Garden Styles
Traditional Front Yard
Use a flat or soldier-course brick border along foundation beds and front walkways. Choose uniform bricks and straight lines for a neat, classic appearance. Add boxwood, hydrangeas, hostas, or seasonal annuals for a polished look.
Cottage Garden
Choose reclaimed bricks, angled edging, or curved borders. Let flowers spill gently over the edge. Pair brick with daisies, salvia, catmint, roses, foxgloves, and ornamental grasses for a romantic, slightly wild style.
Modern Landscape
Use dark, smooth bricks in a flat double-row pattern. Keep lines simple and pair the border with gravel, architectural grasses, evergreens, and minimalist planting. The result feels clean without becoming cold.
Vegetable Garden
Brick edging can define vegetable beds and walking paths. Flat brick strips between beds make harvesting easier and reduce muddy edges. Use clean, safe materials and avoid questionable reclaimed bricks around edible crops.
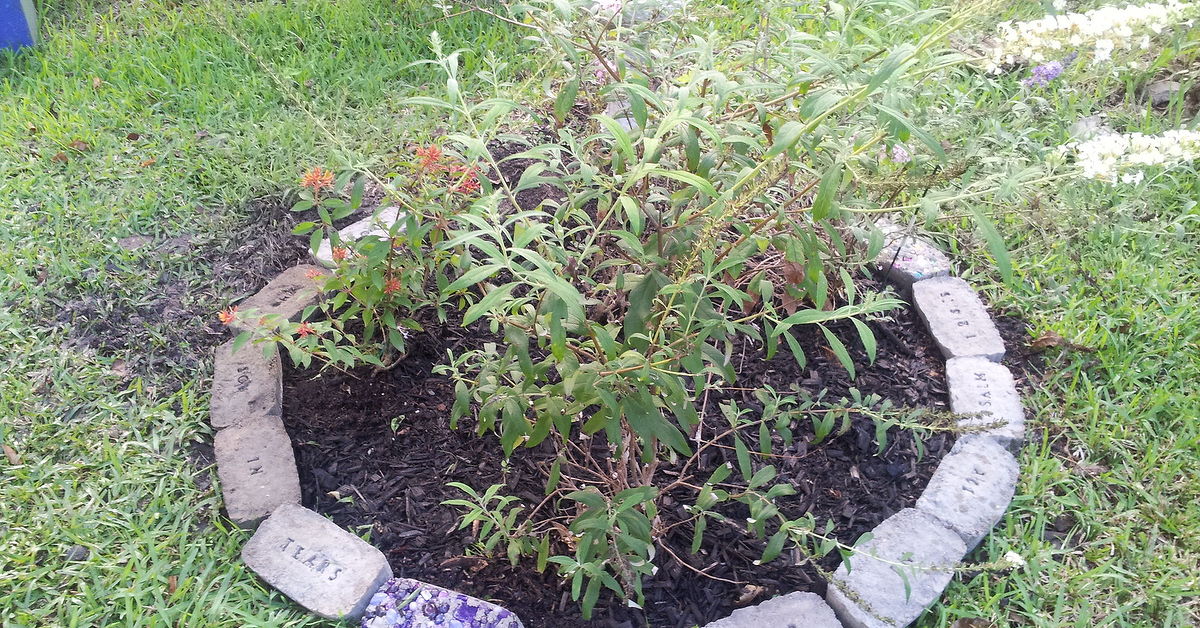
Tree Rings
A brick ring around a tree can protect the trunk from mower damage and contain mulch. Keep mulch several inches away from the trunk, and avoid piling soil or mulch against bark. Trees do not enjoy mulch volcanoes, even if the volcano looks dramatic.
Maintenance Tips for Long-Lasting Brick Borders
Brick edging is low maintenance, but not zero maintenance. Once or twice a year, walk the border and check for movement. Reset any bricks that have lifted, sunk, or tilted. Pull weeds from joints before they become tiny green landlords.
Refresh sand between bricks as needed. If mulch has built up higher than the edging, remove the excess so water can drain properly. In cold climates, inspect the border after winter because freeze-thaw cycles can shift individual bricks.
If moss or algae appears on shaded bricks, scrub the surface with a stiff brush and water. Avoid harsh chemicals near garden plants. A little weathering can look charming, but slippery bricks along walkways should be cleaned for safety.
Personal Experience: What Brick Edging Teaches You After the First Weekend
The first thing you learn from installing brick garden edging is that the planning stage is not optional. It is tempting to start digging the moment you have bricks stacked in the driveway, because bricks have a strange way of making homeowners feel powerful. But the layout determines everything. A garden hose on the ground can save hours of regret. Move it, curve it, straighten it, stare at it from the porch, then stare at it again from the sidewalk like a neighbor with strong opinions.
One of the most useful lessons is that gentle curves usually look better than sharp bends. On paper, dramatic curves feel artistic. In real soil with rectangular bricks, they can become awkward fast. A soft curve is easier to install, easier to mow around, and more natural to the eye. If you are edging a flower bed in front of the house, a curve that echoes the walkway or porch line can make the entire yard feel connected.
Another experience-based tip: do not underestimate the base. Many beginners think the brick is the project, but the base is the real hero. A brick border laid on bare soil may look great for a few weeks, then slowly develop the posture of a tired accordion. Gravel and sand take more time, but they help the bricks stay level after rain, foot traffic, and seasonal soil movement. If the garden is in a wet area, that base becomes even more important.
It also helps to work in small sections. Set five or six bricks, check the line, check the level, then continue. If you install twenty bricks before checking, you may discover that the border has wandered off like it had errands to run. A rubber mallet is your best friend here. It lets you make small adjustments without cracking the brick or your patience.
When using reclaimed bricks, sort them before installation. Put the most attractive bricks in the most visible areas, such as near the front walk or patio. Use chipped or irregular pieces in less noticeable sections, or save them for cuts. Mixing tones can look beautiful, but random does not mean careless. Lay out a few feet of bricks before setting them permanently so the color variation looks balanced.
Mulch depth is another detail that matters. Brick edging can help hold mulch, but too much mulch can bury the border and reduce its visual impact. Keep mulch slightly below the top of raised bricks or level with flat brick edging. Around trees and shrubs, leave breathing room near trunks and crowns. The goal is tidy, not “mulch lasagna.”
Finally, expect the project to change how you see the rest of your garden. Once one bed has a crisp brick edge, nearby beds may suddenly look unfinished. This is the quiet danger of a good DIY project: it improves one area so well that the rest of the yard starts applying for upgrades. But brick edging is worth it. It is affordable, satisfying, and forgiving. If a section shifts, you can reset it. If you want to expand the bed later, you can lift the bricks and reshape the border. That flexibility makes brick one of the most practical and charming materials for garden edging.
Conclusion
A garden edging idea with bricks is more than a decorative weekend project. It is a smart way to organize your outdoor space, protect planting beds, reduce maintenance, and give your yard a finished look. From flat mowing strips to angled cottage borders, brick edging can suit almost any landscape style. The key is choosing the right pattern, preparing a stable base, and thinking about how the border will function through mowing, rain, mulch refreshes, and seasonal changes.
Brick has a timeless quality that works in front yards, backyards, vegetable gardens, tree rings, and walkways. It brings color, texture, and structure without overwhelming the plants. Done well, it makes the garden look intentional while still feeling welcoming. In other words, brick edging is the rare DIY upgrade that can make your yard look more expensive without requiring you to whisper “custom landscaping” into your bank account and watch it tremble.
