
Beauty Tools & Accessories
DIY Tobacco Basket
Jul
Note: This article is about making a decorative farmhouse-style tobacco basket inspired by vintage agricultural baskets. It is not about growing, preparing, selling, or using tobacco.
What Is a DIY Tobacco Basket?
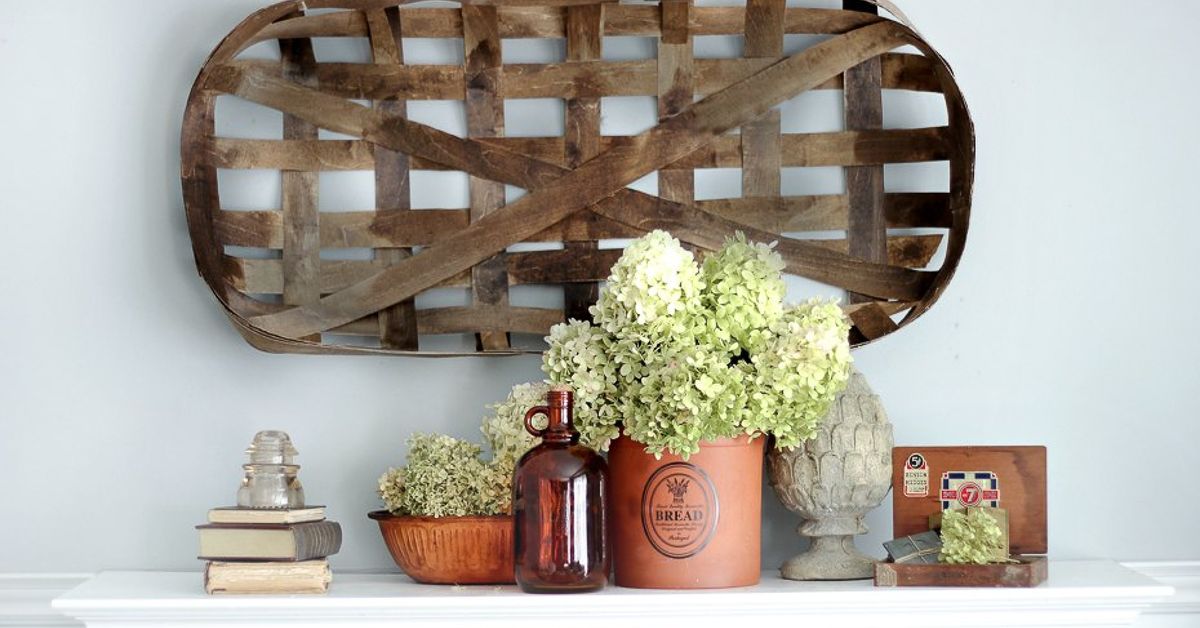
A DIY tobacco basket is one of those home décor projects that looks like it wandered out of a charming Southern farmhouse, stopped by an antique market, and somehow landed on your living room wall looking effortlessly expensive. Traditionally, tobacco baskets were large, flat woven baskets used in tobacco markets to display and transport cured tobacco leaves. Today, they have found a second life as rustic wall décor, wreath backdrops, mantel accents, and cozy farmhouse statement pieces.
The good news? You do not need to inherit a barn, own a pickup truck, or suddenly develop a mysterious appreciation for vintage auction houses to enjoy the look. With basket reed, wood strips, poster board, veneer edging, or even flexible craft material, you can make your own decorative tobacco basket at home for a fraction of the cost of a true antique.
This project is popular because it checks all the DIY boxes: affordable, customizable, beginner-friendly, and satisfyingly impressive. It gives your wall texture without screaming, “I bought this because the internet told me to.” A handmade tobacco basket adds warmth, history, and personality to entryways, kitchens, dining rooms, bedrooms, and gallery walls. It also gives you permission to say, “Oh, I made that,” which is half the fun of DIY and at least 90 percent of the bragging rights.
A Brief History Behind Tobacco Baskets
Before becoming a farmhouse décor favorite, tobacco baskets had a practical job. In tobacco-producing regions of the United States, especially Kentucky, North Carolina, and parts of the South, flat woven baskets were used in warehouses and auction markets. Farmers placed cured tobacco leaves in these baskets to keep them clean, organized, and easy to move across market floors.
Many vintage tobacco baskets were made from split oak strips. Their open lattice design allowed air movement, reduced unnecessary weight, and made the baskets easier to handle. The wide rim often displayed stenciled company names or warehouse markings, which is one reason authentic antique tobacco baskets can be collectible today.
By the late 1800s and early 1900s, areas of North Carolina became known for producing these baskets in significant numbers. Over time, as tobacco markets changed and modern materials replaced older warehouse tools, tobacco baskets faded from everyday agricultural use. Then home decorators discovered them, and suddenly the humble farm basket became wall art. That is the kind of career change most of us can only dream about.
Why Tobacco Baskets Work So Well in Home Décor
A tobacco basket is simple, but it has visual power. The grid pattern creates structure, while the woven material keeps it soft and organic. It can look rustic, modern farmhouse, cottage, vintage, primitive, or even slightly boho depending on how you style it.
Unlike framed prints, tobacco baskets bring texture. Unlike shelves, they do not require dusting seven tiny decorative objects that nobody is allowed to touch. Unlike some trendy wall décor, they do not overpower a room. They simply add depth, warmth, and a hand-crafted feeling.
A DIY tobacco basket can be used in many ways:
- As a standalone wall hanging above a console table
- Behind a wreath for seasonal décor
- As part of a basket wall gallery
- Above a bed, buffet, mantel, or kitchen cabinet
- On a front door or covered porch
- As a backdrop for a family name sign or small chalkboard
The shape also matters. Most tobacco baskets are square or rectangular with gently raised edges. This shallow tray-like form catches light beautifully, especially when stained in warm brown, gray-washed, honey oak, or antique white tones.
Best Materials for a DIY Tobacco Basket
You can make a tobacco basket several ways, depending on your budget, tools, and patience level. Patience is important, because woven strips occasionally behave like they have strong opinions.
Basket Reed
Basket reed is one of the best materials for a realistic DIY tobacco basket. It is flexible, lightweight, and designed for weaving. Flat reed in medium or wide sizes works especially well because it mimics the look of old wooden strips without requiring serious woodworking tools.
Wood Veneer or Edge Banding
Wood veneer edging or iron-on edge banding can create a clean, thin-strip look. It is easy to cut and stain, although it may need gentle bending and careful gluing. This is a good option if you want a more polished decorative basket.
Thin Wood Lath or Craft Wood
Thin craft wood strips offer a sturdier look, but they are less forgiving than reed. If the wood is too thick, it may crack when bent. Choose flexible strips and test one before committing to the full project. Nobody wants to discover halfway through that their “rustic basket” has become “kindling with ambition.”
Poster Board or Heavy Cardstock
For an ultra-budget version, poster board can be cut into strips, painted or stained, and woven into a faux tobacco basket. This version is best for lightweight wall décor. It will not fool an antique dealer, but it can absolutely fool your cousin who thinks everything handmade came from Etsy.
Tools and Supplies You Will Need
For a classic DIY tobacco basket, gather the following supplies:
- Flat basket reed, wood veneer strips, or flexible craft wood
- Ruler or measuring tape
- Scissors, craft knife, or small saw depending on material
- Hot glue gun or strong craft glue
- Small clamps, binder clips, or clothespins
- Mini brads, staples, or small nails for extra hold
- Wood stain, craft paint, or spray paint
- Foam brush or rag
- Clear matte sealer
- Protective gloves
- Drop cloth or old newspaper
If you are using real reed, a bowl or bucket of warm water is also useful. Soaking the reed briefly softens it and makes it easier to bend around corners. Do not soak it forever, though. You are making a basket, not soup.
How to Make a DIY Tobacco Basket
The following tutorial creates a decorative square tobacco basket suitable for wall display. You can adjust the measurements to make a smaller basket for tiered trays or a larger one for a dramatic wall feature.
Step 1: Choose Your Size
Decide how large you want the basket to be. A good beginner size is about 18 inches by 18 inches or 20 inches by 20 inches. This is large enough to make an impact but small enough that your dining table will not look like a craft store had a minor explosion.
For a square basket, cut several strips of equal length for the woven center. You will need strips running vertically and horizontally. For example, cut seven strips for one direction and seven strips for the opposite direction. You will also need longer strips for the outer rim.
Step 2: Soften the Material
If you are using basket reed, soak the strips in warm water for about five to ten minutes. This helps reduce cracking and makes the reed easier to shape. Pat the strips dry with a towel before weaving. If you are using paper, cardboard, or veneer, skip soaking and test flexibility by gently curving a strip in your hands.
Step 3: Lay Out the First Direction
Place your vertical strips on a flat surface, spacing them evenly. Use painter’s tape at the top and bottom to hold them in place. Try to keep the gaps consistent. The beauty of a tobacco basket is that it does not have to be mathematically perfect, but it should not look like it was assembled during an earthquake.
Step 4: Weave the Cross Strips
Take the horizontal strips and weave them over and under the vertical strips. Alternate the pattern with each new strip. If the first strip goes over-under-over, the next should go under-over-under. This creates the classic lattice look.
Once all strips are woven, adjust the spacing until the center looks balanced. Step back and look at it from a distance. DIY projects have a funny way of looking perfect up close and suspicious from across the room.
Step 5: Secure the Intersections
Use a small amount of hot glue or craft glue at the outer intersections where strips meet. You do not need to glue every crossing in the center unless the material is slippery. Focus on stabilizing the edges first. For extra durability, add mini brads, small staples, or tiny nails at key points along the rim area.
Step 6: Form the Raised Rim
The rim is what turns a flat woven panel into something that looks like a tobacco basket. Take your longer strips and wrap them around the outside edge of the woven square. Gently bend the corners upward to form a shallow tray shape. Use clamps or binder clips to hold everything in position while the glue dries.
For a more authentic look, use two layers of strips around the rim. Vintage-style tobacco baskets often have a stronger border than the center weave. A doubled rim gives the basket depth and helps it hold its shape on the wall.
Step 7: Trim the Ends
Once the rim is attached, trim any uneven strip ends. Keep the corners neat but not too perfect. A slightly handmade look is part of the charm. If you want a primitive farmhouse style, small irregularities can actually make the basket look more believable.
Step 8: Stain or Paint the Basket
Now comes the magic. A plain reed basket may look a little too new, so staining or painting helps create an aged finish. Use a warm brown stain for a classic tobacco basket look. For modern farmhouse décor, try weathered gray, whitewash, espresso, or a soft antique cream.
Apply stain lightly with a rag or foam brush, then wipe away excess. If using spray paint, hold the can far away and mist the basket gently. Heavy paint can flatten the woven texture. The goal is “beautifully aged,” not “fell into a paint bucket and gave up.”
Step 9: Add an Aged Finish
For a vintage look, dry-brush a little darker paint along the rim and corners. You can also sand a few raised areas after painting to expose the natural material underneath. A tiny bit of black or dark brown wax in the crevices can make the basket look older and more dimensional.
Step 10: Seal and Hang
Once the finish is dry, apply a clear matte sealer if the basket will be handled often or displayed in a humid area. To hang it, use a small nail, sawtooth hanger, picture wire, or removable wall hook depending on weight. For lightweight versions, adhesive hooks may work well. For heavier wood baskets, use proper wall hardware.
Decorating Ideas for a DIY Tobacco Basket
One of the best things about tobacco basket décor is how easy it is to update. The basket itself can stay on the wall year-round while the accessories change with the season.
Use It Behind a Wreath
A tobacco basket makes a perfect wreath backdrop. Add a boxwood wreath for everyday greenery, eucalyptus for a soft modern look, cotton stems for farmhouse style, or pine and berries for Christmas. The square basket behind the round wreath creates contrast, which is design-speak for “this looks intentional.”
Add a Sign
Attach a small wooden sign with words like “Home,” “Gather,” “Welcome,” or your family name. Keep the sign simple so the weave remains visible. A tobacco basket already has texture, so it does not need a motivational quote long enough to require a reading lamp.
Create Seasonal Displays
For spring, add faux tulips, lavender, or a soft ribbon. For summer, try sunflowers or greenery. For fall, use mini pumpkins, wheat stems, or burnt orange ribbon. For winter, add evergreen sprigs, bells, pinecones, or plaid accents.
Build a Basket Wall
Mix your DIY tobacco basket with round woven trays, shallow seagrass baskets, vintage strainers, or flat wall baskets. Arrange the pieces on the floor first, take a photo, then transfer the layout to the wall. This prevents the classic DIY problem of hanging one item perfectly and then realizing the rest of the wall has become a geometry exam.
Common Mistakes to Avoid
The most common mistake is using material that is too stiff. If the strips crack at the corners, the basket will not hold its shape. Always test the material before cutting every piece.
Another mistake is over-gluing. Too much glue can create bulky spots and shiny residue. Use small dots, especially if the basket will be stained. Hot glue is convenient, but strong craft glue or wood glue may create a cleaner long-term bond depending on your material.
Uneven spacing can also make the basket look messy. A handmade tobacco basket does not need perfect symmetry, but the weave should look balanced. Use a ruler at the beginning, then trust your eye as you adjust.
Finally, avoid making the finish too flat. Realistic farmhouse décor usually has layered tones. Combine stain, dry brushing, and light sanding to create depth. A basket with one solid color can still look nice, but a basket with variation looks more authentic.
Budget-Friendly Tips
A DIY tobacco basket does not need to be expensive. Look for basket reed at craft stores, online marketplaces, or basket-making suppliers. Check hardware stores for veneer edging, thin wood trim, or lath strips. Dollar stores may have poster board, clips, glue sticks, and seasonal decorations.
Repurposing is also your friend. Old bamboo placemats, broken woven baskets, thin blinds, or leftover craft wood can sometimes be transformed into basket strips. Just make sure the material is clean, safe to cut, and flexible enough to weave.
If you want the antique look without the antique price, focus on the finish. A warm stain, darker corners, and a slightly distressed rim can make inexpensive materials look surprisingly convincing. In DIY, confidence is half the project. The other half is hiding the glue strings before anyone sees them.
Where to Display a Tobacco Basket
A tobacco basket works almost anywhere you want warmth and texture. In an entryway, it creates an inviting first impression. In a dining room, it pairs beautifully with buffets, hutches, and farmhouse tables. In a kitchen, it softens hard surfaces like tile, metal, and stone. In a bedroom, it can replace traditional framed art above a headboard.
For a small space, use a mini tobacco basket on a shelf, tiered tray, or gallery wall. For a large space, make an oversized version and style it above a sofa or mantel. If your room has mostly neutral colors, a natural brown basket adds warmth. If your room already has lots of wood tones, a whitewashed or gray basket can provide contrast.
Personal Experiences and Practical Lessons from Making a DIY Tobacco Basket
The first thing you learn when making a DIY tobacco basket is that the project looks simpler in photos than it feels in your hands. In pictures, the strips sit politely in neat rows. In real life, one strip slides away, another pops up, and suddenly you are negotiating with craft materials like they have union representation. That is normal. The early stage always looks a little suspicious.
One helpful experience is to dry-fit everything before touching the glue gun. Lay the strips out, weave the center, adjust the spacing, and walk away for a few minutes. When you come back, you will usually notice one side is tighter than the other or one strip is drifting off like it has weekend plans. Fixing those issues before gluing saves a lot of frustration.
Clamps are another lesson. You can never have too many clamps, binder clips, or clothespins. The rim is the trickiest part because it needs to curve upward while staying attached to the woven center. If you try to hold everything with your hands while gluing, you may briefly question your life choices. Clips make the process calmer and keep the basket from flattening while it dries.
The finish is where personality appears. A freshly woven basket can look too clean, especially if you want vintage farmhouse style. Light stain instantly adds age, but the best results usually come from layering. Start with a natural brown stain, wipe it back, then dry-brush a little darker brown around the rim. If the basket becomes too dark, lightly brush on watered-down white or cream paint and wipe it away. This gives the surface that collected-over-time look.
Another practical lesson: do not overthink perfection. Real tobacco baskets were working objects, not delicate museum jewelry. A little unevenness makes the piece feel handmade. The goal is not a flawless factory grid. The goal is warmth, texture, and charm. If a corner sits slightly higher than the others, call it character and continue bravely.
Styling the finished basket can be even more fun than making it. One of the easiest looks is a tobacco basket with a small wreath attached slightly off-center. It feels casual but finished. For fall, a few faux leaves and wheat stems can turn it into seasonal décor in five minutes. For Christmas, greenery and ribbon make it look festive without requiring glitter cleanup, which is one of adulthood’s greatest blessings.
A DIY tobacco basket also makes a thoughtful handmade gift. It is personal without being overly specific, useful without being boring, and decorative without demanding a complete room makeover. Make a small version for a friend’s kitchen, a medium one for a housewarming gift, or a large one for someone who loves farmhouse décor. Add a removable wreath or sign so they can change the look later.
The biggest takeaway from making a DIY tobacco basket is that simple materials can create a surprisingly beautiful result. A few strips, some glue, stain, and patience can become a piece that looks like it came from an antique booth. It proves that farmhouse style does not have to be expensive or complicated. Sometimes the best décor is the kind you make yourself, preferably while drinking coffee and pretending the glue strings are part of the rustic aesthetic.
Conclusion
A DIY tobacco basket is more than a quick farmhouse craft. It is a simple way to bring history, texture, and handmade character into your home. Whether you use basket reed, veneer strips, craft wood, or poster board, the basic process is approachable: cut, weave, secure, shape, stain, and style.
The finished basket can be rustic, elegant, seasonal, or modern depending on how you decorate it. Hang it alone for a clean vintage statement, layer it behind a wreath, add a sign, or include it in a larger basket wall. With a little patience and a sense of humor, you can create a piece that looks collected, cozy, and far more expensive than it actually was.
And really, that is the heart of good DIY: making something beautiful, saving money, and casually mentioning at least three times that you made it yourself.

