
Body Care
How to Make a Crochet Picot Stitch
Jul
Note: This guide uses standard American crochet terminology. Crochet patterns may define a picot slightly differently, so always treat the pattern’s “special stitches” section as the final authority. The pattern is the boss; the yarn is merely the dramatic coworker.
A crochet picot stitch is one of those tiny details that can make a project look as though it attended finishing school. It creates a small decorative loop or point, often along an edge, and it can turn an ordinary blanket, washcloth, shawl, baby cardigan, or crochet flower into something with a little more personality.
The best part? A picot stitch looks fancy without requiring fancy-level suffering. Once you know how to chain and make a slip stitch, you already have the core skills. The trick is learning where to anchor the chain so the picot sits neatly instead of flopping around like it forgot why it came to the party.
This step-by-step crochet picot stitch tutorial explains the most common version, several useful variations, pattern abbreviations, border ideas, troubleshooting tips, and practical lessons that make the stitch easier to use in real projects.
What Is a Crochet Picot Stitch?
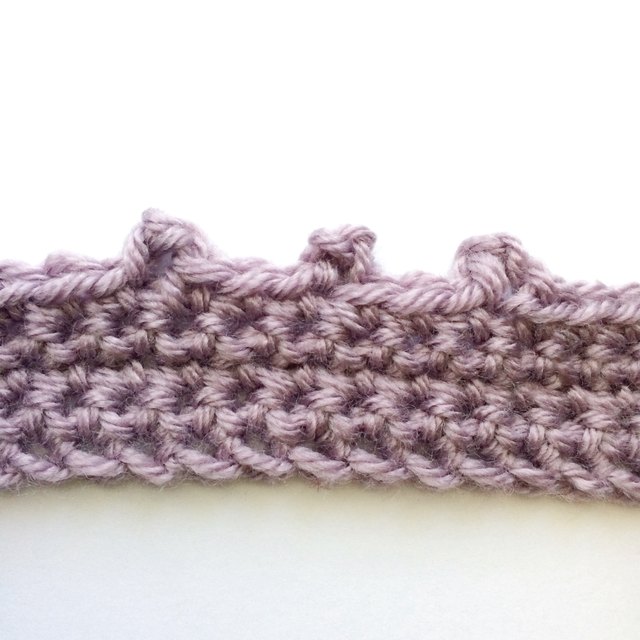
A picot is a small loop, bump, or pointed decorative element made with chain stitches and secured with a slip stitch or another anchor stitch. Picots are especially popular in crochet edging patterns because they add texture without adding much width, weight, or yarn consumption.
You will often see picots used in:
- Blanket borders and afghan edging
- Baby clothes and booties
- Crochet lace, shawls, and scarves
- Doilies, snowflakes, and thread crochet
- Flower petals and leaf motifs
- Necklines, sleeves, and hems
- Coasters, dishcloths, and decorative home projects
Think of a picot as crochet punctuation. A plain edge says, “This project is finished.” A picot edge says, “This project is finished, moisturized, and ready for compliments.”
What You Need Before Making a Picot Stitch
You do not need specialty tools to crochet a picot. A regular crochet hook and yarn are enough. For practice, choose a smooth, light-colored yarn in worsted weight or DK weight. Dark fuzzy yarn is beautiful in theory, but it can make locating tiny chains feel like searching for a black cat in a sock drawer.
Recommended Supplies
- Yarn suitable for your project
- A crochet hook in the size recommended on the yarn label
- Scissors
- A yarn needle for weaving in ends
- Optional stitch markers for borders worked in the round
Skills to Know First
Before learning how to make a crochet picot stitch, you should be comfortable with these beginner basics:
- Chain stitch (ch)
- Slip stitch (sl st)
- Single crochet (sc)
- Working into the top loops of a stitch
If you can make a chain and a slip stitch, you are already very close. The picot stitch is less a mountain and more a decorative speed bump.
Crochet Picot Stitch Abbreviations in U.S. Patterns
| Abbreviation | Meaning |
|---|---|
| ch | chain |
| sc | single crochet |
| sl st | slip stitch |
| st | stitch |
| sp | space |
| rep | repeat |
| picot or p | A picot stitch, defined by the individual pattern |
One important crochet truth: there is no single universal picot formula. A pattern may define a picot as “ch 3, sl st in first chain,” while another may say “sc, ch 3, sl st in the sc just made.” Both are valid. They simply create slightly different shapes.
How to Make a Basic Crochet Picot Stitch
The most dependable beginner-friendly version is a chain 3 picot anchored to the stitch you just made. It creates a small, sturdy decorative point that works well for blanket borders, washcloths, crochet garments, and projects that will be handled often.
Basic Picot Stitch Formula
sc in next stitch, ch 3, sl st in the top or front loop of the single crochet just made.
That is the whole recipe. Three chains, one tiny return trip, and suddenly your edge has opinions.
Step-by-Step Instructions
- Work a single crochet in the stitch where the pattern tells you to begin.
- Chain 3 stitches.
- Look back at the single crochet you just made.
- Insert your hook into the top loop or front loop of that single crochet, depending on the pattern instructions.
- Yarn over and pull the yarn through the stitch and through the loop already on your hook.
- You have completed a slip stitch and formed a picot.
- Continue to the next stitch or repeat the border pattern as instructed.
The finished picot should look like a tiny raised loop or pointed bump. It may not look perfectly sharp on the first attempt, and that is normal. Picots become more consistent when your chain tension becomes consistent.
Practice Swatch: Learn the Picot Stitch Without Risking Your Project
Before adding picots to a beloved blanket or a sweater you have been crocheting since the previous administration, make a quick practice swatch.
Simple Picot Border Practice Pattern
Foundation: Chain 21.
Row 1: Single crochet in the second chain from the hook and in each chain across. Turn.
Row 2: Chain 1, single crochet in each stitch across. Turn.
Row 3: Chain 1, single crochet in the first stitch. Then repeat: ch 3, sl st in the top loop of the single crochet just made, sc in each of the next 2 stitches. Continue across the row.
For a more evenly spaced border, use this repeat:
*sc in next stitch, ch 3, sl st in the sc just made, sc in next 2 stitches; repeat from * across.
When you reach the end, lay the swatch flat. Are the picots evenly spaced? Are they all approximately the same size? If yes, congratulations: you have successfully trained tiny yarn loops to stand in formation.
Two Common Crochet Picot Variations
Once you understand the basic technique, you can adjust the anchoring point, chain length, and spacing. These small changes create noticeably different effects.
1. The Anchored Picot
This is the sturdy version used often in crochet borders.
Instructions: Make a single crochet, chain 3, then slip stitch into the single crochet just made.
This type of picot sits close to the fabric and works well for items that need durability, such as dishcloths, baby blankets, pillow covers, and frequently worn garments.
2. The Closed Chain Picot
This version creates a narrower, more pointed loop and is often used in delicate lace, snowflakes, flowers, and thread crochet.
Instructions: Chain 3, then slip stitch into the third chain from the hook.
Because the chain closes on itself, the picot forms a tiny ring-like point. It is lovely for decorative work, but it can be a bit more fiddly when using fine yarn or thread.
3. The Larger Picot
To make a larger picot, simply increase the chain count.
- ch 2: Small, subtle picot
- ch 3: Standard picot
- ch 4: Larger decorative picot
- ch 5 or more: Dramatic loop, ruffle-like edge, or lace feature
Bigger is not always better. A chain 5 picot can look spectacular on a shawl but may look like tiny yarn antennae on a washcloth. Context matters.
How to Add a Picot Stitch Border to a Crochet Blanket
A picot crochet border is one of the easiest ways to give a blanket a polished finish. It works especially well after a plain round of single crochet, which creates a stable, even base for the decorative edging.
Start With a Foundation Border
First, crochet one round of single crochet around the blanket. Work one single crochet in each stitch along the top and bottom edges. Along the sides, space your single crochets as evenly as possible across the row ends.
In each corner, work three single crochets into the same corner stitch or corner space. This gives the border enough room to turn without pulling or curling.
Easy Blanket Picot Border Pattern
Round 1: Work single crochet evenly around the blanket, placing 3 single crochets in each corner. Join with a slip stitch.
Round 2: Chain 1. Repeat around: sc in next stitch, ch 3, sl st in the sc just made, sc in next 2 stitches. Adjust the number of single crochets between picots as needed so the spacing remains visually balanced.
At each corner, you can make a picot in the center single crochet of the corner group, or work several picots close together for a more decorative point.
Do not panic if the stitch count does not divide perfectly. Crochet is partly math and partly diplomacy. You can add or remove one plain single crochet near a corner to keep the final spacing neat.
How Far Apart Should Picot Stitches Be?
Picot spacing changes the mood of the entire edge. There is no universal rule, but these guidelines are helpful:
| Spacing | Effect | Best For |
|---|---|---|
| Picot in every stitch | Dense, frilly, textured | Small lace pieces, doll clothes, decorative trims |
| 1 stitch between picots | Playful and decorative | Baby blankets, coasters, washcloths |
| 2 to 3 stitches between picots | Balanced and subtle | Blankets, scarves, garment hems |
| 4 or more stitches between picots | Minimal, elegant accent | Shawls, sophisticated edging, lightweight projects |
For a first project, try one picot every three stitches. It usually gives enough detail to be noticeable without turning the edge into a yarn-based picket fence.
How to Read Picot Stitch Instructions in Crochet Patterns
Patterns often use shorthand instructions such as:
Picot: ch 3, sl st in first ch.
Or:
Picot: sc, ch 3, sl st in sc just made.
Or:
(sc, ch 3, sc) in same st.
These instructions may all produce a decorative point, but the construction is different. The first creates a closed chain loop. The second creates an anchored picot. The third creates a more open, decorative shape inside one stitch or chain space.
When reading a crochet pattern, locate the special stitch definition before beginning. Do not assume every picot is made the same way. Crochet designers are wonderfully creative people, which is excellent for art and mildly inconvenient for people who enjoy predictability.
Common Crochet Picot Stitch Problems and Fixes
My Picots Are Too Loose
Tighten your chain stitches slightly. You do not need to strangle the yarn, but each chain should be snug enough to hold its shape. Loose chains create floppy picots that may look more like accidental loops than intentional trim.
My Picots Are Too Tight
If you cannot insert your hook back into the anchor stitch or first chain, relax your tension. Try lifting the hook slightly as you make the three chains. A picot needs structure, not a tiny yarn stress fracture.
My Border Is Curling
Curling usually means there are too few stitches around the edge, especially along blanket sides and corners. Add more foundation single crochets before working the picot round. In corners, make sure there are enough stitches to allow the work to turn.
My Border Is Ruffling
Ruffling happens when there are too many stitches in the border. Remove a few foundation stitches, increase the spacing between picots, or skip a stitch occasionally if the pattern allows it.
My Picots Look Uneven
Uneven picots are almost always a tension issue. Practice several picots in a row while consciously making each chain the same height. Consistency matters more than perfection. Handmade projects should look handmade, not like they were assembled by a very anxious robot.
Best Yarn Choices for Crochet Picot Edging
Picots work with almost any yarn, but the texture of the yarn affects how clearly they show.
- Smooth cotton: Excellent for dishcloths, coasters, borders, and stitch definition.
- Acrylic yarn: Great for blankets and beginner practice because it is affordable and easy to handle.
- Wool: Lovely for warm accessories and textured borders, especially after gentle blocking.
- Fine cotton thread: Ideal for lace, snowflakes, doilies, and delicate picot details.
- Fuzzy or eyelash yarn: Possible, but the picots may disappear into the fluff like they are avoiding responsibility.
Should You Block a Crochet Picot Stitch?
Blocking can make picots look much sharper and more even, especially in lace crochet, shawls, snowflakes, and thread projects. Wet blocking or gentle steam blocking can help open the small loops and define the border.
Always check the yarn label before applying heat. Acrylic yarn can be damaged or permanently altered by high heat, so use steam carefully and do not press the iron directly onto the fabric.
For a blanket or washcloth, blocking is optional. For a lacy shawl with dozens of picots along the edge, blocking can be the difference between “nice project” and “wait, you made that?”
Creative Ways to Use Picot Stitches
Once you know how to crochet a picot stitch, it becomes a handy design tool rather than just a border trick.
- Add picots to the edge of a granny square blanket.
- Create tiny points around crochet flower petals.
- Use picots in snowflake patterns for crisp, icy tips.
- Finish a baby cardigan neckline with a soft decorative edge.
- Add contrast-color picots to a simple scarf.
- Use a picot border around hand towels or washcloths.
- Create a delicate finish on shawls, wraps, and lace tops.
- Place picots at corners to make crochet motifs look more defined.
A contrasting color can make picots stand out dramatically. A matching color creates a softer, more refined result. Both are good choices; one whispers, while the other arrives wearing sequins.
Practical Experience: What I Learned From Using Picot Stitches
The first time many crocheters make a picot, they expect immediate tiny perfection. Instead, they may get one beautiful point, one floppy loop, one knot that looks suspiciously like it has a personal grudge, and one picot that disappears entirely. This is normal. The picot stitch is simple, but it rewards calm repetition.
The most useful lesson is that picots look better when they are supported by a stable foundation. Adding a picot border directly to uneven row ends can produce a wavy result, even when every individual picot is technically correct. A round of evenly spaced single crochet before the decorative edging makes the entire border behave more politely.
Another lesson is that chain tension matters more here than it does in many basic crochet stitches. A loose chain can make one picot noticeably larger than the others. A tight chain can make the loop vanish into the stitch below it. When practicing, pause after every few picots and look at the overall edge rather than judging each one in isolation. Crochet is easier when you inspect the forest, not just the one oddly shaped yarn tree.
Spacing is also surprisingly important. Picots placed in every stitch can look charming on a tiny baby sweater or a lace ornament, but the same spacing can overwhelm a large throw blanket. On a blanket, leaving two or three stitches between picots often gives the border a cleaner rhythm. On a shawl, wider spacing can create an elegant scalloped outline without competing with the main stitch pattern.
Color changes can teach another valuable lesson. A picot border in the same color as the project is forgiving because slight inconsistencies blend in. A high-contrast border makes every picot visible, including the one you made while watching television and briefly forgot how crochet works. Contrast is beautiful, but it asks for a little more attention to tension and stitch placement.
Picots are also excellent confidence builders. They look advanced enough to impress non-crocheters, yet they rely on basic skills you probably already know. This makes them perfect for beginner projects that need a polished finish. A plain single crochet washcloth can become a thoughtful gift with a picot edging. A simple baby blanket can look more special with one final decorative round. A beginner shawl can suddenly appear much more intentional, even if you spent half the project wondering whether you had enough yarn.
One final practical tip: do not be afraid to unravel a few picots and try again. They are quick to remake, and correcting them early is easier than discovering an uneven border after you have worked all the way around a six-foot blanket. Keep your yarn relaxed, make the chains consistent, and remember that picots are tiny details with outsized charm. Once the motion becomes familiar, you will start adding them everywhere. Mugs may be safe. Blankets, sleeves, coasters, and innocent scarf edges are not.
Conclusion
Learning how to make a crochet picot stitch gives you an easy way to add texture, charm, and a finished look to handmade projects. The basic method is simple: make a short chain, anchor it with a slip stitch, and repeat with even tension. From there, you can experiment with bigger picots, tighter picots, wider spacing, decorative corners, and lace-inspired variations.
Start with a small swatch, use smooth yarn, and practice the chain 3 picot until the movement feels natural. Soon, that tiny loop will become one of your favorite crochet finishing techniques: quick, versatile, and just fancy enough to make your project look like it has its life together.

