Beauty Unlocked
How to Make a Letterboard Pumpkin
May
Note: This article is original, web-ready content written in standard American English. It is based on practical DIY methods commonly used for faux pumpkins, no-carve pumpkin decorating, letter board crafts, painted pumpkin projects, and seasonal home styling.
A letterboard pumpkin is the cozy fall craft that says, “I decorated,” without requiring you to wrestle pumpkin guts on your kitchen table. It combines the charm of a classic letter board with the seasonal personality of a pumpkin, giving you a customizable piece of Halloween or autumn decor you can change whenever your mood swings from “Hello, Fall” to “Creep It Real.”
The best part? You do not need to be a professional crafter. You do not need a workshop, a garage full of tools, or the steady hand of a pumpkin surgeon. With a faux pumpkin, a small felt or foam letterboard panel, removable letters, glue, paint, and a little patience, you can create a statement piece for your mantel, porch, entryway, bookshelf, office desk, or Thanksgiving buffet table.
This in-depth guide explains exactly how to make a letterboard pumpkin, what supplies work best, how to customize it, and how to avoid the most common “oops, why is this crooked?” moments. We will also cover phrase ideas, styling tips, budget-friendly alternatives, and real craft-room lessons learned from making this project more than once.
What Is a Letterboard Pumpkin?
A letterboard pumpkin is a decorative pumpkin with a message area built into it. The message may be made with plastic letter board letters, printable paper letters, vinyl decals, stickers, stencils, or hand-painted text. Some versions use an actual mini felt letter board inserted into the front of a pumpkin, while others create the look of a letterboard using foam board, felt, ridges, and alphabet pieces.
Think of it as a pumpkin with a tiny personality billboard. Instead of carving a face, you display a seasonal phrase. You can make it spooky, sweet, sarcastic, farmhouse-style, modern, kid-friendly, or full-on Halloween drama. One pumpkin can say “Boo,” another can say “Pumpkin Spice Everything,” and a third can quietly judge everyone with “I’m Just Here for the Candy.”
Why This DIY Pumpkin Craft Is Worth Making
A DIY letterboard pumpkin is popular because it checks several boxes at once: it is no-carve, reusable, customizable, and easy to match with different fall decor styles. If you use a faux craft pumpkin, you can store it and bring it back next year. If you use removable letters, you can update the phrase all season long.
This project also works for different skill levels. Beginners can use a ready-made mini letter board and hot glue it into a pumpkin opening. More confident crafters can build a custom letterboard face from foam board, felt, and tiny letters. If you have a cutting machine, you can use vinyl phrases. If you prefer paint, you can stencil or hand-letter your message.
In short, the letterboard pumpkin is flexible. It behaves nicely on a mantel, makes a cute centerpiece, and does not leak orange slime onto your dining table. That alone deserves applause.
Supplies You Will Need
Before you start, gather everything in one place. This keeps the project smooth and prevents the classic mid-craft hunt for scissors, which always ends with finding three glue sticks and no scissors.
Basic Supplies
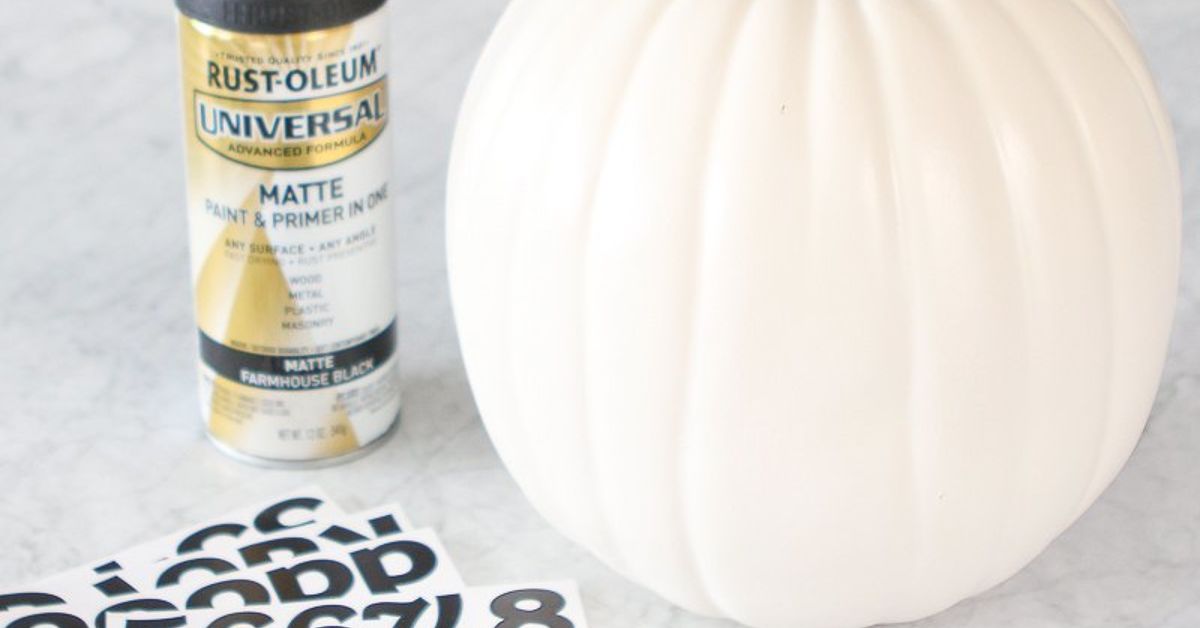
- One faux craft pumpkin, preferably foam or carvable plastic
- Mini felt letter board, black foam board, or white foam board
- Plastic letter board letters, printable letters, stickers, or vinyl letters
- Craft knife or utility knife
- Cutting mat or thick cardboard to protect your work surface
- Pencil or washable marker
- Hot glue gun and glue sticks
- Acrylic craft paint or spray paint
- Paintbrush or foam brush
- Ruler or measuring tape
- Optional: painter’s tape, ribbon, twine, faux leaves, mini spiders, bats, or florals
Best Pumpkin to Use
A faux pumpkin is the best choice for a letterboard pumpkin because it is cleaner, lighter, and reusable. Foam craft pumpkins are especially easy to cut, paint, and decorate. A real pumpkin can work if you want a temporary display, but it will eventually soften, shrink, or rot. That is not the cozy fall vibe most of us are going for.
Choose a pumpkin with a fairly smooth front. Deep ridges look beautiful, but they make it harder to cut a neat opening or attach a flat letterboard surface. White, cream, orange, sage green, matte black, and muted terracotta pumpkins all work well depending on your home style.
Step-by-Step Guide: How to Make a Letterboard Pumpkin
Step 1: Plan Your Design
Start by deciding how you want the finished pumpkin to look. Do you want the letterboard inserted into the pumpkin like a framed sign? Do you want the message attached directly to the pumpkin surface? Do you want a clean modern design or a playful Halloween look?
Place your pumpkin on the table and turn it until you find the best “front.” Most faux pumpkins have one side that looks smoother or more balanced. Mark that side lightly with a pencil. Then hold your mini letter board or foam board against the pumpkin to estimate the size of the opening.
If your pumpkin is small, a simple word like “Boo” or “Fall” may look better than a long phrase. If your pumpkin is larger, you can use a full quote such as “Trick or Treat Yo’Self” or “Hello Pumpkin.”
Step 2: Trace the Letterboard Opening
If you are inserting a mini letter board, place it on the front of the pumpkin and trace around it. A rectangle usually works best, but you can also create an oval or rounded window if your pumpkin shape suits it.
Leave a little extra room around the traced line. You can always make the opening larger, but making it smaller requires craft magic, and craft magic usually looks like extra glue and regret.
If you are making a flat surface letterboard instead of inserting one, trace the shape of the area where your board will sit. You may not need to cut into the pumpkin at all. This is a great option for beginners or for anyone who wants a faster no-carve pumpkin craft.
Step 3: Cut the Pumpkin Carefully
Place the pumpkin on a stable surface. Use a craft knife or utility knife to cut along your traced outline. Work slowly and keep your fingers away from the blade. Foam pumpkins are easier to cut than real pumpkins, but they can still slip if you rush.
Once the opening is cut, gently remove the front piece. If the edges look rough, trim them slowly. You can also paint the edge later or cover it with ribbon, trim, rope, or a thin frame made from craft sticks.
If your pumpkin has a hollow inside, check whether the letter board fits securely. If the pumpkin is solid foam, you may need to carve out a shallow recess so the board sits flush.
Step 4: Paint the Pumpkin
Now it is time to give your pumpkin its personality. Acrylic craft paint works well for small indoor pumpkins. Spray paint is useful for larger pumpkins or for a smoother finish, but it should be used in a well-ventilated area. Apply thin coats rather than one heavy coat. Heavy paint can drip, pool in the pumpkin grooves, or stay tacky longer than expected.
Popular colors include matte black for a spooky look, white for farmhouse decor, soft beige for neutral fall styling, sage green for modern autumn decor, and metallic gold or copper for a glam centerpiece.
Let the pumpkin dry completely before adding the letterboard. Dry time depends on the paint, humidity, and thickness of your coats. When in doubt, wait longer. Crafting rewards patience, even when patience is deeply annoying.
Step 5: Prepare the Letterboard Panel
If you are using a mini felt letter board, you may only need to trim the backing or remove the stand. If you are building your own, cut a piece of foam board to fit the opening. Cover it with felt, textured cardstock, or black poster board. For a classic letterboard look, use thin horizontal strips of foam, cord, or layered cardstock to create grooves.
Another easy method is to use printable letters and attach them to a black or white background. This gives the look of a letter board without needing traditional plastic letters. It is especially useful if you want a specific font, color, or phrase.
Step 6: Attach the Letterboard to the Pumpkin
Test the fit before using glue. The panel should sit straight and snug. If it wobbles, add small pieces of foam inside the pumpkin as support. Once you like the placement, use hot glue around the back edge of the board and press it into place.
Hold it for several seconds until the glue grips. If the board is heavy, add extra glue from the inside of the pumpkin. You can also use strong craft adhesive, but hot glue is faster and easier for most faux pumpkin projects.
Step 7: Add Your Message
This is the fun part. Add your plastic letters, stickers, vinyl phrase, or printable letters. Start from the center and work outward so the text looks balanced. Use a ruler if you want precise spacing.
Short phrases usually look best. A letterboard pumpkin has limited space, and tiny crowded letters can be hard to read from across the room. Choose a message that feels seasonal and clear.
Step 8: Decorate the Edges
To make the pumpkin look finished, decorate around the letterboard opening. You can glue on rope trim, black ribbon, mini pom-pom trim, faux leaves, tiny bats, glitter stars, lace, or small florals. A simple border hides rough cuts and gives the project a polished look.
If you prefer a minimal style, skip the extras and let the message be the star. Not every pumpkin needs a feather boa. Some pumpkins are introverts.
Letterboard Pumpkin Phrase Ideas
The phrase you choose sets the tone of your pumpkin. Here are some easy ideas for different styles.
Classic Fall Phrases
- Hello, Fall
- Happy Harvest
- Gather Here
- Pumpkin Season
- Autumn Leaves & Cozy Please
Funny Halloween Phrases
- Trick or Treat Yo’Self
- Witch, Please
- Creep It Real
- Boo Felicia
- Resting Witch Face
Thanksgiving Phrases
- Grateful Hearts
- Pass the Pie
- Thankful & Stuffed
- Gather and Gobble
- Leftovers Are Love
Design Variations to Try
Farmhouse Letterboard Pumpkin
Use a white faux pumpkin, black letterboard panel, white letters, and jute rope around the opening. Add a small buffalo-check bow near the stem for that “I own a cozy throw blanket for every chair” energy.
Modern Minimalist Pumpkin
Paint the pumpkin matte black, cream, or clay brown. Use simple white letters and skip extra decorations. This version looks beautiful on a mantel with taper candles, dried grasses, or neutral ceramic pumpkins.
Kid-Friendly Pumpkin
Use a lightweight foam pumpkin and stick-on letters instead of hot-glued plastic letters. Let kids choose the message and decorate with felt stickers, googly eyes, paper bats, or foam shapes. Adults should handle cutting and hot glue.
Glam Letterboard Pumpkin
Paint the pumpkin metallic gold, copper, champagne, or pearl white. Use black letters and add rhinestones, gold trim, or velvet ribbon. This version works well for Halloween parties, fall weddings, and entryway displays.
Porch Display Pumpkin
If you plan to use your letterboard pumpkin outside, choose weather-resistant materials and place it in a covered area. Moisture can loosen paper letters, warp cardboard, and weaken glue. A covered porch is much kinder than a rainy front step.
Common Mistakes and How to Avoid Them
Cutting the Opening Too Big
Measure twice and cut once. If the opening is too large, the board may fall inward or look uneven. Trace carefully and cut slightly inside the line first. You can enlarge the opening gradually if needed.
Using Too Much Paint
Thick paint can hide details, drip into grooves, and take forever to dry. Use thin coats and let each layer dry before adding another. This is especially important with spray paint.
Choosing a Phrase That Is Too Long
A tiny pumpkin cannot carry a paragraph. Keep your phrase short, readable, and bold. If you want a longer message, use a larger pumpkin or create a stacked display with multiple pumpkins.
Skipping the Dry Fit
Always test the letterboard placement before gluing. A dry fit helps you catch crooked angles, tight corners, and awkward gaps before everything becomes permanent.
Ignoring the Back
If your pumpkin will sit where people can see it from multiple angles, tidy up the back and inside. Add felt, paper, or extra paint to cover rough areas. It is a small detail, but it makes the finished project feel more professional.
How to Style a Letterboard Pumpkin
A letterboard pumpkin looks great on its own, but it shines even more when styled with other fall decor. Place it on a mantel with eucalyptus garland, mini pumpkins, wood beads, and candleholders. For a porch, pair it with mums, lanterns, hay bales, and a plaid doormat. For a dining table, use it as the centerpiece with taper candles, dried leaves, and small gourds.
Use height to make your display more interesting. Set the pumpkin on a cake stand, stack of books, wooden riser, or tray. A little elevation helps the message stand out and makes the whole arrangement feel intentional.
Color matters, too. If your home decor leans neutral, choose cream, tan, black, or sage. If you love traditional Halloween, go with orange, purple, black, and white. If your style is playful, try pink, mint, lavender, or glitter. Fall decor does not have to be trapped in a pumpkin-spice color palette forever.
How to Store Your Letterboard Pumpkin
When the season ends, remove any loose decorations and wipe the pumpkin with a dry cloth. Store it in a plastic bin or sturdy box. Wrap fragile trim or raised letters in tissue paper so they do not snap off. Keep it away from heavy decorations that could crush the pumpkin or bend the letterboard panel.
If you used removable letters, store extra letters in a small labeled bag. Future you will be grateful. Future you does not want to dig through a Halloween bin looking for one missing letter “E.”
My Experience Making Letterboard Pumpkins: What Actually Helps
The first time I made a letterboard pumpkin, I confidently assumed it would take about twenty minutes. This was adorable of me. The project is not difficult, but it does reward careful measuring, drying time, and a little design planning. The biggest lesson I learned is that the pumpkin shape matters more than you think. A pumpkin with dramatic ridges may look beautiful in the store, but once you try to attach a flat letterboard to it, those ridges become tiny mountains of inconvenience. A smoother faux pumpkin makes the whole process easier.
I also learned that it is smart to choose the phrase before cutting anything. I once made the opening first, then realized my message needed more room. The phrase looked squeezed, like it was wearing jeans fresh from the dryer. Now I lay out the letters on the board before touching the knife. If the words look crowded on the table, they will look even more crowded on the pumpkin.
Another helpful experience: painting before gluing is almost always better. If you attach the letterboard first, you have to paint around it, and that creates more chances for smudges. Paint the pumpkin, let it dry fully, then add the board. I know waiting is not exciting. Nobody starts a craft because they dream of watching paint dry. But rushing the dry time can leave fingerprints, dents, or sticky spots that collect dust.
Hot glue is useful, but it is not a personality trait. Use enough to secure the board, but do not flood the edges. Too much glue can squeeze out and create shiny lumps around the frame. If that happens, let the glue cool and carefully trim it with small scissors or cover it with ribbon or rope trim. A border is a wonderful disguise. In crafting, as in life, a cute accessory can solve many problems.
For the cleanest look, I prefer a black or charcoal letterboard with white letters. It reads clearly from across the room and looks good with almost every pumpkin color. White pumpkins feel farmhouse and classic. Black pumpkins feel spooky and chic. Muted green pumpkins are surprisingly stylish and work well beyond Halloween. If you want the pumpkin to last from September through Thanksgiving, choose a fall phrase rather than a Halloween-only phrase. “Gather,” “Thankful,” and “Hello, Fall” have a longer shelf life than “Boo,” though “Boo” is admittedly hard to beat for cuteness.
One final tip from experience: make more than one if you can. Letterboard pumpkins look especially good in groups of three. Use different sizes, different colors, and related phrases. For example, one small pumpkin can say “Boo,” a medium one can say “Creep It Real,” and a larger one can say “Trick or Treat Yo’Self.” Together, they create a display that looks planned without feeling too perfect. And if one turns out slightly crooked, just place it in the back and call it rustic charm.
Final Thoughts
Learning how to make a letterboard pumpkin is a simple way to add personality to your fall decor. It is creative without being complicated, stylish without being expensive, and customizable enough to fit almost any home. Whether you want a spooky Halloween pumpkin, a sweet Thanksgiving centerpiece, or a funny fall message for your entryway, this DIY project gives you plenty of room to play.
The key is to start with the right pumpkin, plan your message, cut carefully, paint in thin coats, and secure the letterboard neatly. From there, the design is yours. Add ribbon, leaves, bats, glitter, florals, or nothing at all. Keep it classic or make it wonderfully weird. After all, pumpkins are seasonal, but a good pun is forever.
