
Beauty Unlocked
How to Brown a Roast for Cooking in a Crockpot: 9 Steps
Jul
Note: This article is based on practical cooking guidance and food-safety principles from reputable U.S. culinary and government resources, including USDA FSIS, FoodSafety.gov, Serious Eats, Southern Living, Bon Appétit, Allrecipes, Taste of Home, Food Network, The Spruce Eats, Good Housekeeping, Food52, and Wired.
Why Browning a Roast Before Crockpot Cooking Is Worth It
There are two kinds of slow cooker people: the “dump everything in and flee the kitchen” crowd, and the “I own tongs and I’m not afraid to use them” crowd. Both can make dinner. But if you want a roast that tastes rich, savory, and deeply comforting instead of vaguely beige and apologetic, browning the roast before it goes into the crockpot is the move.
Browning a roast does not “seal in the juices.” That old kitchen myth has been hanging around longer than the mystery container in the back of the freezer. What browning actually does is build flavor. When the surface of meat hits a hot pan, a delicious browning process called the Maillard reaction occurs. Proteins and natural sugars on the surface of the roast transform into a dark, savory crust. That crust becomes the flavor foundation for your slow cooker roast, gravy, vegetables, and broth.
A crockpot is wonderful at tenderizing tough cuts of meat like chuck roast, shoulder roast, rump roast, and brisket. It uses low, moist heat over several hours to break down connective tissue and turn budget-friendly beef into fork-tender comfort food. What it does not do well is create a browned exterior. Slow cookers are moist environments, and moisture is the sworn enemy of crust. That is why a quick sear on the stovetop before slow cooking makes such a dramatic difference.
The good news? Browning a roast is not complicated. You do not need a culinary degree, a copper pan, or a dramatic French accent. You need a dry roast, a hot skillet, a little oil, seasoning, and the patience to let the meat sit still long enough to brown. Below is a complete 9-step guide to browning a roast for cooking in a crockpot, plus practical tips, troubleshooting advice, and real-world experience to help you avoid the most common mistakes.
How to Brown a Roast for Cooking in a Crockpot: 9 Steps
Step 1: Choose the Right Roast
For crockpot cooking, the best roast is usually a tougher, well-marbled cut. Chuck roast is the classic choice because it has enough fat and connective tissue to become tender during a long cook. Other good options include shoulder roast, bottom round roast, rump roast, brisket, and arm roast.
Lean roasts can work, but they are less forgiving. A very lean cut may become dry if cooked too long, even in a slow cooker. If you want that fall-apart texture people dream about when they say “Sunday dinner,” choose a roast with visible marbling. Fat is not the villain here; it is the tiny flavor intern working overtime.
Step 2: Thaw the Roast Completely
Do not brown a frozen roast. A frozen center makes it difficult to sear evenly, and it can create food-safety problems in slow cooking because the meat may spend too much time warming through the temperature danger zone. Thaw the roast in the refrigerator until it is fully defrosted.
If the roast is still icy in the middle, give it more time. A large roast can take a full day or longer to thaw safely in the fridge. Planning ahead may not sound exciting, but neither does trying to sear a beef iceberg while your smoke alarm sings backup vocals.
Step 3: Pat the Roast Very Dry
This step is small but mighty. Before seasoning, place the roast on a cutting board or plate and blot every side with paper towels. Surface moisture turns into steam in the pan, and steam prevents browning. Instead of a golden crust, you get gray meat that looks like it has given up on its dreams.
A dry surface allows the roast to make direct contact with the hot pan. That contact is what creates browning. Take your time here. Pat the top, bottom, sides, and any uneven edges. If the paper towel comes away wet, keep blotting.
Step 4: Season Generously
At minimum, season the roast with kosher salt and freshly ground black pepper. For extra flavor, add garlic powder, onion powder, smoked paprika, dried thyme, rosemary, or a small amount of mustard powder. Keep the seasoning simple if you plan to use a strongly flavored sauce or gravy in the crockpot.
Salt helps flavor the meat and improves the final dish. If you have time, season the roast 30 minutes before browning and let it rest uncovered in the refrigerator or on the counter briefly while you prepare the skillet. If you are in a rush, season right before searing. Dinner will survive.
Step 5: Heat a Heavy Skillet Until Hot
Use a heavy-bottomed skillet, cast-iron pan, stainless steel sauté pan, or Dutch oven. Nonstick pans can work in a pinch, but they usually do not create the same deep crust as cast iron or stainless steel. Heat the pan over medium-high to high heat until it is properly hot.
A good test is to flick a few drops of water into the pan. If they sizzle and evaporate quickly, the pan is ready. Do not add the roast to a lukewarm skillet. A cold pan encourages sticking, steaming, and sadness.
Step 6: Add a High-Heat Oil
Add one to two tablespoons of a high-heat oil such as canola oil, avocado oil, vegetable oil, grapeseed oil, or light olive oil. Swirl the oil to coat the bottom of the pan. It should shimmer but not smoke aggressively.
Butter is not the best choice for the initial sear because it can burn quickly. If you love buttery flavor, add a small knob of butter near the end of browning after the crust has already formed. Think of butter as the finishing singer, not the opening act.
Step 7: Sear the Roast on All Sides
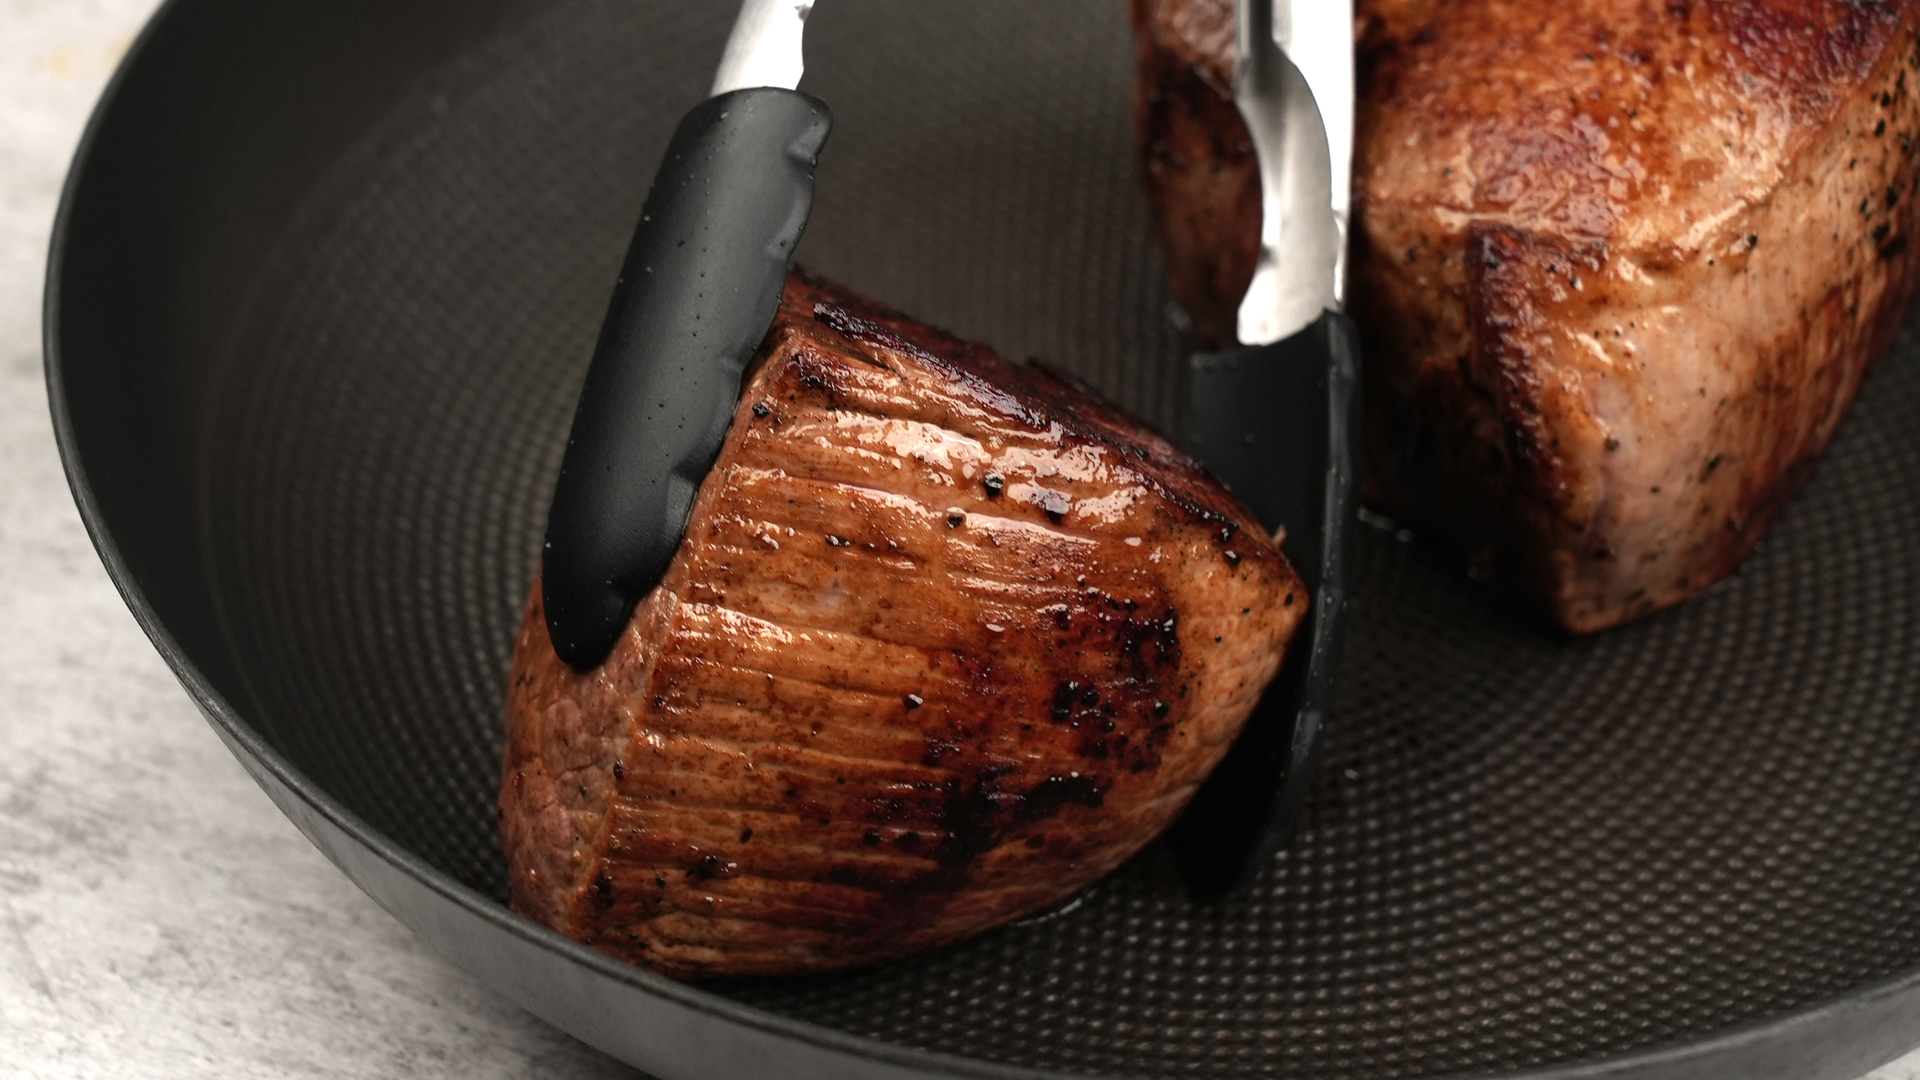
Place the roast in the hot pan and leave it alone for 3 to 5 minutes on the first side. Do not poke it. Do not slide it around. Do not keep checking underneath every ten seconds like the roast owes you money. Let the crust develop.
Once the first side is deeply browned, use sturdy tongs to turn the roast. Brown the second side, then continue browning the edges. Depending on the shape of the roast, you may need to hold it upright with tongs for a minute or two to sear the sides. The goal is not to cook the roast through. The goal is to build a flavorful brown crust before the crockpot does the slow, tenderizing work.
Step 8: Deglaze the Pan
After browning, transfer the roast to the crockpot. Do not wash the skillet. Those browned bits stuck to the bottom are called fond, and they are concentrated flavor. Add a splash of beef broth, red wine, stock, water, or even a little coffee to the hot pan. Scrape the bottom with a wooden spoon to loosen the browned bits.
Pour this flavorful liquid into the crockpot over or around the roast. This step turns pan residue into gravy magic. Skipping it is like leaving money on the table, except the money tastes like beef.
Step 9: Slow Cook Until Tender
Once the browned roast is in the crockpot, add aromatics and liquid. Onions, carrots, celery, garlic, tomato paste, Worcestershire sauce, bay leaves, thyme, and beef broth are all classic choices. Cook on low for the most tender result, usually 8 to 10 hours for a 3- to 4-pound chuck roast. The high setting can work in about 5 to 6 hours, but low and slow generally produces a better texture.
For food safety, use a food thermometer. Whole beef roasts should reach a safe minimum internal temperature of 145 degrees Fahrenheit followed by a rest time. However, pot roast is usually cooked well beyond that for tenderness, often until the meat easily pulls apart with a fork. Tenderness, not just temperature, is the sign that a crockpot roast is ready for the dinner table.
Common Mistakes When Browning a Roast
Mistake 1: Crowding the Pan
A whole roast usually fits in one pan, but if you cut the roast into large pieces, brown them in batches. Crowding drops the pan temperature and creates steam. Steam makes meat gray instead of brown. Give each piece breathing room, like introverts at a family reunion.
Mistake 2: Moving the Meat Too Soon
If the roast sticks when you try to turn it, it may not be ready. Properly browned meat often releases more easily from the pan. Give it another minute, then try again. Patience is the secret ingredient nobody wants to measure.
Mistake 3: Using Too Much Liquid in the Crockpot
A slow cooker traps moisture. You do not need to drown the roast. Too much liquid can dilute the flavor and create a thin sauce. For most pot roasts, one to two cups of liquid is enough, depending on the recipe, size of the cooker, and amount of vegetables.
Mistake 4: Forgetting to Deglaze
Deglazing takes less than two minutes and adds major flavor. The browned bits in the skillet are not burnt unless they are black and bitter. If they are dark brown and smell savory, they belong in your crockpot.
Mistake 5: Browning With Wet Seasoning
Wet marinades, sugary sauces, and thick pastes can burn before the roast browns properly. If you use a marinade, pat the roast dry before searing. Add barbecue sauce, gravy mix, or sweet glazes later in the crockpot, not at the beginning of the sear.
Best Seasonings for a Browned Crockpot Roast
A browned roast already has a strong savory base, so seasonings should support the beef rather than bury it. A classic blend includes kosher salt, black pepper, garlic powder, onion powder, and dried thyme. For a smoky flavor, add smoked paprika. For a richer gravy, add tomato paste to the pan after browning the roast and cook it for about one minute before deglazing.
If you want a French-inspired pot roast, use thyme, rosemary, bay leaf, red wine, and beef stock. For a homestyle American roast, use onion soup mix, Worcestershire sauce, carrots, potatoes, and celery. For a slightly spicy version, add cracked pepper, chili powder, and a small amount of chipotle powder. Go easy with heat because slow cooking can intensify some spices over time.
Should You Flour the Roast Before Browning?
Flouring a roast before browning is optional. A light coating of flour can help create a crust and thicken the final gravy. However, too much flour can burn in the skillet or make the sauce pasty. If you use flour, dust the roast lightly after seasoning and shake off the excess.
For gluten-free cooking, skip the flour and thicken the gravy at the end with cornstarch slurry. Mix one tablespoon of cornstarch with one tablespoon of cold water, stir it into the hot cooking liquid, and let it thicken. This gives you control over the final texture without risking burnt flour during browning.
What to Put in the Crockpot After Browning
After browning the roast, build layers of flavor in the crockpot. Place hearty vegetables like carrots, potatoes, and onions on the bottom or around the sides. Add the roast, then pour in the deglazed pan liquid and broth. Add garlic, herbs, Worcestershire sauce, tomato paste, or a splash of balsamic vinegar for depth.
Avoid adding delicate vegetables too early. Peas, mushrooms, and fresh herbs are better near the end of cooking. Dairy products such as cream, sour cream, and milk should also be added late because they can separate during long cooking. The slow cooker is patient, but it is not gentle with everything.
How Long to Cook a Browned Roast in a Crockpot
A 3- to 4-pound chuck roast usually takes 8 to 10 hours on low or 5 to 6 hours on high. Larger roasts may need more time. Leaner cuts may become sliceable rather than shreddable. If you want a fall-apart roast, cook until a fork slides in easily and the meat pulls apart with little resistance.
Try not to lift the lid repeatedly. Every peek releases heat and extends cooking time. Yes, it smells amazing. Yes, you want to check. No, the roast does not need emotional support every 20 minutes.
Specific Example: Simple Browned Chuck Roast for the Crockpot
Ingredients
- 1 beef chuck roast, 3 to 4 pounds
- 2 teaspoons kosher salt
- 1 teaspoon black pepper
- 1 teaspoon garlic powder
- 1 tablespoon vegetable oil or avocado oil
- 1 large onion, sliced
- 3 carrots, cut into chunks
- 1 pound baby potatoes
- 2 cups low-sodium beef broth
- 1 tablespoon Worcestershire sauce
- 2 tablespoons tomato paste
- 2 sprigs thyme or 1 teaspoon dried thyme
Method
Pat the roast dry, season it with salt, pepper, and garlic powder, then sear it in hot oil until browned on all sides. Transfer it to the crockpot. Add tomato paste to the skillet and cook briefly, then deglaze with beef broth while scraping up the browned bits. Put onions, carrots, and potatoes around the roast. Pour the broth mixture into the crockpot, add Worcestershire sauce and thyme, cover, and cook on low for 8 to 10 hours.
When the meat is tender, remove it to a platter and rest it for several minutes. Skim excess fat from the cooking liquid, thicken it if desired, and serve the roast with vegetables and gravy. This is the kind of meal that makes people wander into the kitchen asking, “Is it ready yet?” approximately 47 times.
Experience-Based Tips for Browning a Roast Before Crockpot Cooking
The biggest lesson from browning roasts at home is that confidence matters less than heat management. Many beginners are afraid of a hot pan. They turn the burner down too far, add the roast too soon, and then wonder why the meat looks dull instead of deeply browned. A properly hot pan is essential. The roast should sizzle loudly when it touches the surface. If it whispers politely, the pan is not ready.
Another practical experience: paper towels are not optional. Even a good-quality roast can have enough surface moisture to ruin the first few minutes of searing. If you season a wet roast and drop it into oil, you are steaming first and browning later, if at all. Drying the meat feels like a tiny step, but it changes everything. The crust forms faster, the color is better, and the pan develops more flavorful browned bits for deglazing.
It also helps to think of browning as flavor-building, not cooking. The roast does not need to look finished when it leaves the skillet. In fact, it should still be raw inside. The crockpot handles the long cooking. Your skillet is only creating the outer layer of flavor. This mindset prevents over-searing, burning spices, or spending 25 minutes trying to “cook” a roast that is about to spend the entire day in a slow cooker anyway.
One of the most common mistakes is using a pan that is too small. A large roast needs room, especially when you are trying to brown the sides. If the pan is cramped, the roast traps steam and the edges stay pale. A cast-iron skillet or wide Dutch oven makes the job easier. If the roast has an awkward shape, use tongs to hold it against the pan for short bursts. It may feel silly, but the browned edges make a real difference in the final gravy.
Deglazing is where many home cooks accidentally become much better cooks. After removing the roast, the bottom of the pan may look messy. That mess is flavor. Add broth, wine, or even water, then scrape with a wooden spoon. The liquid will darken quickly as the browned bits dissolve. Pour that into the slow cooker and suddenly your pot roast has a deeper, more restaurant-style base. It is one of those small habits that makes people think you did something complicated.
Seasoning is another area where experience helps. Salt and pepper are enough, but dried herbs and spices can make the roast feel more intentional. Garlic powder and onion powder are dependable. Smoked paprika adds color and warmth. Rosemary is powerful, so use it carefully unless you want the roast to taste like it was slow-cooked inside a Christmas wreath. Fresh herbs are lovely, but long cooking can mute them, so adding a little freshness at the end is often better.
Finally, do not panic if the sear is not perfect. Browning a roast is not an art museum audition. If one side is darker than another, the crockpot will still produce a delicious meal. The key is to avoid burning. Deep brown is good. Black and bitter is not. If the pan starts smoking heavily or the browned bits smell scorched, lower the heat slightly and deglaze sooner. Cooking should smell savory, not like the smoke detector is filing a complaint.
Over time, browning a roast becomes quick and almost automatic. Pat dry, season, heat pan, sear, turn, deglaze, transfer. Once you build the habit, skipping it feels wrong because the flavor difference is obvious. A browned crockpot roast tastes fuller, looks more appetizing, and creates better gravy. It is still comfort food, still easy, and still slow cooker friendly. It simply starts with five to ten minutes of stovetop attention that pays you back all day.
Conclusion
Browning a roast before cooking it in a crockpot is one of the easiest ways to upgrade a slow cooker meal. It adds color, depth, aroma, and rich savory flavor that the crockpot cannot create on its own. The process is simple: choose the right roast, thaw it safely, dry it thoroughly, season well, sear it in a hot pan, deglaze the skillet, and let the slow cooker finish the job.
You can still make pot roast without browning it, and the kitchen police will not knock on your door. But if you want a roast that tastes more developed, makes better gravy, and earns compliments from people who usually communicate in hungry silence, take the extra few minutes to brown it first. Your crockpot will do the long work. Your skillet just gives the roast a head start.

