Body Care
Laser-Etching Photos On To Eggs
Jun
Laser-etching photos on to eggs sounds like something a bored robot would invent during Easter week, but it is a surprisingly real maker project. With a laser engraver, a carefully prepared photo, and an egg that has agreed to cooperate under extreme artistic pressure, you can turn a fragile eggshell into a miniature portrait, keepsake, science demo, or conversation piece.
The idea is simple: use controlled laser energy to mark or remove tiny areas of the shell’s surface so an image appears. The execution, however, is delightfully tricky. Eggs are curved. Eggshells are thin. Photos contain thousands of tones. Lasers do not care about your feelings. That combination makes this project part art, part engineering, and part “please don’t sneeze near the workpiece.”
What Is Laser-Etching Photos On To Eggs?
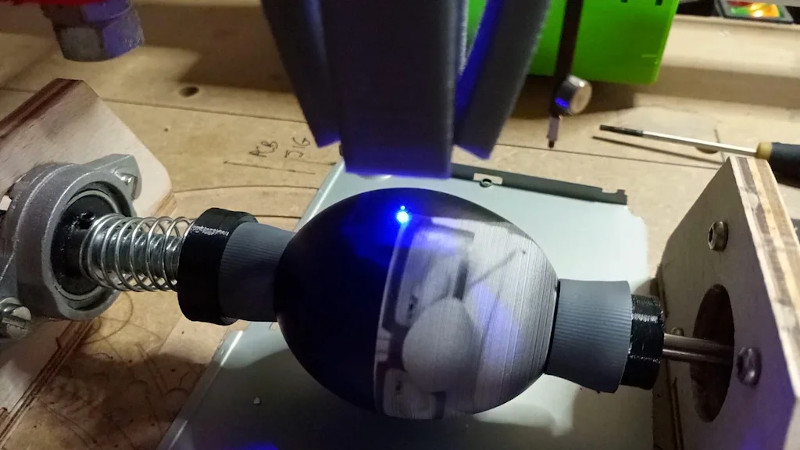
Laser-etching photos on to eggs is the process of using a laser engraver or CNC-mounted laser to reproduce a photographic image on an eggshell. Instead of printing ink onto the egg, the laser changes the surface by lightly engraving, discoloring, or removing a coating. The final result can look like a soft sepia portrait, a high-contrast black-and-white image, or a delicate carved shadow that glows beautifully when light passes through the shell.
Most successful projects use either a blown eggshell or a hard-boiled egg for practice. Serious decorative work usually starts with a hollow, cleaned, and dried shell because it is lighter, safer to store, and less likely to produce an unwanted breakfast incident inside the laser bed. If the shell is coated with black ink, dye, or a removable dark layer, the laser can burn away that coating to reveal lighter shell beneath. That approach often creates stronger contrast than engraving an uncoated white shell directly.
At its best, laser egg engraving feels like combining old-fashioned Easter egg decorating with digital fabrication. At its worst, it feels like convincing a potato-shaped calcium balloon to sit still while a machine draws Grandma’s face on it. Both outcomes are educational.
Why Eggs Are So Weirdly Perfect for Laser Engraving
Eggshells are mostly calcium carbonate, which makes them rigid, pale, and naturally engravable in a delicate way. They are also porous and thin, which means they respond quickly to heat. This is why low-power, well-tested settings matter. Too little power produces a ghost image that looks like it owes you money. Too much power can scorch, crack, or punch through the shell.
The egg’s shape is also part of the charm. A flat tile is easy. A wooden plaque is predictable. An egg is a tiny curved planet. That curve makes focusing the laser more difficult because the distance between the laser head and the surface changes as the image wraps around the shell. The best setups solve this with a rotary attachment, an EggBot-style machine, a fourth-axis CNC system, or a custom jig that holds the egg steady while it turns.
This is why photo laser engraving on eggs has become a favorite among makers, teachers, and experimental artists. It is inexpensive, visually impressive, and technically demanding without requiring rare materials. Eggs are available at any grocery store, and the learning curve is steep enough to keep things interesting.
The Equipment You Need
1. A Laser Engraver or CNC Laser Setup
A diode laser, CO2 laser, or CNC-mounted laser can be used, depending on the setup. The key is control. You need accurate movement, adjustable power, and predictable focus. A machine with image engraving support is helpful because photographic work depends on tiny tonal variations.
2. A Rotary Jig or Egg Holder
The egg must not roll, wobble, or launch itself across the laser bed like a tiny breakfast torpedo. A good egg holder can be made from rubber rollers, soft foam supports, 3D-printed cups, or a rotary axis. The goal is gentle grip without crushing pressure.
3. Prepared Eggs
For decorative keepsakes, use blown eggshells. Make small holes at both ends, empty the egg, rinse carefully, and let it dry completely. For quick tests, hard-boiled eggs can work, but they should be treated as test objects, not edible food, especially if coatings, smoke, or engraving residue are involved.
4. Photo Editing Software
Photo preparation is half the project. Software such as GIMP, Photoshop, Affinity Photo, LightBurn, or laser-specific image tools can help convert a color photo into a laser-friendly grayscale or dithered image. This step decides whether your finished egg looks like a charming portrait or a weather map from 1978.
5. Ventilation and Laser Safety Gear
Use proper laser eye protection rated for your machine’s wavelength, keep the laser enclosed whenever possible, and ventilate the work area. Eggshell dust, burned coating, smoke, and fumes are not decorative aromatherapy. A secured laser, clean work area, and fire-safe habits are non-negotiable.
How the Photo Becomes an Egg Engraving
A photograph contains continuous tones: highlights, midtones, shadows, skin texture, hair, background details, and all the tiny information that makes a face recognizable. A laser, however, does not naturally “paint” tones. It burns dots, lines, or depth changes. That means the photo must be translated into a pattern the laser can understand.
Two common approaches are grayscale engraving and dithering. In grayscale engraving, darker pixels usually receive more power and lighter pixels receive less. This can produce depth variation, but it is difficult to control on a fragile eggshell. Dithering converts tones into dot patterns. Dark areas get more dots; light areas get fewer dots. From a normal viewing distance, the eye blends those dots into a photographic image.
For eggs, dithering is often more forgiving than true grayscale. The shell does not offer a wide, predictable range of burn tones, so dot-based images can look sharper. Stucki, Jarvis, Floyd-Steinberg, and ordered dithering methods are all worth testing. There is no universal “best” setting because egg color, shell thickness, coating, laser wavelength, focus, and speed all change the result.
Step-by-Step: How to Laser-Etch a Photo Onto an Egg
Step 1: Choose the Right Egg
Start with clean, uncracked eggs. White eggs create a bright base, while brown eggs can produce warmer, antique-looking results. Larger eggs give you more image area and slightly more forgiveness. Goose, duck, or ostrich eggs offer more surface area, but they require stronger holders and more careful focus planning.
Step 2: Empty, Rinse, and Dry the Shell
For a lasting keepsake, blow out the egg. Use a small needle or rotary tool to make holes at each end, empty the contents into a bowl, rinse the shell gently, and let it dry thoroughly. Moisture can cause uneven marks and may weaken the shell during engraving.
Step 3: Add a Coating for Contrast
If you want a bold photo, coat the egg with black ink, dark dye, or another laser-safe surface treatment. The laser removes or lightens this layer, revealing the shell underneath. Always test coatings first. Avoid unknown paints, plastics, vinyls, or anything that may release toxic fumes when lasered.
Step 4: Prepare the Photo
Pick a photo with strong contrast, clear lighting, and a simple subject. Faces, pets, silhouettes, and vintage portraits work well. Crop tightly, remove busy backgrounds, convert to grayscale, increase contrast, sharpen important features, and test a dithered version. Avoid low-resolution screenshots and dark, blurry images. The egg is already doing enough emotional labor.
Step 5: Size the Image for the Egg
Measure the usable area of the shell. Keep the design smaller than you think you need, especially on your first attempts. A small portrait on the front of the egg is easier than a full wraparound panorama. Curvature distorts wide images, so simple compositions usually look better.
Step 6: Secure the Egg
Place the shell in a jig or rotary holder. The egg should be centered, stable, and square to the laser head. If using air assist, reduce airflow so it does not move the shell. A hollow egg is extremely light, and lasers are not improved by surprise egg migration.
Step 7: Focus Carefully
Focus is everything. Because an egg is curved, only part of the surface will be perfectly in focus at one time unless your setup rotates or maps the surface. Keep the engraving area modest, or use a rotary/fourth-axis system that maintains a more consistent focal distance.
Step 8: Run a Test Pattern
Before engraving the final photo, test speed, power, line interval, and dithering on a sacrificial shell. Label your tests if possible. The best settings are usually found by comparing several small patches rather than trusting a random setting from the internet and hoping the egg respects authority.
Step 9: Engrave the Image
Run the job slowly enough for detail but gently enough to avoid cracking or overburning. Watch the first pass closely. If the mark is too light, adjust power or speed. If the shell smokes heavily, browns too much, or pits deeply, back off. Patience produces portraits; impatience produces calcium confetti.
Step 10: Clean and Seal
After engraving, remove residue gently with a soft brush or dry cloth. If the shell is decorative, a light clear coat can add strength and protect the image. Handle the egg from the ends, not the engraved face, and store it in a padded box or display stand.
Best Photos for Egg Laser Engraving
The best images are not always the most beautiful photos on your phone. Laser engraving rewards structure: strong shadows, crisp edges, visible facial features, and clean backgrounds. A dramatic black-and-white portrait usually works better than a colorful beach selfie with twelve people, two umbrellas, and a suspiciously heroic seagull.
Pet portraits are excellent because fur texture translates well into dots and lines. Old family photos can look charming because the natural sepia feel of engraved shell matches vintage imagery. Simple architecture, flowers, birds, and high-contrast logos also work nicely. If the subject is recognizable as a small black-and-white thumbnail, it has a good chance of working on an egg.
Before engraving, view the photo at the final size. If the eyes disappear or the subject becomes a blob, edit more aggressively. Boost contrast, simplify the background, and sharpen the focal point. Laser photo engraving is not about preserving every pixel. It is about preserving the important visual information.
Common Mistakes and How to Avoid Them
Using Too Much Power
Eggshells engrave quickly. High power can burn through coatings, scorch the shell, or create cracks. Start low and work upward.
Skipping Test Engravings
Every egg is different. Shell thickness, color, coating, and moisture all affect the result. Test first, brag later.
Choosing the Wrong Photo
Soft lighting and busy backgrounds turn muddy fast. Choose bold images with clear shapes and strong contrast.
Ignoring the Curve
Large flat images distort on a rounded shell. Keep designs small or use rotary control.
Poor Ventilation
Laser engraving creates fumes and fine residue. Ventilation protects both the user and the machine.
Treating Engraved Eggs as Food
If the egg has been coated, handled, lasered, or exposed to smoke and residue, treat it as decorative. Do not serve it. The guests came for brunch, not a materials-science experiment.
Creative Uses for Laser-Etched Photo Eggs
Laser-etched photo eggs make memorable Easter decorations, but the idea goes far beyond holiday crafts. A portrait egg can become a wedding favor, a memorial keepsake, a family reunion gift, a classroom demonstration, or a maker fair showpiece. The small size makes the object feel personal, almost like a tiny museum artifact.
Teachers can use the project to explain CNC motion, raster images, grayscale conversion, laser safety, surface mapping, and material science. Artists can combine laser etching with traditional dyeing, wax resist, pysanky-inspired patterns, or hand-painted details. Makers can use it to test rotary fixtures, image processing workflows, and low-power laser control.
For businesses, the concept has novelty value. A bakery, farm shop, craft studio, or Easter event could use laser-marked decorative eggs for displays. However, commercial food marking must follow food-safety rules, equipment requirements, and local regulations. Decorative art is one thing; marking edible products for sale is another.
Safety Notes Before You Start
Laser egg engraving is fun, but it should be treated seriously. Use certified eye protection, never stare at the beam, keep the machine enclosed, and do not bypass safety interlocks. Secure the laser module firmly if using a CNC conversion. A loose laser is not a tool; it is a tiny chaos cannon.
Ventilation matters because coatings, shell dust, and engraving residue can produce fumes. Use only materials you know are laser-safe. Avoid PVC, unknown plastics, glossy mystery coatings, and household paints that are not intended for laser processing.
Food safety also matters. Raw eggs can carry harmful bacteria even when the shell looks clean. Wash hands, clean surfaces, refrigerate eggs before use, and do not eat eggs that have been used as laser projects. If you empty raw eggs, handle the contents safely and cook them promptly if you plan to use them. When in doubt, separate “food eggs” from “art eggs” completely.
Experience Notes: What Laser-Etching Photos On To Eggs Is Really Like
The first experience most people have with laser-etching photos on to eggs is not triumph. It is negotiation. You set the egg into the holder, step back proudly, and realize the egg is not centered. You adjust it. Now it is centered but tilted. You adjust again. Now it is centered, tilted less, and somehow judging you. This is normal. Egg engraving teaches patience before it teaches technique.
One of the most useful lessons is that the photo matters more than the machine. A powerful laser cannot rescue a weak image. A bright, sharp portrait with clear shadows can look impressive even on a simple setup, while a dull photo becomes a dull engraving with excellent accuracy. The machine faithfully reproduces your bad decisions. That is humbling, but also helpful.
Testing becomes its own little ritual. You engrave a tiny square at one power level, another at a different speed, and another with a new dithering pattern. At first, the samples look confusing. Then your eye starts to recognize what works. A little more contrast here. A little less power there. A smaller line interval. A different crop. Suddenly the process feels less mysterious and more like tuning an instrument.
The most satisfying moment is when the image appears gradually on the shell. It does not look like much at first. Then the eyes show up. Then the hairline. Then the shadow under the chin. A few minutes later, a plain egg has become a tiny portrait. It is ridiculous and impressive at the same time, which is the sweet spot for any good maker project.
There is also a strong respect factor. Eggshells are unforgiving. If you clamp too hard, they crack. If you focus poorly, the image blurs. If you use too much power, the mark becomes harsh. The material forces you to slow down. That makes the finished piece feel more valuable than its grocery-store origin suggests.
Another experience worth mentioning is the reaction from other people. Show someone a laser-etched wooden coaster and they may nod politely. Show them a photo engraved on an egg and they lean closer. The object is familiar, but the technique is unexpected. People immediately ask, “How did you do that?” followed closely by “Is that a real egg?” and sometimes “Can you do my dog?” The answer to the last question is usually yes, provided the dog photo is not a blurry brown comet.
The project also encourages creative combinations. Some makers dye the shell first, engrave through the color, and reveal a pale design underneath. Others engrave a portrait on one side and add decorative borders around it. A clear coat can make the shell feel sturdier, while a small LED display stand can turn a thin engraving into a glowing object. The egg becomes less like a craft supply and more like a curved canvas.
The biggest practical takeaway is simple: start small. Do not begin with a full wraparound family portrait of eighteen people. Try a single face, a pet silhouette, initials, or a small black-and-white illustration. Learn how your egg, coating, and laser behave together. Once you understand that relationship, bigger experiments become much easier.
Laser-etching photos on to eggs is not the fastest craft in the world, and it is definitely not the least fragile. But it is memorable. It combines digital precision with a material that can break if you look at it too confidently. That tension is exactly what makes it fun. When it works, you do not just get an engraved egg. You get proof that technology can still be wonderfully strange.
Conclusion
Laser-etching photos on to eggs is a small project with a big personality. It blends photo editing, laser engraving, CNC alignment, material testing, and old-school decorative egg art into one fragile little challenge. The best results come from high-contrast images, careful grayscale or dithering preparation, a stable egg holder, conservative laser settings, and plenty of testing.
Whether you are making Easter decorations, personalized gifts, classroom demos, or experimental artwork, the process rewards patience. The egg may be cheap, but the technique is not careless. Respect the shell, respect the laser, and respect the fact that sometimes the most interesting canvas in the room came from the dairy aisle.
