Beauty Unlocked
Arduino-based Sieve Of Eratosthenes
Jun
The Arduino-based Sieve Of Eratosthenes is one of those projects that sounds like it escaped from a secret meeting between a math professor, an electronics hobbyist, and a very patient LED matrix. At first glance, it is simple: use an Arduino to find prime numbers. Look closer, and it becomes a wonderful lesson in algorithms, memory limits, embedded programming, visual learning, and why tiny computers deserve more respect than we usually give them.
The Sieve of Eratosthenes is an ancient algorithm for finding prime numbers up to a chosen limit. Arduino, meanwhile, is a friendly microcontroller platform built for hands-on experiments. Put them together, and you get a project that turns invisible number theory into blinking lights, serial output, or a compact classroom demonstration. It is not just “math on a board.” It is a tiny prime-number factory with wires.
This article explores how the algorithm works, how it can be implemented on Arduino, what hardware choices make sense, and what practical lessons developers can learn from building a microcontroller-based prime sieve. Whether you are a beginner learning arrays or an experienced maker looking for a clean educational project, this is a satisfying build that proves one thing clearly: math is much less scary when it blinks.
What Is the Sieve of Eratosthenes?
The Sieve of Eratosthenes is a classic method for identifying all prime numbers up to a maximum value. A prime number is a whole number greater than 1 that has exactly two positive divisors: 1 and itself. So 2, 3, 5, 7, 11, and 13 are prime. Numbers like 4, 6, 8, 9, and 10 are composite because they can be divided evenly by other numbers.
The sieve works by starting with a list of numbers, usually from 2 to a selected limit. It begins with 2, the first prime number, and marks all multiples of 2 as composite. Then it moves to the next unmarked number, 3, and marks all multiples of 3. Then 5, then 7, and so on. By the end, the numbers that remain unmarked are prime.
The beauty of the algorithm is that it does not test every number by dividing it repeatedly. Instead, it eliminates known composites in waves. Imagine a crowd of numbers standing in a gymnasium. The multiples of 2 sit down. Then the multiples of 3 sit down. Then the multiples of 5 sit down. Eventually, only the primes are still standing, looking slightly smug.
Why Build the Sieve on Arduino?
Running the Sieve of Eratosthenes on a desktop computer is easy. A modern laptop can generate thousands or millions of primes without even putting down its coffee. Arduino is different. A typical Arduino Uno has limited SRAM, limited processing power, and a much smaller environment than a PC. That limitation is exactly what makes the project interesting.
An Arduino prime number generator forces you to think like an embedded developer. How much memory does an array use? Should each number be stored as a byte, a Boolean value, or a single bit? How often should output be printed to the Serial Monitor? Can the results be shown on an LED matrix? These questions turn a simple algorithm into a practical engineering exercise.
The project also makes an excellent teaching tool. Students can watch composite numbers disappear from a grid. Makers can use LEDs to represent candidates and primes. Programmers can compare a basic implementation with an optimized version. It is educational without feeling like homework, which is a rare achievement. Most homework does not glow.
How the Arduino Sieve Works
A basic Arduino implementation follows the same logical steps as the traditional algorithm. First, define a maximum number, such as 100, 500, or 1,000. Then create an array to track whether each number has been marked as composite. The Arduino starts with all numbers unmarked. It then loops from 2 upward and, whenever it finds an unmarked number, treats that number as prime and marks its multiples.
Basic Algorithm Steps
- Create a list of numbers from 2 to the chosen limit.
- Start with the first prime number, 2.
- Mark every multiple of 2 as composite, except 2 itself.
- Move to the next unmarked number.
- Repeat the process until the square of the current prime is greater than the limit.
- Print or display all numbers that remain unmarked.
The square-root stopping rule matters. If a number has a factor larger than its square root, it must also have a matching factor smaller than its square root. That means all composites will already have been marked by the time the loop passes the square root of the maximum value. This small optimization saves time, and on a microcontroller, saving time is not a personality flaw. It is survival.
Example Arduino Code for the Sieve
The following sketch demonstrates a clean, beginner-friendly version of the Sieve of Eratosthenes using the Arduino Serial Monitor. It is not the most memory-efficient version possible, but it is readable and practical for small limits.
This sketch stores whether each number is composite. When the process finishes, every number still marked as false is prime. For a limit of 500, this approach works comfortably. Increase the limit too aggressively, however, and the Arduino Uno’s SRAM will start complaining like a printer that knows you are in a hurry.
Memory: The Real Boss Battle
On Arduino boards, memory is not an abstract concept. It is a tiny room, and your variables are furniture. Add too much furniture, and suddenly nobody can open the door. A standard Arduino Uno uses the ATmega328P microcontroller, commonly associated with 32 KB of flash memory, 2 KB of SRAM, and 1 KB of EEPROM. Flash stores the program. SRAM stores runtime variables. EEPROM stores small amounts of data that should remain after power is removed.
The sieve mainly stresses SRAM because the composite-marker array lives in runtime memory. A simple Boolean array with 1,001 entries may use roughly 1,001 bytes, depending on implementation. That is already about half the SRAM on an Uno before accounting for the stack, Serial buffers, and other variables. This is why embedded programming teaches humility faster than most motivational posters.
Using Bits Instead of Bytes
One optimization is to store each composite flag as a single bit instead of a full byte. In that design, eight numbers fit into one byte. A sieve up to 1,000 would need about 125 bytes instead of about 1,001 bytes. That is a major improvement.
Bit-packed code is less beginner-friendly, but it reflects how real embedded systems conserve memory. Developers can also skip even numbers after handling 2. Since every even number greater than 2 is composite, the program only needs to track odd candidates. Combining odd-only storage with bit packing creates a much more efficient Arduino Sieve of Eratosthenes project.
Displaying Prime Numbers: Serial Monitor, LEDs, or Matrix?
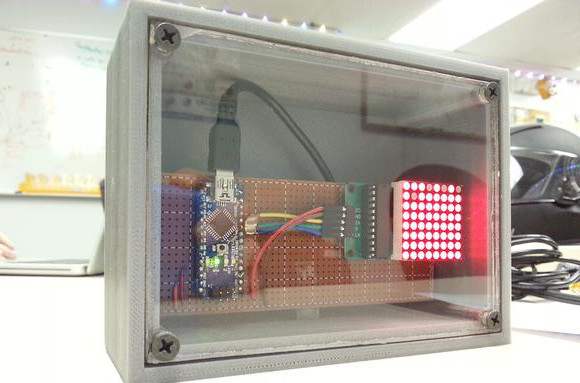
The simplest output method is the Arduino Serial Monitor. It is quick, clear, and requires no extra hardware. For a classroom or maker-space project, however, visual output is more exciting. An LED matrix can represent a number grid, where each LED corresponds to a candidate number. As multiples are marked, LEDs can switch off, change brightness, or change color depending on the hardware.
A 10-by-10 LED matrix works nicely for numbers 1 through 100. The algorithm can animate the process: first crossing out multiples of 2, then 3, then 5, then 7. This visual approach helps beginners understand that the sieve is not guessing primes. It is eliminating composites systematically.
Other display options include small OLED screens, LCD modules, addressable LED strips, or even a row of basic LEDs for a limited range. The best choice depends on the goal. If the goal is learning C++ arrays, Serial output is enough. If the goal is a science-fair-style demonstration, lights are worth the wiring. If the goal is impressing relatives at dinner, a glowing prime-number matrix is definitely stronger than explaining your spreadsheet macros.
Hardware Ideas for an Arduino Prime Sieve
A basic Arduino-based sieve can be built with only a board and a USB cable. For a richer physical build, consider the following components:
- Arduino Uno or Nano: ideal for a compact beginner build.
- Arduino Mega: useful if you want more SRAM for larger sieves.
- 8×8 or 10×10 LED matrix: excellent for visualizing numbers.
- MAX7219 driver module: helpful for controlling LED matrices with fewer pins.
- OLED display: good for showing primes, progress, and memory notes.
- Push button: lets users step through each prime wave manually.
- Buzzer: optional, but it can beep when a prime is found, because apparently numbers also deserve theme music.
The hardware does not need to be complicated. In fact, a simpler build often teaches the algorithm better. Too many wires can distract from the mathematical idea. The sweet spot is a setup where the viewer can see numbers being eliminated and understand why.
Performance and Practical Limits
The Sieve of Eratosthenes is efficient, but an Arduino is still a small microcontroller. For small limits such as 100, 500, or 1,000, the code runs quickly. For much larger ranges, memory becomes the main obstacle. Printing results can also slow the program because Serial communication is far slower than internal arithmetic.
A common beginner mistake is assuming that if the code compiles, the board has enough memory to run safely. That is not always true. SRAM can be consumed at runtime, and unstable behavior may appear as random resets, strange output, or results that look like the Arduino has discovered a new branch of mathematics. Spoiler: it has not. It is probably out of memory.
Good Practical Limits
For an Arduino Uno, a simple Boolean-array sieve is comfortable at a few hundred numbers and possible at modestly higher limits if the rest of the sketch is lean. For larger demonstrations, use bit packing, odd-only storage, or a board with more memory. An Arduino Mega, ESP32, or other higher-memory microcontroller gives more breathing room while keeping the project accessible.
Educational Value: Why This Project Works So Well
The Arduino-based Sieve of Eratosthenes is useful because it connects three worlds: mathematics, programming, and electronics. A student does not merely read that multiples of 2 are composite. They can watch those positions change on a display. They can modify the limit, adjust the delay, change the output format, and immediately see the result.
This kind of project also teaches debugging. If 1 appears as prime, the initialization is wrong. If 4 remains prime, the marking loop is wrong. If the board resets, memory may be too tight. If nothing appears in Serial Monitor, the baud rate or port may be incorrect. Each error teaches a real skill.
For teachers, the project is flexible. It can be introduced as a math activity, a coding exercise, a hardware lab, or a discussion about computational efficiency. For makers, it is a small but elegant build that can be finished in a weekend. For programmers, it is a reminder that algorithms live differently when moved from abundant desktop memory to a microcontroller with strict limits.
Common Mistakes and How to Avoid Them
Starting Multiples at the Wrong Place
Many beginners start marking multiples from 2 * p. That works, but starting from p * p is more efficient because smaller multiples have already been marked by smaller primes. For example, when handling 5, the multiples 10, 15, and 20 were already handled by 2 or 3. Starting at 25 avoids repeated work.
Forgetting That 0 and 1 Are Not Prime
Both 0 and 1 should be marked as non-prime before the sieve begins. If you forget this, your program may proudly announce that 1 is prime. This is a classic beginner bug and a fine reminder that computers do exactly what we say, not what we meant while drinking iced coffee.
Using Too Much SRAM
Large arrays can break a small Arduino sketch. Keep limits reasonable, reduce unnecessary strings, avoid oversized buffers, and consider storing fixed text in flash memory when appropriate. If your project includes an LED display library, remember that the library may also use RAM.
Printing Too Often
Printing every step of the sieve can slow the demonstration dramatically. This may be desirable for animation, but if you are benchmarking performance, print only after the calculation is complete. Serial output is useful, but it is not fast magic.
How to Make the Project More Impressive
Once the basic sieve works, the project can grow in several directions. Add a button that advances one prime at a time. Display the current base prime on an OLED screen. Use different LED colors for untouched numbers, composites, and primes. Add a speed control knob so viewers can slow down or speed up the animation. Save the highest calculated prime limit to EEPROM. Compare a naive divisibility test with the sieve and show the runtime difference.
You can also create a “prime counter” mode. Instead of printing every prime, the Arduino counts how many primes exist up to the selected limit. This is useful when output space is limited. Another option is a segmented sieve, where the Arduino processes a large range in smaller chunks. That approach is more advanced, but it introduces an important real-world idea: when memory is limited, process data in pieces.
Experience Notes: Building an Arduino-based Sieve Of Eratosthenes
Building an Arduino-based Sieve Of Eratosthenes feels simple at the start, then quietly becomes a lesson in practical engineering. The first version usually runs in the Serial Monitor, and that is the right place to begin. You upload the sketch, open the monitor, and see the primes appear in a neat row. It feels satisfying, like the Arduino just passed a tiny ancient Greek exam.
The next stage is where the real learning begins. When you raise the limit, the board may still compile the sketch, but SRAM becomes tight. This is the moment many makers discover the difference between flash memory and runtime memory. The program can fit in flash, yet the data array can still crowd SRAM. That distinction is one of the most valuable lessons in the project. It turns memory from a vague specification into something you can actually feel through bugs, resets, and strange output.
Using an LED matrix adds another layer of experience. Mapping numbers to physical positions sounds easy until you decide whether 1 should appear in the top-left corner, whether 100 belongs in the bottom-right, and how to handle numbers beyond the display size. A 10-by-10 layout is intuitive for 1 through 100, but an 8-by-8 matrix forces compromises. Those compromises are not failures; they are design decisions. Real projects are full of them.
Animation timing also matters. If the sieve runs at full speed, viewers may only see the final answer. If it runs too slowly, everyone starts aging in real time. A good demonstration uses a short delay after marking each batch of multiples, then pauses when a new prime is found. That rhythm makes the algorithm understandable. The viewer can see that 2 removes the evens, 3 removes every third remaining candidate, and 5 continues the pattern.
One enjoyable improvement is adding a button for manual stepping. Instead of watching the Arduino race through the sieve, the user presses a button to move from one base prime to the next. This makes the project more interactive and especially useful for teaching. It also gives the Arduino a tiny game-show-host personality: “Next prime, please.”
Another useful experiment is comparing memory models. Start with a Boolean array. Then rewrite the sketch to track only odd numbers. Then try bit packing. Each version teaches a different trade-off between readability and efficiency. The beginner version is easier to understand. The optimized version is more powerful. Both are valid, and comparing them is better than pretending one style fits every situation.
The biggest takeaway is that the Arduino sieve is not valuable because it finds prime numbers faster than a laptop. It does not. Your laptop could calculate circles around it while also streaming music and judging your cable management. The value is that Arduino makes the algorithm physical. It turns memory limits, loops, arrays, optimization, and number theory into something visible and testable. That is why this project remains charming: it is small, clever, educational, and just nerdy enough to make an LED blink with mathematical purpose.
Conclusion
The Arduino-based Sieve Of Eratosthenes is a compact project with surprising depth. It teaches prime numbers, algorithmic thinking, memory management, output design, and embedded-programming trade-offs. A basic version can run with only an Arduino board and the Serial Monitor, while a more polished version can use an LED matrix, buttons, displays, and animation to turn ancient mathematics into a hands-on demonstration.
For beginners, it is a friendly introduction to arrays and loops. For teachers, it is a visual way to explain prime numbers. For makers, it is a weekend project with room for creativity. For experienced programmers, it is a reminder that elegant algorithms still need to respect the hardware beneath them. In other words, the sieve may be ancient, but on Arduino, it still knows how to put on a show.
Note: This article is an original educational synthesis based on established Arduino documentation, maker-project reporting, and standard computer-science references. It contains no copied source text, source-link placeholders, or unnecessary citation artifacts.
