Beauty Tools & Accessories
Brewing Tea Too Stressful? 3D Print A Tea Steeper
May
Tea is supposed to be calming. The kettle hums, the leaves unfurl, the mug warms your hands, and for a few glorious minutes life feels less like a browser with 47 open tabs. Then reality barges in: Did you steep it for three minutes or nine? Is the tea bag still drowning in there? Why does your green tea now taste like a polite lawn mower? And why, in the age of rockets landing themselves, are we still babysitting a tea bag with the emotional intensity of a NASA launch?
Enter the wonderfully unnecessary, surprisingly useful world of the 3D printed tea steeper. At its simplest, it can be a custom tea-bag holder, drip stand, or loose-leaf basket accessory. At its most gloriously nerdy, it can be a tiny automated dunking machine powered by a microcontroller and a servo motor, designed to lower a tea bag into hot water, wait for the right amount of time, and lift it out before bitterness ruins the mood. Is it overengineering? Absolutely. Is that the point? Also absolutely.
The phrase “Brewing Tea Too Stressful? 3D Print A Tea Steeper” sounds like a joke, but it captures a real maker mindset: when a tiny daily annoyance meets a 3D printer, something delightful happens. The result might not replace your favorite teapot, but it can make tea brewing more consistent, more fun, and more personal. Better yet, it gives you an excuse to combine design, food safety, electronics, and a cozy beverage in one weekend project.
Why a 3D Printed Tea Steeper Makes Sense
Most people do not truly need a custom tea steeper. A spoon, timer, and mug will do the job. But makers do not live by “need” alone. They live by “what if?” and “I wonder if this will fit on my printer bed.” A 3D printed tea steeper makes sense because it solves several small problems at once.
First, it helps control steeping time. Tea changes quickly in hot water. Black tea can become harsh if forgotten too long, green tea can turn bitter when treated like it owes you money, and herbal blends can taste thin if pulled too early. A physical steeper, holder, or automated lifter encourages consistency, which matters if you want your favorite cup to taste the same every morning.
Second, it improves convenience. A printed clip can hold a tea bag string so the tag does not slide into the mug. A drip tray can catch the last drops when you remove the bag. A custom lid can help retain heat while giving the string a dedicated slot. These are not world-changing inventions, but they are exactly the sort of tiny improvements that make a kitchen feel smarter.
Third, it makes tea feel playful. That matters more than we admit. A tiny robot that dunks a tea bag may be absurd, but absurdity is often where creativity stretches its legs. The best DIY projects are not always the most practical ones. Sometimes they are the ones that make you grin before the caffeine kicks in.
The Classic Maker Approach: Automate the Dunk
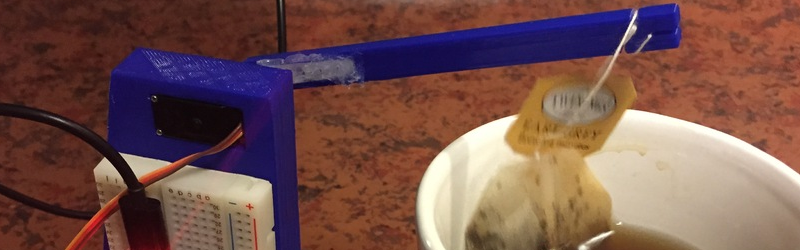
One popular version of the 3D printed tea steeper uses a small servo motor to move a tea bag up and down. The idea is simple: print a frame that sits near or over a mug, attach a lightweight arm, connect that arm to a servo, and use a microcontroller to control the motion. The device can dunk the tea bag a few times, hold it in the water, then lift it out when the steeping time ends.
The parts list is usually friendly to hobbyists: a small 9g servo, an Arduino-style board, wires, a button or two, a power source, and printed plastic parts for the arm, body, enclosure, or mug support. Some designs add a small screen so you can select steeping times for black tea, green tea, oolong, or herbal blends. Others keep it wonderfully primitive: press a button, watch the bag descend, and enjoy the tiny theatrical performance.
For beginners, the key design challenge is not strength. A wet tea bag is light. The key challenge is stability. The device should not tip into the mug, slide across the counter, or place electronics anywhere near steam and splashes. A good design keeps the motor and circuit above and away from the water, uses a wide base, and limits moving parts to a simple arm. If your first prototype looks like a baby crane built by a caffeinated squirrel, congratulations: you are doing real product development.
Food Safety Comes First: Do Not Print a Random Plastic Basket and Drop It in Hot Tea
This is the part where the fun project puts on responsible shoes. A 3D printer can make wonderful kitchen accessories, but not every printed object belongs in your drink. Food-contact safety is more complicated than choosing a filament with a friendly label. The printed object, the printer nozzle, layer lines, additives, dyes, coatings, cleaning method, and heat exposure all matter.
FDM prints are built layer by layer, which creates tiny grooves. Those grooves can trap residue and be difficult to clean thoroughly. Even if PLA or PETG is often discussed as chemically neutral in maker communities, the final printed part may still be unsuitable for repeated direct contact with hot liquid. Hot tea adds another concern: heat can soften or stress some plastics, and repeated exposure may degrade surfaces over time.
A safer design choice is to keep printed plastic out of the tea itself. Instead of printing a perforated basket that touches hot water and leaves, print the support structure, handle, stand, clip, timer enclosure, or lifting arm. Use stainless steel mesh, a commercial tea ball, a paper tea filter, or a known food-safe infuser for the part that actually touches the tea. This gives you the best of both worlds: custom 3D printed convenience without turning your mug into a materials-science experiment.
Better Food-Safe Design Ideas
Try printing a tea bag string clip that hooks onto the rim of the mug but does not dip below the liquid line. Print a drip stand where the used tea bag can rest after steeping. Print a holder that suspends a stainless steel mesh infuser. Print an enclosure for the electronics of an automated steeper while keeping the moving arm attached to a washable, replaceable, food-safe hook. Print a labeled tea timer dial that reminds you of steeping times. These projects are useful, attractive, and easier to clean.
If you insist on making a part that directly touches food or drink, use filament specifically intended for food-contact applications, verify the manufacturer’s documentation, avoid unknown additives, use a clean stainless steel nozzle, print with smooth settings, and consider a food-safe coating that is rated for the intended temperature. Even then, repeated use in hot liquid is a higher bar than cutting cookie dough once. When in doubt, keep plastic above the mug and let stainless steel do the steeping.
Tea Steeping Basics Your 3D Printed Gadget Should Respect
A tea steeper is only as good as the brewing logic behind it. A robot that makes bad tea is still a robot, but it is not a friend. Different teas need different water temperatures and steeping times because the leaves, oxidation level, and desired flavor profile vary.
Black tea usually handles near-boiling water and a steep time around three to five minutes. Green tea often prefers cooler water and a shorter steep, commonly around one to three minutes depending on the tea. White tea is delicate and usually benefits from lower temperatures and a gentle steep. Oolong can vary widely, from floral and light to roasted and bold, so it rewards experimentation. Herbal infusions are not true tea from the Camellia sinensis plant, but they often need hotter water and longer contact time to extract flavor from dried flowers, fruit, roots, or spices.
For a simple automated steeper, you could program three buttons: “Light,” “Standard,” and “Strong.” A more advanced build might include presets such as green tea, black tea, oolong, and herbal. A delightfully extra version could use a rotary encoder and LCD screen. A deeply unnecessary version could connect to Wi-Fi, track your tea history, and send a notification that says, “Your Earl Grey has achieved enlightenment.” Please do not blame the tea if your family stages an intervention.
Designing the 3D Printed Tea Steeper
Start with the mug. Measure the rim diameter, wall thickness, height, and handle position. Many failed kitchen prints happen because the designer modeled an ideal mug that exists only in a CAD fantasyland. Real mugs are lumpy, charming, and inconsistent. Design your steeper to fit several mugs if possible, using adjustable clips, a wide bridge, or a freestanding base.
Next, choose the steeping method. If you use tea bags, your device only needs to hold the string or lift the bag. If you use loose-leaf tea, design around a stainless steel infuser. Do not make the leaves fight for space. Tea leaves expand as they hydrate, and cramped leaves produce flat flavor. A roomy basket gives water more contact with the leaves, which means better extraction and a more balanced cup.
Then think about motion. For a manual design, the motion might be as simple as sliding a printed lever upward when the timer ends. For an automated design, a servo arm can raise and lower the bag. Keep the arm short and lightweight to reduce wobble. Add stops so the servo does not push beyond the safe range. Make sure the tea bag cannot swing into the electronics. Steam is not a seasoning for circuit boards.
Recommended Print Features
Use rounded corners so the part is easier to wipe clean. Avoid deep decorative grooves near the mug. Add drainage channels to drip trays. Use thicker walls for clips that flex. Add rubber feet or a weighted base if the device sits on the counter. If the printed part is near heat but not touching water, PETG may be preferable to PLA because it generally tolerates heat better, though exact performance depends on the filament and print conditions.
For a polished look, print the enclosure in a color that matches your kitchen or your favorite tea tin. Label buttons clearly. A tiny teapot icon is cute; a mystery button beside hot water is less cute. If the device has electronic controls, keep the user interface simple. Tea should not require a firmware manual unless you are serving it at a robotics convention.
Manual vs. Automatic: Which Version Should You Build?
A manual 3D printed tea steeper is the best first project. It has fewer parts, no wiring, and fewer things that can go wrong before breakfast. Examples include a mug clip, removable infuser holder, drip tray, tea bag parking stand, or timer stand. These prints are practical, quick, and easy to customize.
An automatic tea steeper is better for people who enjoy electronics and do not mind troubleshooting. It is more impressive, more entertaining, and more likely to become a conversation piece. It also has more failure points. The servo may jitter, the arm may need adjustment, the enclosure may need better balance, and the timing code may require tweaking. But that is the fun. A small tea robot teaches mechanical design, basic programming, electronics layout, and the sacred art of not spilling hot Earl Grey on your desk.
If you are building this as a gift, choose manual unless the recipient loves gadgets. A beautifully printed tea bag holder or custom drip stand is charming. A motorized dunking device is charming too, but it also says, “I have brought a small machine into your peaceful ritual.” Know your audience.
Common Mistakes to Avoid
The first mistake is putting printed plastic directly into hot tea without thinking through food safety. The second is making the design too small. Tea leaves need room, tea bags need clearance, and human hands need space to remove parts without performing finger yoga.
The third mistake is ignoring cleaning. A kitchen gadget that is annoying to clean becomes a drawer fossil. Make surfaces smooth. Avoid tiny corners. Make the drip tray removable. Keep electronic parts separate from anything that might need washing.
The fourth mistake is overcomplicating the first prototype. Do not begin with a touchscreen, app control, and six-axis tea recognition. Start with a clip, then a lever, then a servo. The best maker projects evolve in layers, just like a print. Unlike a print, they should not come loose at layer 37.
Why This Project Is Great for Makers
A 3D printed tea steeper is a small project with a surprisingly wide skill range. Beginners can practice measurement, tolerances, and simple functional design. Intermediate makers can explore hinge geometry, snap fits, and heat-aware material choices. Advanced makers can add electronics, programmable steeping presets, displays, sound alerts, or even a tiny mechanical flourish that dunks the tea bag like it is ringing a dinner bell.
It also encourages better design thinking. The goal is not merely to print a shape. The goal is to improve a real routine. That means observing how people brew tea, where the tea bag goes afterward, how much counter space is available, how the device will be cleaned, and whether the final object feels pleasant to use. In other words, it turns a simple beverage into a design brief.
Experience Notes: What It Feels Like to Use a 3D Printed Tea Steeper
The first time you use a 3D printed tea steeper, the experience feels slightly ridiculous in the best possible way. You place a mug under the device, hook the tea bag onto the arm, press a button, and watch as the little mechanism lowers the bag into the water with more ceremony than most office meetings deserve. There is a tiny thrill in seeing something you made perform a task, even if that task is basically “put leaf water in cup.”
The practical benefits show up after the novelty settles down. The biggest one is consistency. Before using a timed steeper, tea often becomes a background activity. You pour water, answer a message, open a tab, forget why you opened the tab, remember the tea, and return to a mug that tastes like it has been reviewing your life choices. With a steeper, especially an automatic one, the process becomes more reliable. The tea bag comes out on time. The flavor stays closer to what you expected. Your morning routine loses one tiny source of chaos.
A manual 3D printed holder has its own charm. A rim clip that keeps the tag from falling into the mug sounds trivial until you use one every day. A drip stand also becomes surprisingly useful. Instead of carrying a soggy tea bag across the kitchen like a tiny leaking suitcase, you lift it out and park it neatly. It keeps the counter cleaner and makes the whole ritual feel more intentional.
There are lessons, too. The first printed version may not fit every mug. A clip that works perfectly on a thin ceramic mug may fail on a chunky handmade one. A base that feels stable when dry may slide when the counter is wet. A servo arm that looks elegant in CAD may wobble like a nervous flamingo once it moves. These small frustrations are not failures; they are feedback. The next version gets a wider grip, a better angle, a larger drip area, or a more balanced base.
The food-safety lesson becomes clear quickly as well. It is tempting to print everything, including the basket that holds loose tea. But after thinking about cleaning, heat, and layer lines, the smarter approach is obvious: let printed parts support the process, not soak in the drink. A stainless steel infuser paired with a custom printed holder feels like the winning combination. It looks custom, works well, and does not ask a hobby printer to pretend it is a certified kitchenware factory.
The most enjoyable part is personalization. You can print a steeper shaped like a tiny crane, a minimalist bridge, a cat holding the tea string, a sci-fi docking station for your mug, or a clean modern stand that looks store-bought. You can add your initials, label steeping presets, or design a matching organizer for tea bags. Suddenly tea is not just a drink; it is a tiny design ecosystem sitting beside your kettle.
In daily use, a 3D printed tea steeper will not change civilization. It will not solve inbox overload, laundry, or the mysterious disappearance of matching socks. But it can make one small ritual smoother and more enjoyable. That is the quiet magic of practical 3D printing. It lets you notice a tiny annoyance, design a tiny solution, and start the day with a cup of tea that tastes a little more like victory.
Conclusion
A 3D printed tea steeper is the perfect blend of cozy and geeky. It can be simple, like a tea bag clip or drip stand, or delightfully complex, like an Arduino-powered dunking machine that rescues your tea from oversteeping. The best designs focus on consistency, stability, easy cleaning, and smart food-contact choices. Keep printed plastic away from hot tea unless you have verified the material, process, and finish for the intended use. Use stainless steel or commercial food-safe components where they matter most, and let your 3D printer handle the custom structure, holder, enclosure, or playful mechanism.
In the end, the project is not really about eliminating the “stress” of tea. It is about turning a familiar ritual into a creative experiment. A mug, a motor, a printed arm, and a little curiosity can transform an ordinary tea break into a tiny act of invention. And if your tea robot makes you smile before you even take a sip, that is already a successful brew.
